
|
Component family |
Cloud/AmazonRDS/MySQL |
|
|
Function |
tAmazonMysqlInput reads a |
|
|
Purpose |
tAmazonMysqlInput executes a DB |
|
|
Basic settings |
Property type |
Either Built-in or Repository. Since version 5.6, both the Built-In mode and the Repository mode are |
|
|
|
Built-in: No property data stored |
|
|
|
Repository: Select the repository |
|
|
DB Version |
MySQL 5 is available. |
|
|
Use an existing connection |
Select this check box and in the Component List click the NoteWhen a Job contains the parent Job and the child Job, if you need to share an existing
For an example about how to share a database connection across Job levels, see |
|
|
Host |
Database server IP address. |
|
|
Port |
Listening port number of DB server. |
|
|
Database |
Name of the database. |
|
|
Username and |
DB user authentication data. To enter the password, click the […] button next to the |
|
|
Schema and Edit |
A schema is a row description, it defines the number of fields to Since version 5.6, both the Built-In mode and the Repository mode are This component offers the advantage of the dynamic schema feature. This allows you to This dynamic schema feature is designed for the purpose of retrieving unknown columns |
|
|
|
Built-in: The schema is created |
|
|
|
Repository: The schema already |
|
|
Table |
Name of the table to be read. |
|
|
Query type and |
Enter your DB query paying particularly attention to properly Warning
If using the dynamic schema feature, the |
|
Advanced settings |
Additional JDBC parameters |
Specify additional connection properties for the DB connection you Note When you need to handle data of the time-stamp type
|
|
|
Enable stream |
Select this check box to enables streaming over buffering which |
|
|
Trim all the String/Char columns |
Select this check box to remove leading and trailing whitespace |
|
|
Trim column |
Remove leading and trailing whitespace from defined Note Deselect Trim all the String/Char |
|
|
tStatCatcher Statistics |
Select this check box to collect log data at the component |
|
Dynamic settings |
Click the [+] button to add a row in the table and fill The Dynamic settings table is available only when the For more information on Dynamic settings and context |
|
|
Global Variables |
NB_LINE: the number of rows read by an input component or
QUERY: the SQL query statement being processed. This is a ERROR_MESSAGE: the error message generated by the A Flow variable functions during the execution of a component while an After variable To fill up a field or expression with a variable, press Ctrl + For further information about variables, see Talend Studio |
|
|
Usage |
This component covers all possible SQL queries for Mysql |
|
|
Log4j |
The activity of this component can be logged using the log4j feature. For more information on this feature, see Talend Studio User For more information on the log4j logging levels, see the Apache documentation at http://logging.apache.org/log4j/1.2/apidocs/org/apache/log4j/Level.html. |
|
In this scenario we will read certain columns from a MySQL database, and then write
them to a table in a local output file.
-
Drop tAmazonMysqlInput and tFileOutputDelimited from the Palette onto the workspace.

-
Link tAmazonMysqlInput to tFileOutputDelimited using a Row > Main connection.
-
Double-click tAmazonMysqlInput to open
its Basic Settings view in the Component tab.
-
From the Property Type list, select
Repository if you have already stored
the connection to database in the Metadata
node of the Repository tree view. The
property fields that follow are automatically filled in.For more information about how to store a database connection, see
Talend Studio User Guide.If you have not defined the database connection locally in the Repository, fill in the details manually after
selecting Built-in from the Property Type list. -
Set the Schema as Built-in and click Edit
schema to define the desired schema.The schema editor opens:

-
Click the [+] button to add the rows
that you will use to define the schema, four columns in this example
id, first_name,
city and salary. -
Under Column, click in the fields to
enter the corresponding column names. -
Click the field under Type to define the
type of data. Click OK to close the schema
editor. -
Next to the Table Name field, click the
[…] button to select the database
table of interest.A dialog box displays a tree diagram of all the tables in the selected
database:
-
Click the table of interest and then click OK to close the dialog box.
-
Set the Query Type to Built-In. In the Query box, enter the query required to retrieve
the desired columns from the table.
-
Double-click tFileOutputDelimited to set
its Basic Settings in the Component tab.
-
Next to the File Name field, click the
[…] button to browse your directory
to where you want to save the output file, then enter a name for the
file. -
Select the Include Header check box to
retrieve the column names as well as the data.
Save the Job and press F6 to run it.
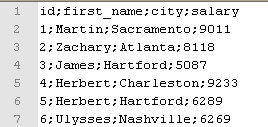
The output file is written with the desired column names and corresponding data,
retrieved from the database:
Note
The Job can also be run in the Traces Debug
mode, which allows you to view the rows as they are being written to the output
file, in the workspace.
Warning
This scenario makes use of the Dynamic Schema feature, which
is only available to users who have subscribed to one of the Talend solutions.
In this scenario we will read dynamic columns from a MySQL database, map them and then
write them to a table in a local output file. By defining a dynamic column alongside
known column names, we can retrieve all of the columns from the database table,
including the unknown columns.
-
Drop a tAmazonMysqlInput, a tMap and a tFileOutputDelimited component onto the workspace.

-
Link tAmazonMysqlInput to tMap using a Row >
Main connection. Link tMap
to tFileOutputDelimited using a Row > *New Output* (Main) connection.
-
Double-click tAmazonMysqlInput to open
its Basic settings view in the Component tab.
Warning
The dynamic schema feature is only supported in
Built-In mode. -
Select Built-in as the Property Type. Select the DB Version from the corresponding list.
-
Next to Host, enter the database server
IP address. Next to Port, enter the
listening port number of the database server. -
Enter your authentication data in the Username and Password
fields. Set the Schema type as Built-in and click Edit
schema to define the dynamic schema.The schema editor opens:

-
Click the [+] button to add a row to the
schema. Under Column, click in the fields
to enter the corresponding column names. -
Click the field under Type to define the
type of data. Click the arrow and select Dynamic from the list and click OK to close the schema editor.Warning
Under Type, the
dynamic column type must be set as Dynamic. -
Next to the Table Name field, click the
[…] button to select the database
table of interest.A dialog box displays a tree diagram of all the tables in the selected
database:
-
Click the table of interest and then click OK to close the dialog box. Set the Query Type as Built-In.
-
In the Query box, enter the query
required to retrieve all of the columns from the table.Warning
In the SELECT statement it is necessary to use
the * wildcard character, to
retrieve all of the columns from the selected table.
-
Click tMap to open its Basic Settings view in the Component tab. Click […]
next to Map Editor to map the column from
the source file.
-
Drop the column defined as dynamic from the input schema on the left onto
the output schema on the right.The column dropped on the output schema retains its original
values.Warning
The dynamic column must be mapped on a one to one basis and
cannot undergo any transformations. It cannot be used in a filter
expression or in a variables section. It cannot be renamed in the
output table and cannot be used as a join condition.
-
Click OK to close the Map Editor.
-
Double-click tFileOutputDelimited to set
its Basic Settings in the Component tab.
-
Next to the File Name field, click the
[…] button to browse your directory
to where you want to save the output file, then enter a name for the
file. -
Select the Include Header check box to
retrieve the column names as well as the data.
Save the Job and press F6 to run it.
The output file is written with all the column names and corresponding data,
retrieved from the database via the dynamic schema:

Note
The Job can also be run in the Traces Debug
mode, which allows you to view the rows as they are written to the output file,
in the workspace.
For further information about defining and mapping dynamic schemas, see
Talend Studio User Guide.
For related scenarios, see: