Warning
This component will be available in the Palette of the studio on the condition that you have subscribed to
one of the Talend solutions with Big
Data.
|
Component family |
Big Data / Neo4j |
|
|
Function |
tNeo4jOutputRelationship receives |
|
|
Purpose |
tNeo4jOutputRelationship is used to |
|
|
Basic settings |
Use existing connection |
Select this check box and in the Component List click the |
|
DB version |
Select the Neo4j version you are using, between Neo4J 1.X.X and Neo4J 2.X.X. Note that Neo4j version 2.X.X is compatible only with Java 7 but This list is not shown if the Use an existing connection Upon selecting a DB version, you will be prompted to install the corresponding database |
|
|
Remote server |
Select this check box if you use a Neo4j REST server. WarningThis check box appears only if you do not select the Use an existing connection check box. |
|
|
Database path |
If you use Neo4j in embedded mode, specify the path of data WarningThis field appears only if you do not select the Use an existing connection check box. |
|
|
Schema and Edit schema |
A schema is a row description. It defines the number of fields to be processed and passed on Since version 5.6, both the Built-In mode and the Repository mode are Click Edit schema to make changes to the schema. If the
|
|
|
|
|
Built-In: You create and store the schema locally for this |
|
|
|
Repository: You have already created the schema and When the schema to be reused has default values that are integers or functions, ensure that For more details, see https://help.talend.com/display/KB/Verifying+default+values+in+a+retrieved+schema. |
|
Server url |
If you use Neo4j in REST mode, specify the root URL. WarningThis field appears only if you select the Remote server check box. |
|
|
Shutdown after job (Only embedded |
Select this check box if you want to shutdown the Neo4j database WarningThis check box is available only if the Use an existing connection is selected. |
|
|
Relationship type |
Specify the relationship type to create for each row. |
|
|
Start node / Index name |
Specify the index name to query the starting node of the newest |
|
|
Start node / Index key |
Specify the index key to query the starting node. |
|
|
Start node / Index value |
Select the index value to query the starting node. |
|
|
Relationship direction |
Select a relationship direction.
|
|
|
End node / Index name |
Specify the index name to query the ending node of the newest |
|
|
End node / Index key |
Specify the index key to query the ending node. |
|
|
End node / Index value |
Select the index value to query the ending node. |
|
| Mapping |
Use this table to map relationship properties with the input |
|
|
Advanced settings |
Commit every |
Enter the number of rows to be completed before committing batches WarningThis option is only supported by the embedded mode of the |
|
Batch import |
Select this check to activate the batch mode WarningThis option is only supported by the embedded mode of the If you want more explanations about memory mapping configuration |
|
|
Node store mapped memory |
Type in the memory size in MB allocated to nodes. |
|
|
Relationship store mapped memory |
Type in the memory size in MB allocated to relationships. |
|
|
Property store mapped memory |
Type in the memory size in MB allocated to property. |
|
|
String store mapped memory |
Type in the memory size in MB in Mo allocated to strings. |
|
|
Array store mapped memory |
Type in the memory size in MB allocated to arrays. |
|
|
tStatCatcher Statistics |
Select this check box to gather the Job processing metadata at the |
|
|
Global Variables |
NB_LINE: the number of rows read by an input component or ERROR_MESSAGE: the error message generated by the A Flow variable functions during the execution of a component while an After variable To fill up a field or expression with a variable, press Ctrl + For further information about variables, see Talend Studio |
|
| Usage | This component is used as an output component and it always needs an incoming link. |
|
| Limitation | n/a | |
This scenario describes a Job that will import information about actors and movies
from two CSV files into a remote Neo4j database and then create relationship between the
actors and the movies based on another CSV file that describes the actors’ roles in the
movies.
-
Create a Job and add the following components to the Job by typing theirs
names in the design workspace or dropping them from the Palette:-
a tNeo4jConnection component, to
open a connection to a Neo4j database, -
three tFileInputDelimited
components, to read the input information of actors and
movies, -
two tNeo4jOutput components, to
write information of movies and actors to the connected Neo4j
database, -
a tNeo4jOutputRelationship
component, to create relationship between actors and movies,
and -
a tNeo4jClose component, to close
the previous opened Neo4j connection at the end of Job
execution.
-
-
Link the first tFileInputDelimited to the
first tNeo4jOutput component using a
Row > Main connection. This sub-job will import the actors data
into the Neo4j database. -
Link the second tFileInputDelimited
component to the second tNeo4jOutput
component using a Row > Main connection. This sub-job will import the
movies data into the Neo4j database. -
Link the third tFileInputDelimited
component to the tNeo4jOutputRelationship
component using a Row > Main connection. This sub-job will create
relationship between actors and movies. -
Link the sub-jobs using Trigger >
On Subjob Ok connections. -
Label the components to better identify their roles in the Job.

Opening a Neo4j database connection
-
Double-click the tNeo4jConnection
component to open its Basic settings view
on the Component tab.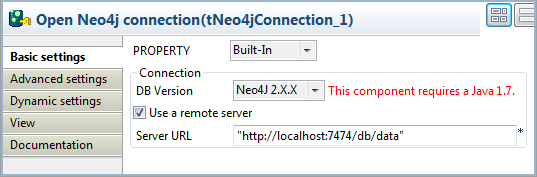
-
From the DB Version list, select
Neo4J 2.X.X to enable node labeling. -
Select the Use a remote server check box
and specify the URL of the Neo4j server in the Server
URL field, “http://localhost:7474/db/data” in this example.
Importing the actors data into Neo4j
-
Double-click the first tFileInputDelimited component to open its Basic settings view on the Component tab.

-
In the File name/Stream field, specify
the path to the CSV file that describes the actors’ names, the years they
were born in, and their roles in the movies.The input CSV file used in this example is as follows:
1234Name;BornKeanu Reeves;1964Laurence Fishburne;1961Carrie-Anne Moss;1967 -
In the Header field, specify the number
of rows to skip as header rows. In this example, the first row of the CSV
file is the header row. -
Click the […] button next to Edit schema to open the [Schema] dialog box, and define the input schema based on
the structure of the input file. In this example, the input schema is
composed of two columns, name and
born, both of type String.When done, click OK to close the
[Schema] dialog box and propagate the
schema to the next component.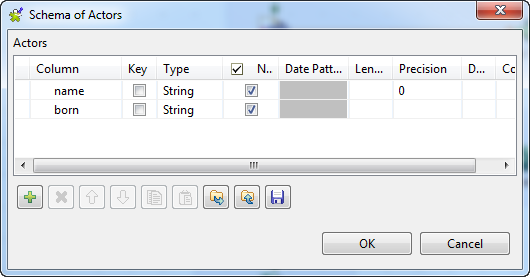
-
Click the first tNeo4jOutput component
and select the Component tab to open its
Basic settings view.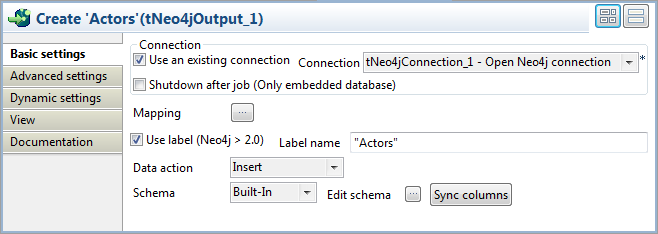
-
Select the Use an existing connection
check box to reuse the Neo4j database connection opened by the tNeo4jConnection component, which is the only
connection component used in this example. -
Double-click the tNeo4jOutput component
or click the Mapping button on the
component’s Basic settings view to open the
index and relationship mapping editor. -
With the name column selected from the
schema panel, click the Index creation tab,
click the [+] button to add a row in the
table, and create an index named name on
this column:-
In the Name field, enter
name between double quotation
marks. -
In the Key field, enter name between double quotation marks to
give the index a key name.
Then click in the schema panel to validate your index creation, and click
OK to close the mapping editor.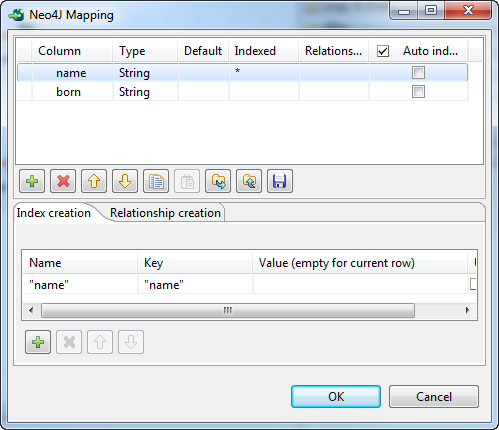
-
-
Select the Use label (Neo4j > 2.0) check
box and enter Actors between double
quotation marks in the Label name field so
that the nodes to be created will be labeled Actors.
Importing the movies data into Neo4j
-
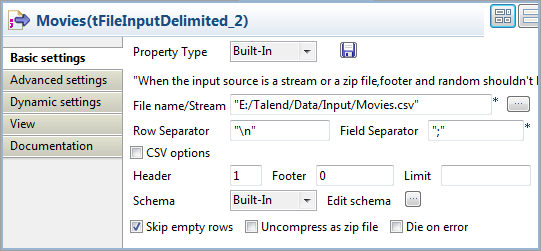
Double-click the second tFileInputDelimited component to open its Basic settings view on the Component tab.
-
In the File name/Stream field, specify
the path to the CSV file that contains the information of the movies.The input CSV file used in this example is as follows:
1234Title;Released;TaglineThe Matrix;03-31-1999;Welcome to the Real WorldThe Matrix Reloaded;05-07-2003;Free Your MindThe Matrix Revolutions;10-27-2003;Everything that has a Beginning has an End -
In the Header field, specify the number
of rows to skip as header rows. In this example, the first row of the CSV
file is the header row. -
Click the […] button next to Edit schema to open the [Schema] dialog box, and define the input schema based on
the structure of the input file. In this example, the input schema is
composed of three columns, title (type
String), released (type Date), and
tagline (type String).When done, click OK to close the
[Schema] dialog box and propagate the
schema to the next component. -
Click the second tNeo4jOutput component
and select the Component tab to open its
Basic settings view.
-
Select the Use an existing connection
check box to reuse the Neo4j database connection opened by the tNeo4jConnection component, which is the only
connection component used in this example. -
Double-click the tNeo4jOutput component
or click the Mapping button on the
component’s Basic settings view to open the
index and relationship mapping editor. -
With the title column selected from the
schema panel, click the Index creation tab,
click the [+] button to add a row in the
table, and create an index named title on
this column:-
In the Name field, enter
title between double
quotation marks. -
In the Key field, enter title between double quotation marks to
give the index a key.
Then click in the schema panel to validate your index creation, and click
OK to close the mapping editor.
-
-
Select the Use label (Neo4j > 2.0) check
box and enter Movies between double
quotation marks in the Label name field so
that the nodes to be created will be labeled Movies.
Creating actor-movie relationship in Neo4j
-
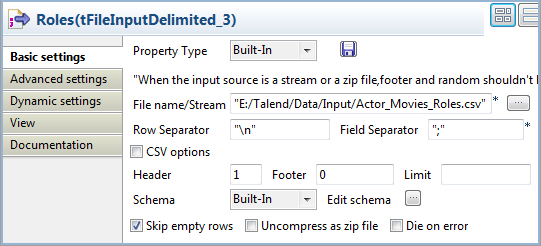
Double-click the third tFileInputDelimited component to open its Basic settings view on the Component tab.
-
In the File name/Stream field, specify
the path to the CSV file that describes the actors’ roles in the
movies.The input CSV file used in this example is as follows:
12345678910Actor;Movie;RoleKeanu Reeves;The Matrix;NeoKeanu Reeves;The Matrix Reloaded;NeoKeanu Reeves;The Matrix Revolutions;NeoLaurence Fishburne;The Matrix;MorpheusLaurence Fishburne;The Matrix Reloaded;MorpheusLaurence Fishburne;The Matrix Revolutions;MorpheusCarrie-Anne Moss;The Matrix;TrinityCarrie-Anne Moss;The Matrix Reloaded;TrinityCarrie-Anne Moss;The Matrix Revolutions;Trinity -
In the Header field, specify the number
of rows to skip as header rows. In this example, the first row of the CSV
file is the header row. -
Click the […] button next to Edit schema to open the [Schema] dialog box, and define the input schema based on
the structure of the input file. In this example, the input schema is
composed of three columns, actor,
movie, and role, all of type String.When done, click OK to close the
[Schema] dialog box and propagate the
schema to the next component. -
Double-click the tNeo4jOutputRelationship
component to open its Basic settings
view.
-
Select the Use an existing connection
check box to reuse the Neo4j database connection opened by the tNeo4jConnection component, which is the only
connection component used in this example. -
In the Relationship type field, enter the
type of relationship to be created, between double quotation marks. In this
example, the relationship type is ACTED_IN, which will appear as the label of the relationship
between nodes. -
Define the start and end nodes and the direction of the relationship to be
created. In this example, the relationship will be created from Actors nodes, on which an index called
name has been defined, to Movies nodes, on which an index called
title has been defined.-
Start node: enter name between double quotation marks in
the Index name and Index key fields, and select the schema
column name from the Index value list. As the Value field is left blank in index
creation, the index value will be the value of column name for each row. -
From the Relationship direction
list, select Outgoing. -
End node: enter title between double quotation marks in
the Index name and Index key fields, and select the schema
column title from the Index value list. As the Value field is left blank in index
creation, the index value will be the value of column title for each row.
-
-
Click the [+] button three times to add
three rows in the Mapping table to define
three properties of the relationship:-
Actor, the value of which
will be taken from the actor
column of the schema, -
Movie, the value of which
will be taken from the movie
column of the schema, and -
Role, the value of which
will be taken from the role
column of the schema.
-
-
Press Ctrl+S to save the Job, and press
F6 or click Run on the Run tab to run
the Job. -
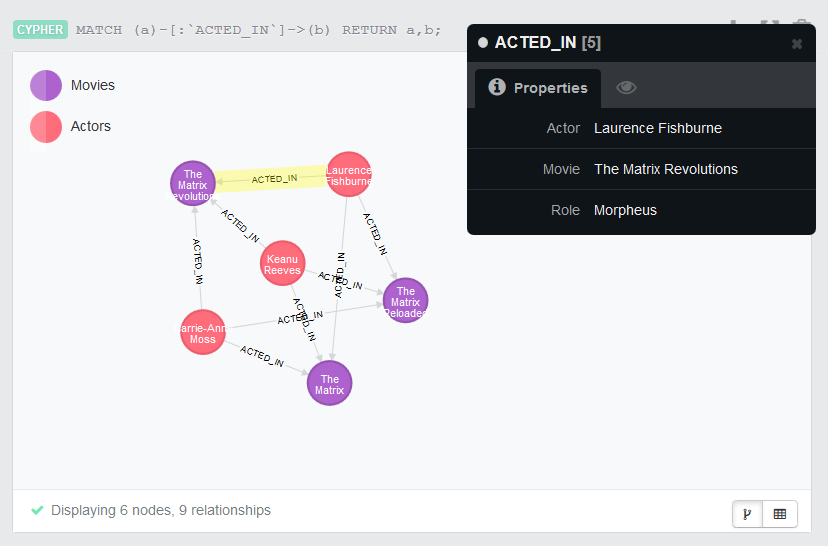
In the address bar of your Web browser, enter the URL of the Neo4j
database browser,http://localhost:7474/in this example, and
enter the following Cypher query in the command line to view the nodes with
the specified relationship between them.1MATCH (a)-[:`ACTED_IN`]->(b) RETURN a,b;As shown in the graphic view, Actors
nodes are linked with Movies nodes via
the relationship ACTED_IN, with
properties as defined in the Job.