Scenario 4: Calling a Job exported as Webservice in another Job
This scenario describes a Job that calls another Job exported as a Webservice
using the tWebServiceInput. This scenario
will call the Job created in Scenario 2: Buffering output data on the webapp server.
-
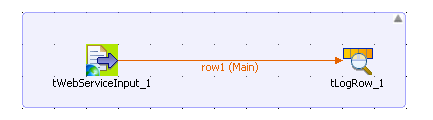
Drop the following components from the Palette onto the design workspace:
tWebServiceInput
and tLogRow. -
Connect tWebserviceInput to
tLogRow using a
Row Main
link.
-
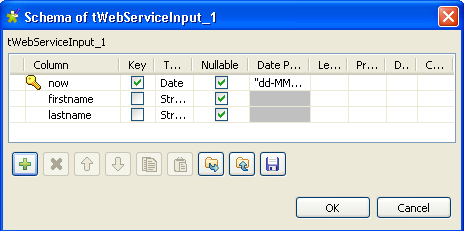
In the design workspace, select tWebServiceInput.
-
Click the Component tab to
define the basic settings for tWebServiceInput.

-
Set the Schema Type to
Built-In and click
the three-dot […] button
next to Edit Schema to
describe the data structure you want to call from the
exported Job. In this scenario, the schema is made of three
columns, now,
firstname, and
lastname.
-
Click the plus button to add the three parameter lines and
define your variables. Click OK to close the dialog box. -
In the WSDL field of the
Basic settings view
of tWebServiceInput, enter
the URL http://localhost:8080/export_job/services/export_job3?WSDL
where “export_job” is the name od the webapp directory where
the Job to call is stored and “export_job3” is the name of
the Job itself.

-
In the Method name field,
enter runJob. -
In the Parameters panel,
Click the plus button to add two parameter lines to define
your context variables. -
Click in the first Value cell
to enter the parameter to set the number of generated lines
using the following syntax: –context_param
nb_line=3. -
Click in the second Value
cell to enter the parameter to set the last name to display
using the following syntax: –context_param
lastname=Ford. -
Select tLogRow and click the
Component tab to
display the component view. -
Set the Basic settings for
the tLogRow component to
display the output data in a tabular mode. For more
information, see tLogRow. -
Save your Job and press F6 to
execute it.

The system generates three columns with the current date, first name, and last
name and displays them onto the log console in a tabular mode.