Scenario: Merging data directly on the DBMS
This scenario describes a simple Job that opens a connection to a MySQL database,
merges data from a source table into a target table according to customer IDs, and
displays the contents of the target table before and after the merge action. A WHERE
clause is used to filter data during the merge operation.

-
Drop a tMysqlConnection component, a
tSQLTemplateMerge component, two tMysqlInput components and two tLogRow components from the Palette onto the design workspace. -
Connect the tMysqlConnection component to the
first tMysqlInput component using a Trigger > OnSubjobOK connection. -
Connect the first tMysqlInput component to
the first tLogRow component using a Row > Main
connection. This row will display the initial contents of the target table on
the console. -
Connect the first tMysqlInput component to
the tSQLTemplateMerge component, and the
tSQLTemplateMerge component to the second
tMysqlInput component using Trigger > OnSubjobOK connections. -
Connect the second tMysqlInput component to
the second tLogRow component using a Row > Main
connection. This row will display the merge result on the console. -
Double-click the tMysqlConnection component
to display its Basic settings view.

-
Set the database connection details manually or select Repository from the Property
Type list and select your DB connection if it has already been
defined and stored in the Metadata area of the
Repository tree view.For more information about Metadata, see
Talend Studio User
Guide. -
Double-click the first tMysqlInput component
to display its Basic settings view.

-
Select the Use an existing connection check
box. If you are using more than one DB connection component in your Job, select
the component you want to use from the Component
List. -
Click the three-dot button next to Edit
schema and define the data structure of the target table, or
select Repository from the Schema list and select the target table if the schema
has already been defined and stored in the Metadata area of the Repository
tree view.In this scenario, we use built-in schemas.

-
Define the columns as shown above, and then click OK to propagate the schema structure to the output component and
close the schema dialog box. -
Fill the Table Name field with the name of
the target table, customer_info_merge in this
scenario. -
Click the Guess Query button, or type in
"SELECT * FROM customer_info_merge"in the Query area, to retrieve all the table columns. -
Define the properties of the second tMysqlInput component, using exactly the same settings as for
the first tMysqlInput component. -
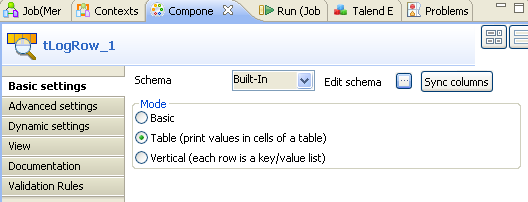
In the Basic settings view of each tLogRow component, select the Table option in the Mode area
so that the contents will be displayed in table cells on the console.
-
Double-click the tSQLTemplateMerge component
to display its Basic settings view.

-
Type in the names of the source table and the target table in the relevant
fields.In this scenario, the source table is new_customer_info,
which contains eight records; the target table is
customer_info_merge, which contains five records, and
both tables have the same data structure.
The source table and the target table may have different schema structures. In
this case, however, make sure that the source column and target column specified in
each line of the Merge ON table, the UPDATE Columns table, and the INSERT Columns table are identical in data type and the target
column length allows the insertion of the data from the corresponding source
column.
-
Define the source schema manually, or select Repository from the Schema list
and select the relevant table if the schema has already been defined and stored
in the Metadata area of the Repository tree view.In this scenario, we use built-in schemas.

-
Define the columns as shown above and click OK to close the schema dialog box, and do the same for the
target schema. -
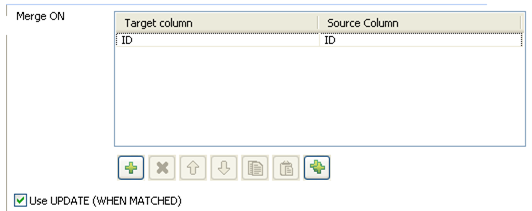
Click the green plus button beneath the Merge
ON table to add a line, and select the ID
column as the primary key.
-
Select the Use UPDATE check box to update
existing data during the merge operation, and define the columns to be updated
by clicking the green plus button and selecting the desired columns.In this scenario, we want to update all the columns according to the customer
IDs. Therefore, we select all the columns except the ID
column.
The columns defined as the primary key CANNOT and MUST NOT be made subject
to updates.
-
Select the Specify UPDATE WHERE clause check
box and type incustomer_info_merge.ID >= 4within double
quotation marks in the WHERE clause field so
that only those existing records with an ID equal to or greater than 4 will be
updated.

-
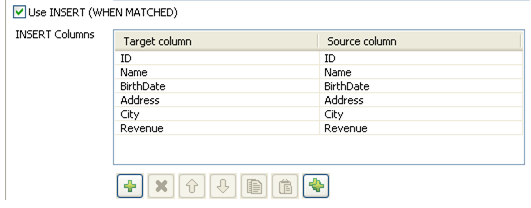
Select the Use INSERT check box and define
the columns to take data from and insert data to in the INSERT Columns table.In this example, we want to insert all the records that do not exist in the
target table.
-
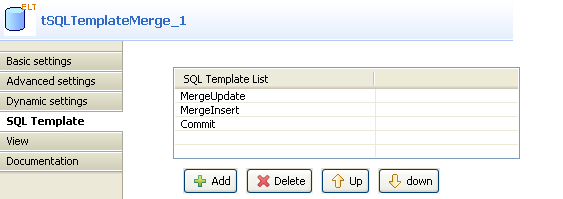
Select the SQL Template view to display and
add the SQL templates to be used.By default, the SQLTemplateMerge component
uses two system SQL templates: MergeUpdate and
MergeInsert.
In the SQL Template tab, you can add system SQL
templates or create your own and use them within your Job to carry out the coded
operation. For more information, see tSQLTemplateFilterColumns Standard properties.
-
Click the Add button to add a line and select
Commit from the template list to commit the
merge result to your database.Alternatively, you can connect the tSQLTemplateMerge component to a tSQLTemplateCommit or tMysqlCommit component using a Trigger > OnSubjobOK
connection to commit the merge result to your database. -
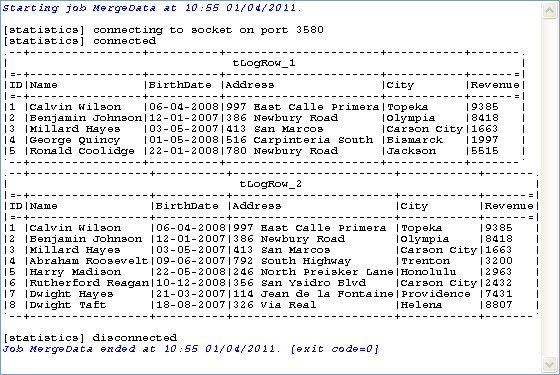
Save your Job and press F6 to run it.
Both the original contents of the target table and the merge result are
displayed on the console. In the target table, records No. 4 and No. 5 contain
the updated information, and records No.6 through No. 8 contain the inserted
information.