cJMS
cJMS Standard properties
These properties are used to configure cJMS running in the Standard Job framework.
The Standard
cJMS component belongs to the Connectivity family.
Basic settings
|
URI/Type |
Select the messaging type, either queue or |
|
URI/Destination |
Type in a name for the JMS queue or topic. |
| ConnectionFactory | Click the three-dot button and select a JMS connection factory to be used for handling messages or enter the name of the corresponding cMQConnectionFactory component directly in the field. |
Advanced settings
| URI Options | Set the optional arguments in the corresponding table. Click [+] as many times as required to add arguments to the table. Then click the corresponding value field and enter a value. See the site http://camel.apache.org/jms.html for available URI options. |
Usage
|
Usage rule |
cJMS can be a start, middle or end component in a |
|
Limitation |
n/a |
Sending and receiving a message from a JMS queue
This scenario applies only to Talend Open Studio for ESB, Talend Data Services Platform and Talend Data Fabric.
In this scenario, a cJMS component sends messages
from the local file system to a message queue in one sub-route, and the messages are
then consumed by another cJMS component in the other
sub-route.

Dropping and linking the components
-
From the Palette, expand the Connectivity/Messaging folder, and drop a cMQConnectionFactory component onto the design
workspace to specify the JMS connection factory for handling
messages. - From the Connectivity folder, drop one cFile and two cJMS components onto the design workspace.
- From the Custom folder, drop a cProcessor component onto the design workspace.
-
Connect the cFile component to a
cJMS component using a Row > Route
connection as the message producer sub-route. -
Connect the other cJMS component to the
cProcessor component using a Row > Route
connection as the message consumer sub-route. -
Label the components properly for better identification of their
functionalities.
Configuring the components
-
Double-click the cMQConnectionFactory component to
display its Basic settings view in the
Component tab.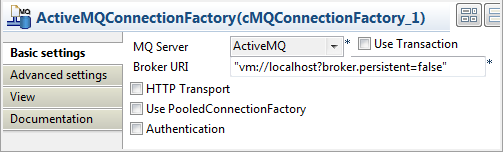
-
From the MQ Server list, select an MQ
server. In this use case, we use the default ActiveMQ server to handle the
messages.In the Broker URI field, type in the URI
of the message broker. Here we simply use the default URI “vm://localhost?broker.persistent=false”. -
In the message producer sub-route, double-click the cFile component to display its Basic
settings view.
-
Define the properties of the cFile
component.In this use case, simply specify the path to the folder that holds the
source file to be sent as electronic message, and leave the other parameters
as they are. -
Double-click the cJMS
component labeled Message_producer to display its
Basic settings view.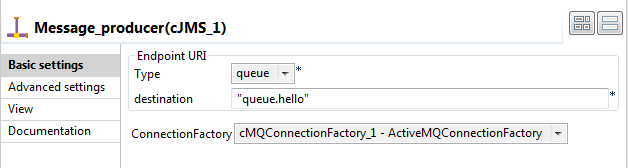
-
From the Type list, select queue to send the messages to a JMS queue.
In the Destination field, type in a name
for the JMS queue,"queue.hello"in this use case.Double-click the […] button next to ConnectionFactory. Select the MQ connection
factory that you have just configured in the dialog box and click OK.
-
Switch to the message consumer sub-route, and double click the
cJMS component labeled Message_consumer to display its Basic
settings view.
-
Configure the message consumer using exactly the same parameters as in the
message producer. -
Double-click the cProcessor
component to display its Basic settings
view.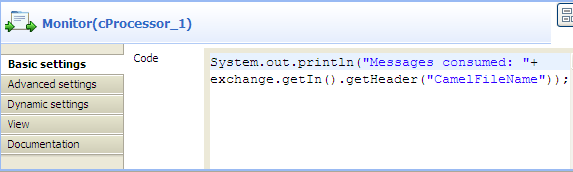
-
In the Code area, customize the code as
shown below to display the file names of the consumed messages on the
Run console.12System.out.println("Message consumed: "+exchange.getIn().getHeader("CamelFileName")); - Press Ctrl+S to save your Routes.
Viewing code and executing the Route
-
Click the Code tab at the bottom of the
design workspace to have a look at the generated code.
 In the partially shown code, a message route is built
fromthe
File_source_cFile_1
.tothecJMS_1which then sends the message to a
message queue via a broker identified by
vm://localhost?broker.persistent=false. The message
fromtheMessage_consumer_cJMS_2is processed
bycProcessor_1. -
Click the Run button in the Run view to launch the execution of your Route.
You can also press F6 to execute it.RESULT: The message is received by the consumer, as shown on the Run console.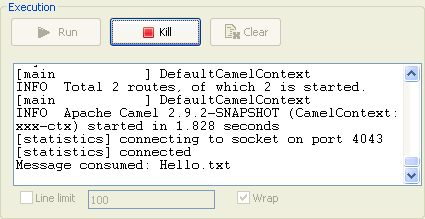
Setting up a JMS local transaction
This scenario applies only to Talend Open Studio for ESB, Talend Data Services Platform and Talend Data Fabric.
In this scenario, a local transaction with three steps is performed to send, test and
consume a JMS message:
-
The first Route is used to send a “hello
world!” message to feed the queue.hello JMS queue. -
The second Route is used to test the received JMS message. This message is
redelivered six times to the queue.hello
queue and is then moved to the Dead Letter
JMS queue. The Route is programmed to throw an exception every time an exchange
is processed by the Route. -
The last Route is used to consume the “hello
world!” message from the Dead
Letter JMS queue.
In this use case, we use the local ActiveMQ server to handle messages between
different Routes. The ActiveMQ server need to be started before executing the Routes.
For more information on installing and launching ActiveMQ server, see the Apache Web
site http://activemq.apache.org/index.html.
Sending a message to the queue.hello JMS
queue

Dropping and linking the components
-
From the Palette, drop the five following components
onto the design workspace: one cMQConnectionFactory, one cConfig, one cMessagingEndpoint, one cJMS and one cProcessor
component. -
Connect the cMessagingEndpoint component
to the cJMS using a Row > Route
connection. -
Connect the cJMS component to the
cProcessor component using a Row > Route
connection.
Configuring the components
-
Double-click the cMQConnectionFactory component labelled
AMQ_Send_ConnectionFactory to display
its Basic settings view in the Component tab.
-
From the MQ Server list, select an MQ
server. In this use case, we use the default ActiveMQ server to handle the
messages. -
In the Broker URI field, type in Active
MQ’s default URI of the localhost server: “tcp://localhost:61616”. -
Double-click the cConfig component, which
is labelled DatasetConfig, to display its
Basic settings view in the Component tab and set its parameters.
-
Write a piece of code in the Code field
to register the dataset instance hello
into the registry, as shown below.1234567org.apache.camel.component.dataset.SimpleDataSet dataset = neworg.apache.camel.component.dataset.SimpleDataSet(1);dataset.setDefaultBody("Test Data: hello world!");org.apache.camel.impl.SimpleRegistry registry = neworg.apache.camel.impl.SimpleRegistry();registry.put("hello",dataset);camelContext.setRegistry(registry); -
Double-click the cMessagingEndpoint
component, which is labelled SimpleDatasetGen, to display its Basic
settings view in the Component tab. and set its parameters.
-
In the URI field, enter
dataset:hello between the quotation marks. -
Double-click the cJMS
component labeled AMQ_Send to display its Basic settings view.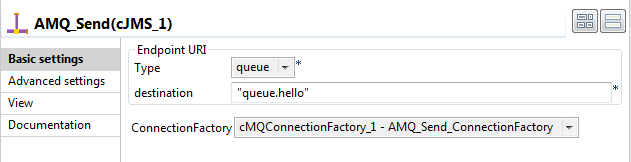
-
From the Type list, select queue to send the message to a JMS queue.
In the Destination field, type in a name
for the JMS queue, “queue.hello” in this
use case.Double-click the […] button next to ConnectionFactory. Select the MQ connection
factory that you have just configured in the dialog box and click OK.
-
Double-click the cProcessor component
labelled PrintSendMsg to display its
Basic settings view in the Component tab, and customize the code in the
Code area to display the sent message
intercepted on the console.12System.out.println("AMQ Send: "+exchange.getIn().getBody(String.class));
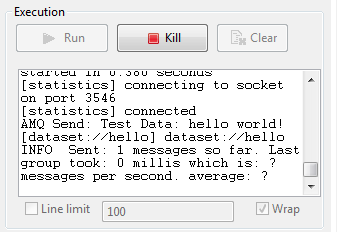
Executing the Route
You can also press F6 to execute it.
sent to the JMS Queue, as shown in the Run
console.
Testing the received message

Linking the components
-
From the Palette, drop the four following components
onto the design workspace: one cJMS, two
cProcessor components and one cMQConnectionFactory. -
Connect the cJMS component to the first
cProcessor using a Row > Route
connection. -
Connect the first cProcessor component to
the second cProcessor component using a
Row > Route connection.
Defining the settings of the components
-
Double-click the cMQConnectionFactory component labelled
AMQ_Rev_ConnectionFactory to display
its Basic settings view in the Component tab.
-
From the MQ Server list, select an MQ
server. In this use case, we use the default ActiveMQ server to handle the
messages.Select the Use transaction check
box. -
In the Broker URI field, type in Active
MQ’s default URI of the localhost server: “tcp://localhost:61616”. -
Double-click the cJMS
component labeled AMQ_Rev to display its Basic settings view.
-
From the Type list, select queue to send the messages to a JMS queue.
In the Destination field, type in a name
for the JMS queue, “queue.hello” in this
use case.Double-click the […] button next to ConnectionFactory. Select the MQ connection
factory that you have just configured in the dialog box and click OK.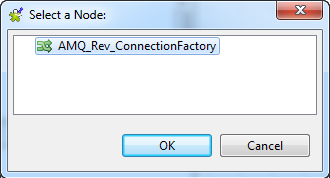
-
Double-click the first cProcessor
component labelled PrintRevMsg to display
its Basic settings view in the Component tab, and customize the code in the
Code area to display the received
message intercepted on the console.12System.out.println("AMQ Receive: "+exchange.getIn().getBody(String.class)); -
Double-click the second cProcessor
component labelled ThrowEx to display its
Basic settings view in the Component tab, and customize the code in the
Code area to throw the Force fail exception every time an exchange is
processed by the route.1throw new Exception("Force fail")
Running the Route
You can also press F6 to execute it.
tested and a rollback transaction is performed. Once the message redelivery
attempts exceeds six times, the pending message is sent to the Dead Letter JMS Queue.
Consuming the message from the DeadLetter JMS
queue

Arranging the flow of the message
-
From the Palette, drop the three following components
onto the design workspace: one cMQConnectionFactory, one cJMS and one cProcessor
component. -
Connect the cJMS component to the
cProcessor component using a Row > Route
connection.
Configuring how the message is processed
-
Double-click the cMQConnectionFactory component to
display its Basic settings view in the
Component tab.
-
From the MQ Server list, select an MQ
server. In this use case, we use the default ActiveMQ server to handle the
messages. -
In the Broker URI field, type in Active
MQ’s default URI of the localhost server: “tcp://localhost:61616”. -
Double-click the cJMS
component labeled DeadLetterQueueJMS to display its
Basic settings view.
-
From the Type list, select queue to send the messages to a JMS queue.
In the Destination field, type in a name
for the JMS queue, “ActiveMQ.DLQ” in this
use case (the default Dead Letter Queue
in ActiveMQ).Double-click the […] button next to ConnectionFactory. Select the MQ connection
factory that you have just configured in the dialog box and click OK.
-
Double-click the cProcessor component
labelled PrintMsg to display its
Basic settings view in the Component tab, and customize the code in the
Code area to display the received
message intercepted on the console.12System.out.println("AMQ Receive: "+exchange.getIn().getBody(String.class));
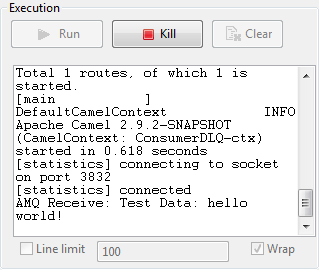
Launching the execution of the Route
You can also press F6 to execute it.
was in the Dead Letter queue is consumed,
as shown in the Run console.
Sending and receiving a scheduled delivery of messages from a JMS Queue
using Camel Quartz
This scenario applies only to Talend Open Studio for ESB, Talend Data Services Platform and Talend Data Fabric.
This scenario will show you how to use the Camel Quartz component to provide a
scheduled delivery of messages from a JMS Queue.
To do this, we will build two Routes, a message producer Route and a consumer Route.
We will implement the Quartz component in the producer Route to send scheduled messages
to a JMS Queue. The messages are then consumed by the consumer Route.
In this use case, we will use Apache ActiveMQ as the message broker. We need to launch
the ActiveMQ server before executing the Route. For more information about installing
and launching ActiveMQ server, see the site http://activemq.apache.org/index.html.
Building the producer Route
Dropping and linking the components

-
From the Palette, drag and drop a cMQConnectionFactory, a cJMS, a cSetBody, and two
cMessagingEndpoint components onto the
design workspace. -
Label the components for better identification of their roles and link
them with the Row > Route connection as shown above.
Configuring the components
-
Double-click the cMQConnectionFactory component to
display its Basic settings view in the
Component tab.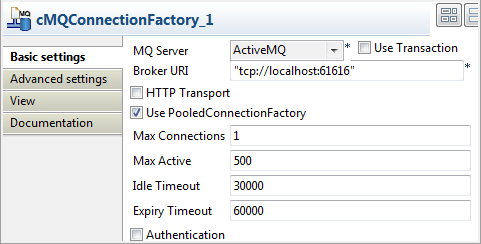
-
From the MQ Server list, select ActiveMQ to handle messages.
In the Broker URI field, type in the URI
of the local Active MQ server, “tcp://localhost:61616”.Select the Use PooledConnectionFatory
check box and keep the default settings. -
Double-click the quartzConsumer component
to open its Basic settings view in the
Component tab.
-
In the URI field, enter the code
"quartz://HelloWorld?trigger.repeatInterval=2000&trigger.repeatCount=-1"
to define a timer for starting message exchanges. In this use case, we want
the message to be delivered endlessly between an interval of two seconds.
For more information about Quartz, see the site http://camel.apache.org/quartz.html. -
Click the Advanced settings view. Click

at the bottom of the Dependencies list to add a row and select
quartzfrom the drop-down list. For more information about
the Quartz component, see the site http://camel.apache.org/quartz.html.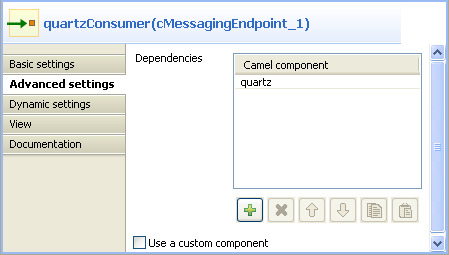
-
Double-click the cSetBody component to
open its Basic settings view in the
Component tab.
-
Select Simple from the Language list box and type in
"Helloin the Expression
world"
field. -
Double-click the logMessage component to
open its Basic settings view in the
Component tab.
-
In the URI field, enter
"log:quartzMessage"where the message exchanges are
logged. -
Double-click the jmsProducer
component to display its Basic settings
view in the Component tab.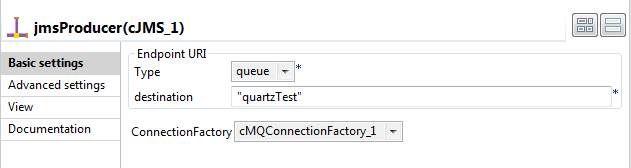
-
From the Type list, select queue to send the messages to a JMS queue.
In the Destination field, type in a name
for the JMS queue,"quartzTest"in this use case.In the ConnectionFactory field, click […] and select the MQ connection factory that
you have just configured. - Press Ctrl+S to save your Route.
Viewing the code and executing the Route
-
Click the Code tab at the bottom of the
design workspace to check the generated code.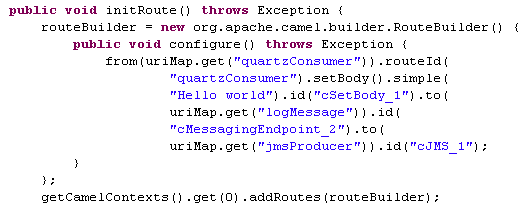 As shown above, the message flow from
quartzConsumeris given
a payload bycSetBody_1and then sent to
logMessageandjmsProducer. -
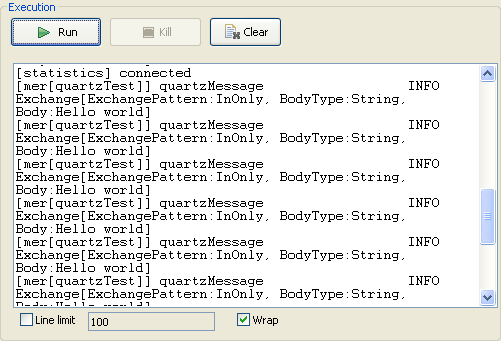
Press F6 to execute the Route.
RESULT: The logs of the message exchange are printed in the
console.
Building the consumer Route
Arranging the flow of the message

- From the Palette, drag and drop a cMQConnectionFactory, a cJMS, and a cMessagingEndpoint component onto the design workspace.
-
Label the components for better identification of their roles and link
them with the Row > Route connection as shown above.
Configuring how the message is processed
-
Double-click the cMQConnectionFactory component to
display its Basic settings view in the
Component tab.
-
Configure the cMQConnectionFactory component the same as
in the producer Route. -
Double-click the jmsConsumer
component to display its Basic settings
view in the Component tab. -
Configure the jmsConsumer component the
same as the jmsProducer component in the
producer Route to consume the messages in the defined queue
"quartzTest". -
Double-click the logMessage component to
open its Basic settings view in the
Component tab.
-
In the URI field, enter
"log:quartzMessage"where the message exchanges are
logged. - Press Ctrl+S to save your Route.
Executing the Route
-
Click the Code tab at the bottom of the
design workspace to check the generated code. As shown above, the message flow is routed from
jmsConsumer
tologMessage. -
Press F6 to execute the Route.
RESULT: The logs of the message exchange are printed in the
console.