tCassandraInput
Extracts the desired data from a standard or super column family of a Cassandra
keyspace so as to apply changes to the data.
tCassandraInput allows
you to read data from a Cassandra keyspace and send data in the Talend flow.
Depending on the Talend
product you are using, this component can be used in one, some or all of the following
Job frameworks:
-
Standard: see tCassandraInput Standard properties.
The component in this framework is available in all Talend products with Big Data
and in Talend Data Fabric. -
Spark Batch: see tCassandraInput properties for Apache Spark Batch.
The component in this framework is available in all subscription-based Talend products with Big Data
and Talend Data Fabric.
Mapping tables between Cassandra type and Talend data type
Cassandra type with Cassandra API, Datastax, and Talend
data type .
Cassandra 2.0 or later versions
|
Cassandra Type |
Talend Data Type |
|---|---|
|
Ascii |
String; Character |
|
BigInt |
Long |
|
Blob |
Byte[] |
|
Boolean |
Boolean |
|
Counter |
Long |
|
Inet |
Object |
|
Int |
Integer; Short; Byte |
|
List |
List |
|
Map |
Object |
|
Set |
Object |
|
Text |
String; Character |
|
Timestamp |
Date |
|
UUID |
String |
|
TimeUUID |
String |
|
VarChar |
String; Character |
|
VarInt |
Object |
|
Boolean |
Boolean |
|
Float |
Float |
|
Double |
Double |
|
Decimal |
BigDecimal |
Cassandra Hector API ( for Cassandra versions older than 2.0)
The following table presents the mapping relationships between Cassandra type with the Hector API and Talend data type.
|
Cassandra Type |
Talend Data Type |
|---|---|
|
BytesType |
byte[] |
|
AsciiType |
String |
|
UTF8Type |
String |
|
IntegerType |
Object |
|
Int32Type |
Integer |
|
LongType |
Long |
|
UUIDType |
String |
|
TimeUUIDType |
String |
|
DateType |
Date |
|
BooleanType |
Boolean |
|
FloatType |
Float |
|
DoubleType |
Double |
|
DecimalType |
BigDecimal |
tCassandraInput Standard properties
These properties are used to configure tCassandraInput running in the Standard Job framework.
The Standard
tCassandraInput component belongs to the Big Data and the Databases NoSQL families.
The component in this framework is available in all Talend products with Big Data
and in Talend Data Fabric.
Basic settings
|
Property type |
Either Built-In or Repository. Built-In: No property data stored centrally.
Repository: Select the repository file where the |
|
Use existing connection |
Select this check box and in the Component List click the relevant connection component to |
|
DB Version |
Select the Cassandra version you are using. |
|
API type |
This drop-down list is displayed only when you have selected the 2.0 version Note that the Hector API is deprecated along with Along with the evolution of the CQL commands, the parameters to be set in the Basic settings view varies. |
|
Host |
Hostname or IP address of the Cassandra server. |
|
Port |
Listening port number of the Cassandra server. |
|
Required authentication |
Select this check box to provide credentials for the Cassandra This check box appears only if you do not select the Use existing connection check box. |
|
Username |
Fill in this field with the username for the Cassandra |
|
Password |
Fill in this field with the password for the Cassandra To enter the password, click the […] button next to the |
|
Keyspace |
Type in the name of the keyspace from which you want to read data. |
|
Column family |
Type in the name of the column family from which you want to read data. |
|
Schema and |
A schema is a row description. It defines the number of fields Click Edit
|
|
Query |
Enter the query statements to be used to read data from the Cassandra By default, the query is not case-sensitive. This means that at runtime, the column names The […] button next to this field This feature is available only for the Datastax API of Cassandra 2.0 (deprecated) |
|
Column family type |
Standard: Column family is of
Super: Column family is of super |
|
Include key in output |
Select this check box to include the key of the column family in
|
|
Row key type |
Select the appropriate |
|
Row key Cassandra type |
Select the corresponding Cassandra type for the row key from the Warning:
The value of the Default option For more information about the mapping table between Cassandra type |
|
Include super key output |
Select this check box to include the super key of the column family in
This check box appears only if you select Super from the Column family |
|
Super column type |
Select the type of the super column from the list. |
|
Super column Cassandra type |
Select the corresponding Cassandra type for the super column from the For more information about the mapping table between Cassandra type |
|
Specify row keys |
Select this check box to specify the row keys of the column family |
|
Row Keys |
Type in the specific row keys of the column family in the correct This field appears only if you select the Specify row keys check box. |
|
Key start |
Type in the start row key of the correct data type. |
|
Key end |
Type in the end row key of the correct data type. |
|
Key limit |
Type in the number of rows to be read between the start row key and |
|
Specify columns |
Select this check box to specify the column names of the column family |
|
Columns |
Type in the specific column names of the column family in the correct This field appears only if you select the Specify columns check box. |
|
Columns range start |
Type in the start column name of the correct data type. |
|
Columns range end |
Type in the end column name of the correct data type. |
|
Columns range limit |
Type in the number of columns to be read between the start column and |
Advanced settings
|
tStatCatcher Statistics |
Select this check box to gather the Job processing metadata at the Job |
Global Variables
|
Global Variables |
NB_LINE: the number of rows read by an input component or
ERROR_MESSAGE: the error message generated by the A Flow variable functions during the execution of a component while an After variable To fill up a field or expression with a variable, press Ctrl + For further information about variables, see |
Usage
|
Usage rule |
This component always needs an output link. |
Handling data with Cassandra
This scenario applies only to Talend products with Big Data.
This scenario describes a simple Job that reads the employee data from a CSV file,
writes the data to a Cassandra keyspace, then extracts the personal information of some
employees and displays the information on the console.

-
tCassandraConnection: opens a connection
to the Cassandra server. -
tFileInputDelimited: reads the input
file, defines the data structure and sends it to the next component. -
tCassandraOutput: writes the data it
receives from the preceding component into a Cassandra keyspace. -
tCassandraInput: reads the data from the
Cassandra keyspace. -
tLogRow: displays the data it receives
from the preceding component on the console. -
tCassandraClose: closes the connection to
the Cassandra server.
Dropping and linking the components
-
Drop the following components from the Palette onto the design workspace: tCassandraConnection, tFileInputDelimited, tCassandraOutput, tCassandraInput, tLogRow
and tCassandraClose. - Connect tFileInputDelimited to tCassandraOutput using a Row > Main link.
-
Do the same to connect tCassandraInput to
tLogRow. -
Connect tCassandraConnection to tFileInputDelimited using a Trigger > OnSubjobOk
link. - Do the same to connect tFileInputDelimited to tCassandraInput and tCassandraInput to tCassandraClose.
- Label the components to better identify their functions.
Configuring the components
Opening a Cassandra connection
-
Double-click the tCassandraConnection
component to open its Basic settings view
in theComponent tab.
- Select the Cassandra version that you are using from the DB Version list. In this example, it is Cassandra 1.1.2.
-
In the Server field, type in the hostname
or IP address of the Cassandra server. In this example, it is localhost. -
In the Port field, type in the listening
port number of the Cassandra server. -
If required, type in the authentication information for the Cassandra
connection: Username and Password.
Reading the input data
-
Double-click the tFileInputDelimited
component to open its Component view.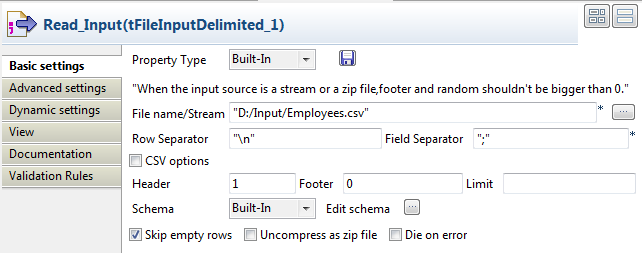
-
Click the […] button next to the
File Name/Stream field to browse to the
file that you want to read data from. In this scenario, the directory is
D:/Input/Employees.csv. The CSV file
contains four columns: id, age, name
and ManagerID.id;age;name;ManagerID
1;20;Alex;1
2;40;Peter;1
3;25;Mark;1
4;26;Michael;1
5;30;Christophe;2
6;26;Stephane;3
7;37;Cedric;3
8;52;Bill;4
9;43;Jack;2
10;28;Andrews;4
-
In the Header field, enter 1 so that the first row in the CSV file will be
skipped. -
Click Edit schema to define the data to
pass on to the tCassandraOutput component.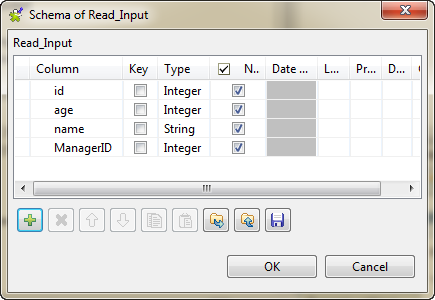
Writing data to a Cassandra keyspace
-
Double-click the tCassandraOutput
component to open its Basic settings view
in the Component tab.
-
Type in required information for the connection or use the existing
connection you have configured before. In this scenario, the Use existing connection check box is
selected. -
In the Keyspace configuration area, type
in the name of the keyspace: Employee in
this example, and select Drop keyspace if exists and
create from the Action on
keyspace list. -
In the Column family configuration area,
type in the name of the column family: Employee_Info in this example, and select Drop column family if exists and create from
the Action on column family list.The Define column family structure check
box appears. In this example, clear this check box. -
In the Action on data list, select the
action you want to carry on, Upsert in
this example. -
Click Sync columns to retrieve the schema
from the preceding component. -
Select the key column of the column family from the Key column list. In this example, it is id.
If needed, select the Include key in
columns check box.
Reading data from the Cassandra keyspace
-
Double-click the tCassandraInput
component to open its Component
view.
-
Type in required information for the connection or use the existing
connection you have configured before. In this scenario, the Use existing connection check box is
selected. -
In the Keyspace configuration area, type
in the name of the keyspace: Employee in
this example. -
In the Column family configuration area,
type in the name of the column family: Employee_Info in this example. -
Select Edit schema to define the data
structure to be read from the Cassandra keyspace. In this example, three
columns id, name and age are
defined.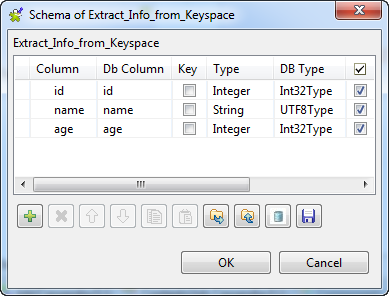
-
If needed, select the Include key in output
columns check box, and then select the key column of the
column family you want to include from the Key
column list. -
From the Row key type list, select
Integer because id is of integer type in this example.Keep the Default option for the row key
Cassandra type because its value will become the corresponding Cassandra
type Int32 automatically. -
In the Query configuration area, select
the Specify row keys check box and specify
the row keys directly. In this example, three rows will be read. Next,
select the Specify columns check box and
specify the column names of the column family directly. This scenario will
read three columns from the keyspace: id,
name and age. -
If needed, the Key start and the
Key end fields allow you to define the
range of rows, and the Key limit field
allows you to specify the number of rows within the range of rows to be
read. Similarly, the Columns range start
and the Columns range end fields allow you
to define the range of columns of the column family, and the Columns range limit field allows you to specify
the number of columns within the range of columns to be read.
Displaying the information of interest
-
Double-click the tLogRow component to
open its Component view. - In the Mode area, select Table (print values in cells of a table).
Closing the Cassandra connection
-
Double-click the tCassandraClose
component to open its Component
view.
- Select the connection to be closed from the Component List.
Saving and executing the Job
- Press Ctrl+S to save your Job.
-
Execute the Job by pressing F6 or
clicking Run on the Run tab.The personal information of three employees is displayed on the
console.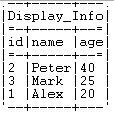
tCassandraInput properties for Apache Spark Batch
These properties are used to configure tCassandraInput running in the Spark Batch Job framework.
The Spark Batch
tCassandraInput component belongs to the Databases family.
The component in this framework is available in all subscription-based Talend products with Big Data
and Talend Data Fabric.
Basic settings
|
Schema and |
A schema is a row description. It defines the number of fields Click Edit
The schema of this component does not support the Object type and the List type. |
|
Keyspace |
Type in the name of the keyspace from which you want to read data. |
|
Column family |
Type in the name of the column family from which you want to read data. |
|
Selected column function |
Select the columns about which you need to retrieve the TTL (time to live) or the writeTime The TTL property determines the time for records in a column to expire; the writeTime For further information about these properties, see Datastax’s documentation for Cassandra |
|
Filter function |
Define the filters you need to use to select the records to be processed. The component generates the WHERE ALLOW FILTERING clause using the filters you put and |
|
Order by clustering column |
Select how you need to sort the retrieved records. You can select NONE so as not to sort the data. |
|
Use limit |
Select this check box to display the Limit per partition |
Usage
|
Usage rule |
This component is used as a start component and requires an output This component should use one and only one tCassandraConfiguration component present in the same Job to connect to This component, along with the Spark Batch component Palette it belongs to, Note that in this documentation, unless otherwise explicitly stated, a |
|
Spark Connection |
In the Spark
Configuration tab in the Run view, define the connection to a given Spark cluster for the whole Job. In addition, since the Job expects its dependent jar files for execution, you must specify the directory in the file system to which these jar files are transferred so that Spark can access these files:
This connection is effective on a per-Job basis. |
Related scenarios
For a scenario about how to use the same type of component in a Spark Batch Job, see Writing and reading data from MongoDB using a Spark Batch Job.