tDropboxPut
tDropboxPut Standard properties
These properties are used to configure tDropboxPut running in the Standard Job framework.
The Standard
tDropboxPut component belongs to the Cloud
family.
The component in this framework is available in all Talend
products.
Basic settings
|
Use Existing Connection |
Select this check box and in the Component List click the relevant connection component to |
|
Access Token |
Enter the access token required by the Dropbox account you need to connect to. This access Note that a Dropbox App should have been created under that account before generating the |
|
Use HTTP Proxy |
If you are using a proxy, select this check box and enter the host and port information of |
|
Path (File Only) |
Enter the path pointing to the file you need to write contents in. Note that the path string should start with a slash (/). It is the root folder of the |
|
Upload Mode |
Select upload mode to be used:
|
|
Upload Incoming content as File |
Select this radio button to read data directly from the input flow |
|
Schema and Edit schema |
A schema is a row description. It defines the number of fields Note that the schema of this component is read-only with a single The Schema field is not available |
|
Upload local file |
Select this radio button to upload a locally stored file to |
|
Expose as OutputStream |
Select this check box to expose the output stream of this For example, you can use the Use output |
Advanced settings
|
tStatCatcher Statistics |
Select this check box to gather the Job processing metadata at the Job level |
Global Variables
| ERROR_MESSAGE |
The error message generated by the component when an error occurs. This |
Usage
|
Usage rule |
This component is used either standalone in a subJob to directly |
Uploading files to Dropbox
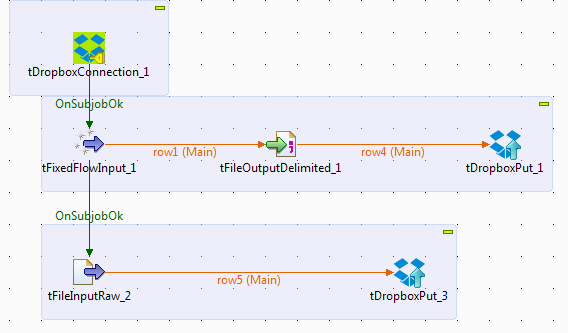
In this scenario, a six-component Job consisting of three subJobs is created to
write data onto Dropbox using different upload modes.
Before replicating this scenario, you need to create a Dropbox App under the
Dropbox account to be used. In this scenario, the Dropbox App to be used is named to talenddrop and thus the root folder in which files are uploaded is talenddrop, too. In addition, the access token to this folder has been
generated from the App console provided by Dropbox.
For further information about a Dropbox App, see https://www.dropbox.com/developers/apps/.
Linking the components
-
In the
Integration
perspective of the Studio, create
an empty Job from the Job Designs node in
the Repository tree view.For further information about how to create a Job, see
Talend Studio User Guide. -
In the workspace, enter the name of the component to be used and select this component from the list that appears. In this scenario, the components are tDropboxConnection, tFixedFlowInput, tFileOutputDelimited, tFileInputRaw and two tDropboxPut components.
The tFixedFlowInput component generates some
data to be uploaded to Dropbox in this scenario. In the
real-world case, you can use other components such as tMysqlInput or tMap in the
place of tFixedFlowInut to design a
sophisticated process to prepare your data to be handled. -
Connect tFixedFlowInput to tFileOutputDelimited using the Row >
Main link. -
Do the same to connect tFileOutputDelimited to one of the two
tDropboxPut components and connect
tFileInputRaw to the other tDropboxPut component. - Connect tDropboxConnection to tFixedFlowInput using the Trigger > On Subjob Ok link. Then connect tFixedFlowInput to tFileInputRaw using the same type of link.
Connecting to Dropbox
-
Double-click tDropboxConnection to open its
Component view.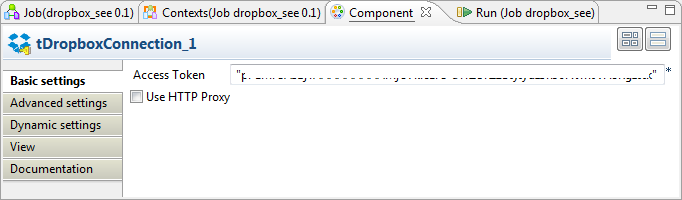
-
In the Access token field, paste the token that you have
generated via the App console of Dropbox for accessing the Dropbox App
folder to be used.
Generating the output stream
Defining the input data
-
Double-click tFixedFlowInput to open its
Component view. In this scenario, only three rows of sample data are created to indicate three countries
and their calling
codes.12333;France86;China81;Japan -
Click the […] button next to Edit
schema to open the schema editor. -
Click the [+] button twice to add two rows and in the
Column column, rename them to code and country, respectively.
-
Click OK to validate these changes and accept the
propagation prompted by the pop-up dialog box. -
In the Mode area, select the Use
Inline Table radio button. The code and the country
column have been automatically created in this table. - Enter the sample data mentioned above in this table.
Defining the output stream
-
Double-click tFileOutputDelimited to open its
Component view.
-
Select the Use output stream check box to write the data to
be outputted into a given output stream. -
In the Output stream field, enter the code to define the
output stream you need to write data in. In this scenario, it is the output
stream of the tDropboxPut_1 component
linked with the current component. Thus the code used to write the data
reads as
follows:((java.io.OutputStream)globalMap.get("tDropboxPut_1_OUTPUTSTREAM"))
Note that in this example code, the tDropboxPut
component has the number 1 as its affix,
which represents its component ID distributed automatically within this Job.
If the tDropboxPut component you are using
has a different ID, you need to adapt the code to that ID number. -
Click Edit schema to verify that the
schema of this component is identical with that of the preceding tFixedFlowInput component. If not so, click the
Sync columns button to make both of the
schemas identical. -
Navigate to the Advanced
settings tab. -
Mark the Custom the flush buffer
size check box. This automatically adds 1 in the Row number field.
Exposing the tDropboxPut output stream
-
Double-click the tDropboxPut component linked with
tFileOutputDelimited to open its
Component view.
-
Select the Use existing connection check box to reuse
the connection created by tDropboxConnection. -
In the Path field, enter the path pointing to the file
you need to write data in, with a slash (/) at the beginning of the path.
For example, enter /calling_code.csv. - In the Upload mode area, select the Rename if Existing radio button.
-
Select the Expose As OutputStream radio button to expose
the output stream of this component so that the other component, tFileOutputDelimited in this scenario, can write
data in the stream.
Defining the media data to be uploaded
-
Double-click tFileInputRaw to open its
Component view. This component is used to read a picture named esb_architecture.png into the data flow. In the real-world
practice, this file can be of many other formats, such as pdf, xls, ppt or
mp3. -
In the Filename field, enter the path or browse to the
file you need to upload. -
In the Mode area, select the Read
the file as a bytes array radio button.
Uploading the incoming contents
-
Double-click the tDropboxPut component linked with
tFileInputRaw to open its Component view.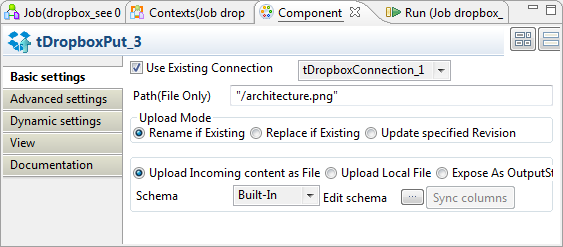
-
Select the Use existing connection check box to reuse
the connection created by tDropboxConnection. -
In the Path field, enter the path pointing to the file
you need to write data in, with a slash (/) at the beginning of the path.
For example, enter /architecture.png. - In the Upload mode area, select Rename if existing.
-
Select the Upload incoming content as
file radio button. This displays the Edit schema button to allow you to view the read-only schema
of this component.
Executing the Job
Then you can press F6 to run this Job.
Once done, check the uploaded files in the Dropbox App folder of your Dropbox, in this
scenario, the talenddrop folder.
