tDynamoDBInput
follows for transformation.
Depending on the Talend
product you are using, this component can be used in one, some or all of the following
Job frameworks:
-
Standard: see tDynamoDBInput Standard properties.
The component in this framework is available in all Talend products with Big Data
and in Talend Data Fabric. -
Spark Batch: see tDynamoDBInput properties for Apache Spark Batch.
The component in this framework is available in all subscription-based Talend products with Big Data
and Talend Data Fabric.
tDynamoDBInput Standard properties
These properties are used to configure tDynamoDBInput running in the Standard Job framework.
The Standard
tDynamoDBInput component belongs to the Big Data and the Databases NoSQL families.
The component in this framework is available in all Talend products with Big Data
and in Talend Data Fabric.
Basic settings
|
Access Key |
Enter the access key ID that uniquely identifies an AWS |
|
Secret Key |
Enter the secret access key, constituting the security To enter the secret key, click the […] button next to |
|
Inherit credentials from AWS role |
Select this check box to leverage the instance profile |
|
Assume role |
If you temporarily need some access permissions associated |
|
Use End Point |
Select this check box and in the Server Url field |
|
Region |
Specify the AWS region by selecting a region name from the |
|
Action |
Select the operation to be performed from the drop-down list, either |
|
Schema and Edit |
A schema is a row description. It defines the number of fields
|
|
|
Click Edit
If a column stores JSON documents, select JSON from the DB |
|
Table Name |
Specify the name of the table to be queried or scanned. |
|
Use advanced key condition expression |
Select this check box and in the Advanced key |
|
Key condition expression |
Specify the key condition expressions used to determine the items to
Note that only the items that meet all the key conditions defined in This table is not available when the Use |
|
Use filter expression |
Select this check box to use the filter expression for the query or |
|
Use advanced filter expression |
Select this check box and in the Advanced filter This check box is available when the Use filter |
|
Filter expression |
Specify the filter expressions used to refine the results returned to
Note that only the items that meet all the filter conditions defined This table is available when the Use filter |
|
Value mapping |
Specify the placeholders for the expression attribute values.
For more information, see Expression Attribute Values. |
|
Name mapping |
Specify the placeholders for the attribute names that conflict with
For more information, see Expression Attribute Names. |
Advanced settings
|
STS Endpoint |
Select this check box and in the field displayed, specify the This check box is available only when the Assume role check box is selected. |
|
tStatCatcher Statistics |
Select this check box to gather the Job processing metadata at the Job level |
Global Variables
|
Global Variables |
NB_LINE: the number of rows processed. This is an After
QUERY: the query statement being processed. This is a Flow
ERROR_MESSAGE: the error message generated by the A Flow variable functions during the execution of a component while an After variable To fill up a field or expression with a variable, press Ctrl + For further information about variables, see |
Usage
|
Usage rule |
This component is usually used as a start component of a Job or |
Writing and extracting JSON documents from DynamoDB
- A Talend Studio with Big Data
- Your AWS credentials that have been granted the access to your Amazon DynamoDB.
this:
|
1 2 |
21058;{"accountId" : "900" , "accountName" : "xxxxx" , "action" : "Create", "customerOrderNumber" : { "deliveryCode" : "261" , "deliveryId" : "313"}} 21059;{"accountId" : "901" , "accountName" : "xxxxy" , "action" : "Delete", "customerOrderNumber" : { "deliveryCode" : "262" , "deliveryId" : "314"}} |
This data has two columns: DeliverID and
EventPayLoad, seperated by a semicolon (;).
The JSON document itself is stored in the EventPayLoad column.
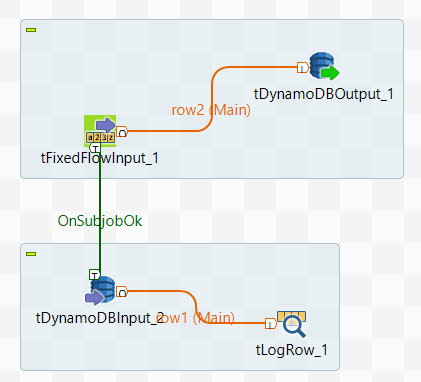
Designing the data flow around the DynamoDB components
tDynamoDBInput and tLogRow on the design space
of your Studio to create the Job.
-
In the
Integration
perspective of the Studio, create an empty Standard Job from the
Job Designs node in the Repository tree view. -
In the workspace, enter the name of the component to be used and select this
component from the list that appears. In this scenario, the components are
tFixedflowInput, tDynamoDBOutput,
tDynamoDBInput and tLogRow.The tFixedFlowInput component is used to load the
sample data into the data flow. In the real-world practice, use the input
component specific to the data format or the source system to be used instead of
tFixedFlowInput. -
Connect tFixedFlowInput to
tDynamoDBOutput and connect
tDynamoDBInput to tLogRow
using the Row > Main link. -
Connect tFixedFlowInput to
tDynamoDBInput using the Trigger > On Subjob Ok link.
Writing the sample JSON documents to DynamoDB
-
Double-click tFixedFlowInput in its
Component view.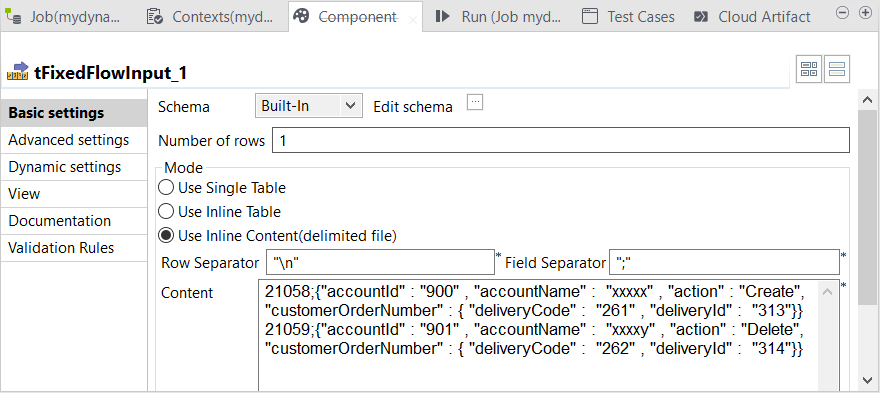
-
Click the … button next to Edit
schema to open the schema editor.
-
Click the + button twice to add two rows, each
representing a column of the sample data, and in the
Column column, name these columns to
DeliveryId and EventPayload,
respectively. -
On the row for the DeliveryId column, select the check
box in the Key column to use this
DeliveryID column as the partition key column of the
DynamoDB table to be used. A DynamoDB table requires a partition key
column. -
Click OK to validate these changes and once prompted,
accept the propagation of the schema to the connected component,
tDynamoDBOutput. -
In the Mode area, select the Use Inline
content radio box and enter the sample data in the field that is
displayed:1221058;{"accountId" : "900" , "accountName" : "xxxxx" , "action" : "Create", "customerOrderNumber" : { "deliveryCode" : "261" , "deliveryId" : "313"}}21059;{"accountId" : "901" , "accountName" : "xxxxy" , "action" : "Delete", "customerOrderNumber" : { "deliveryCode" : "262" , "deliveryId" : "314"}} -
Double-click tDynamoDBOutput to open its
Component view.
-
Click the … button next to Edit schema to open the schema editor. This
component should have retrieved the schema from
tFixedFlowInput.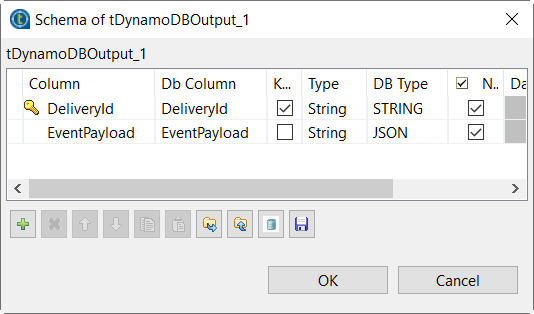
-
In the DB Type column, select
JSON for the EventPayload
column, as this is the column in which the JSON documents are stored. -
In the Access key and Secret key
fields, enter the credentials of the AWS account to be used to access your
DynamoDB database. -
From the Region drop-down list, select the AWS region to
be used. If you do not know which region to select, ask the administrator of
your AWS system for more information. -
From the Action on table drop-down list, select
Drop table is exists and create. -
From the Action on data drop-down list, select
Insert. -
In the Table name field, enter the name to be used for
the DynamoDB table to be created. -
In the Partition Key field, enter the name of the column
to be used to provide parition keys. In this example, it is
DeliveryId.
Extracting a JSON document using advanced filters
read a JSON document from DynamoDB and use tLogRow to output this
document in the console of the Studio.
-
Double-click tDynamoDBInput to open its
Component view.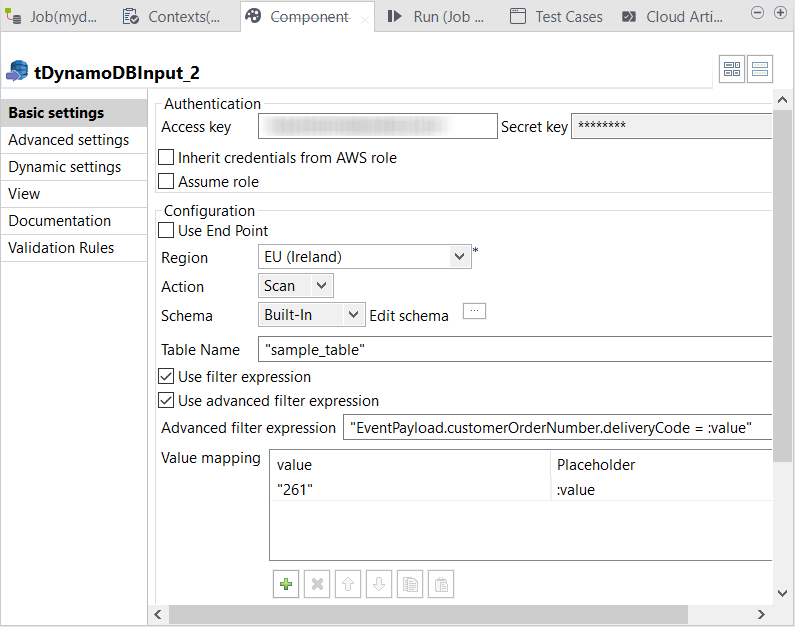
-
Click the … button next to Edit schema to open the schema editor.
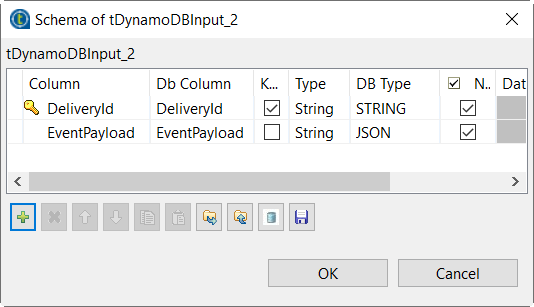
-
Click the + button twice to add two rows, each
representing a column of the sample data, and in the
Column column, name these columns to
DeliveryId and EventPayload,
respectively. -
On the row for the DeliveryId column, select the check
box in the Key column to use this
DeliveryID column as the partition key column of the
DynamoDB table to be used. A DynamoDB table requires a partition key
column. -
In the DB Type column, select JSON for the EventPayload column, as this is the column in which the JSON
documents are stored. -
In the Access key and Secret key fields, enter the credentials of the
AWS account to be used to access your DynamoDB database. -
From the Region drop-down list, select
the same region as you selected in the previous steps for
tDynamoDBOutput. -
From the Action drop-down list, select
Scan. -
In the Table Name field, enter the name of the DynamoDB
table to be created by tDynamoDBOutput. -
Select the Use filter expression check box and then the
Use advanced filter expression check box. -
In the Advanced filter expression field, enter the
filter to be used to select JSON documents.1"EventPayload.customerOrderNumber.deliveryCode = :value"The part on the left of the equals sign reflects the structure within a JSON document of the
sample data, in the EventPayload column. The purpose
is to use the value of deliveryCode element to filter
the document to be read.You need to define the
:valueplaceholder in the
Value mapping table. -
Under the Value mapping table, click the
+ button to add one row and do the following:-
In the value column, enter the value of the JSON
element to be used as a filter.In this example, this element is deliveryCode
and you need to extract the JSON document in which the value of the
deliveryCode element is
261. As this value is a string, enter
261 within double quotation marks.If this value is an integer, do not use any quotation marks.
-
In the Placeholder column, enter the name of the
placeholder to be defined, without any quoation marks. In this example,
it is :value, as you have put in the
Advanced filter expression.A placeholder name must start with a colon (:).
-
In the value column, enter the value of the JSON
-
Double-click tLogRow to open its
Component view and select the
Table radio box to display the extracted data in a
table in the console of the Studio. -
Press Ctrl+S to save the Job and press
F6 to run it.
Run view of the Studio.


tDynamoDBInput properties for Apache Spark Batch
These properties are used to configure tDynamoDBInput running in the Spark Batch Job framework.
The Spark Batch
tDynamoDBInput component belongs to the Databases family.
The component in this framework is available in all subscription-based Talend products with Big Data
and Talend Data Fabric.
Basic settings
|
Use an existing connection |
Select this check box and in the Component List click the relevant connection component to |
|
Access |
Enter the access key ID that uniquely identifies an AWS |
|
Secret |
Enter the secret access key, constituting the security To enter the secret key, click the […] button next to |
|
Region |
Specify the AWS region by selecting a region name from the |
|
Use End Point |
Select this check box and in the Server Url field |
|
Schema and Edit |
A schema is a row description. It defines the number of fields
|
|
|
Click Edit
|
|
Table Name |
Specify the name of the table from which you need to read data. |
Advanced settings
|
Number of scan segments |
Enter, without using quotation marks, the number of segments for the parallel scan. |
|
Number of partitions |
Enter, without using quotation marks, the maximum number of partitions into which you want |
|
Throughput read percent |
Enter, without using quotation marks, the percentage (expressed in decimal) to be used of |
|
Advanced settings |
Add properties to define extra operations you need tDynamoDBInput to perform when reading data. This table is present for future evolution of the component and using it requires the |
Usage
|
Usage rule |
This component is used as a start component and requires an output This component should use a tDynamoDBConfiguration This component, along with the Spark Batch component Palette it belongs to, Note that in this documentation, unless otherwise explicitly stated, a |
|
Spark Connection |
In the Spark
Configuration tab in the Run view, define the connection to a given Spark cluster for the whole Job. In addition, since the Job expects its dependent jar files for execution, you must specify the directory in the file system to which these jar files are transferred so that Spark can access these files:
This connection is effective on a per-Job basis. |
Related scenarios
For a scenario about how to use the same type of component in a Spark Batch Job, see Writing and reading data from MongoDB using a Spark Batch Job.