tExtractDelimitedFields
Generates multiple columns from a delimited string column.
The extracted fields are written in new columns of the output schema. If you need to keep
the original columns in the output of this component, define these columns in the output
schema using the same column names as the original ones.
Depending on the Talend
product you are using, this component can be used in one, some or all of the following
Job frameworks:
-
Standard: see tExtractDelimitedFields Standard properties.
The component in this framework is available in all Talend
products. -
MapReduce: see tExtractDelimitedFields MapReduce properties (deprecated).
The component in this framework is available in all subscription-based Talend products with Big Data
and Talend Data Fabric. -
Spark Batch:
see tExtractDelimitedFields properties for Apache Spark Batch.The component in this framework is available in all subscription-based Talend products with Big Data
and Talend Data Fabric. -
Spark Streaming:
see tExtractDelimitedFields properties for Apache Spark Streaming.This component is available in Talend Real Time Big Data Platform and Talend Data Fabric.
tExtractDelimitedFields Standard properties
These properties are used to configure tExtractDelimitedFields running in the Standard Job framework.
The Standard
tExtractDelimitedFields component belongs to the Processing family.
The component in this framework is available in all Talend
products.
Basic settings
|
Field to split |
Select an incoming field from the Field to |
|
Ignore NULL as the source data |
Select this check box to ignore the Null value in the source data. Clear this check box to generate the Null records that correspond |
|
Field separator |
Enter character, string or regular expression to separate fields for the transferred Note:
Since this component uses regex to split a filed and the regex |
|
Die on error |
Clear the check box to skip any rows on error and complete the process for |
|
Schema and Edit |
A schema is a row description. It defines the number of fields Click Edit
Click Sync |
|
|
Built-In: You create and store the schema locally for this component |
|
|
Repository: You have already created the schema and stored it in the |
Advanced settings
|
Advanced separator (for number) |
Select this check box to change the separator used for numbers. By default, the thousands separator is a comma (,) and the decimal separator is a period (.). |
|
Trim column |
Select this check box to remove leading and trailing whitespace |
|
Check each row structure against schema |
Select this check box to check whether the total number of columns |
|
Validate date |
Select this check box to check the date format strictly against the input schema. |
|
tStatCatcher Statistics |
Select this check box to gather the processing metadata at the Job |
Global Variables
|
Global Variables |
ERROR_MESSAGE: the error message generated by the
NB_LINE: the number of rows read by an input component or A Flow variable functions during the execution of a component while an After variable To fill up a field or expression with a variable, press Ctrl + For further information about variables, see |
Usage
|
Usage rule |
This component handles flow of data therefore it requires input |
Extracting a delimited string column of a database table
This scenario describes a Job that writes data including a delimited string column into a
MySQL database table and displays the data on the console, then extracts the delimited
string column into multiple columns and displays the data after extraction on the
console.
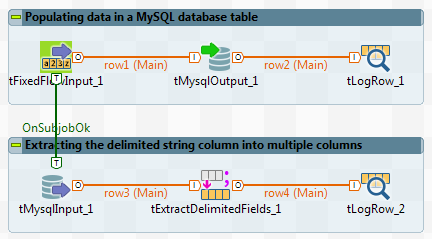
Adding and linking components
-
Create a new Job and add the following components by typing their names in the
design workspace or dropping them from the Palette: a tFixedFlowInput
component, a tMysqlOutput component, a
tMysqlInput component, a tExtractDelimitedFields component, two tLogRow components. -
Link tFixedFlowInput to tMysqlOutput using a Row >
Main connection. -
Do the same to link tMysqlOutput to the first
tLogRow, link tMysqlInput to tExtractDelimitedFields, link tExtractDelimitedFields to the second tLogRow. -
Link tFixedFlowInput to tMysqlInput using a Trigger
> On Subjob Ok connection.
Configuring the components
Populating data in a MySQL database table
-
Double-click tFixedFlowInput to open its
Basic settings view.
-
Click the […] button next to Edit schema and in the pop-up window define the
schema by adding three columns: Id of Integer
type, and Name and DelimitedField of String type. Click OK to close the schema editor and
accept the propagation prompted by the pop-up dialog box. -
In the Mode area, select Use Inline Content(delimited file). Then in the
Content field displayed, enter the data to
write to the database. This input data includes a delimited string column. In
this example, the input data is as follows:123451;Adam;32,Component Team,Developer2;Bill;28,Component Team,Tester3;Chris;30,Doc Team,Writer4;David;35,Doc Team,Leader5;Eddie;33,QA Team,Tester -
Double-click tMysqlOutput to open its
Basic settings view.
-
Fill the Host, Port, Database, Username, Password
fields with the MySQL database connection information. -
Fill the Table field with the name of the
table to be written. In this example, it is employee. -
Select Drop table if exists and create from
the Action on table list. -
Double-click the first tLogRow to open its
Basic settings view. In the Mode area, select Table (print values in cells of a table) for better
readability of the result.
Extracting the delimited string column in the database table into multiple
columns
-
Double-click tMysqlInput to open its
Basic settings view.
-
Fill the Host, Port, Database, Username, Password
fields with the MySQL database connection information. -
Click the […] button next to Edit schema and in the pop-up window define the
schema of the tMysqlInput component same as the
schema of the tMysqlOutput component.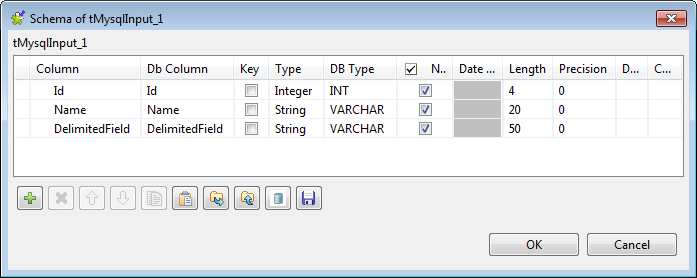
-
In the Table Name field, enter the name of
the table into which the data was written. In this example, it is employee. -
Click the Guess Query button to fill the
Query field with the SQL query statement to
be executed on the specified table. In this example, it is as follows:12345SELECT`employee`.`Id`,`employee`.`Name`,`employee`.`DelimitedField`FROM `employee` -
Double-click tExtractDelimitedFields to open
its Basic settings view.
-
In the Field to split list, select the
delimited string column to be extracted. In this example, it is DelimitedField.In the Field separator, enter the separator
used to separate the fields in the delimited string column. In this example, it
is ,. -
Click the […] button next to Edit schema and in the pop-up window define the
schema by adding five columns: Id of Integer
type, and Name, Age, Team, Title of String type.In this example, the delimited string column DelimitedField is split into three columns Age, Team and
Title, and the Id and Name columns are kept
as well. Click OK to close the schema editor and
accept the propagation prompted by the pop-up dialog box. -
Double-click the second tLogRow to open its
Basic settings view.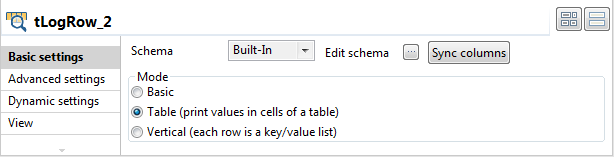 In the Mode area, select Table (print values in cells of a table) for better
readability of the result.
Saving and executing the Job
- Press Ctrl + S to save the Job.
-
Execute the Job by pressing F6 or clicking
Run on the Run tab.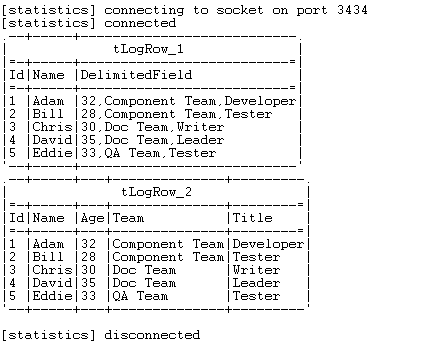 As shown above, the primitive input data and the data after extraction are
displayed on the console, and the delimited string column DelimitedField is extracted into three columns
Age, Team, and Title.
tExtractDelimitedFields MapReduce properties (deprecated)
These properties are used to configure tExtractDelimitedFields running in the MapReduce Job framework.
The MapReduce
tExtractDelimitedFields component belongs to the Processing family.
The component in this framework is available in all subscription-based Talend products with Big Data
and Talend Data Fabric.
The MapReduce framework is deprecated from Talend 7.3 onwards. Use Talend Jobs for Apache Spark to accomplish your integration tasks.
Basic settings
|
Schema and Edit |
A schema is a row description. It defines the number of fields Click Edit
schema to make changes to the schema. Note: If you
make changes, the schema automatically becomes built-in. |
|
Built-In: You create and store the schema locally for this component |
|
|
Repository: You have already created the schema and stored it in the |
|
|
Prev.Comp.Column list |
Select the column you need to extract data from. |
|
Die on error |
Select the check box to stop the execution of the Job when an error |
|
Field separator |
Enter character, string or regular expression to separate fields for the transferred |
|
CSV options |
Select this check box to include CSV specific parameters such as Escape char and Text |
Advanced settings
|
Custom Encoding |
You may encounter encoding issues when you process the stored data. In that Then select the encoding to be used from the list or select Custom and define it manually. |
|
Advanced separator (for number) |
Select this check box to change the separator used for numbers. By default, the thousands separator is a comma (,) and the decimal separator is a period (.). |
|
Trim all columns |
Select this check box to remove the leading and trailing whitespaces from all |
|
Check column to trim |
This table is filled automatically with the schema being used. Select the check |
|
Check each row structure against |
Select this check box to check whether the total number of columns |
|
Check date |
Select this check box to check the date format strictly against the input schema. |
|
Decode String for long, int, short, byte |
Select this check box if any of your numeric types (long, integer, short, or byte type), will |
Global Variables
|
Global Variables |
ERROR_MESSAGE: the error message generated by the A Flow variable functions during the execution of a component while an After variable To fill up a field or expression with a variable, press Ctrl + For further information about variables, see |
Usage
|
Usage rule |
In a Once a Map/Reduce Job is opened in the workspace, tExtractDelimitedFields as well as the Note that in this documentation, unless otherwise |
|
Hadoop Connection |
You need to use the Hadoop Configuration tab in the This connection is effective on a per-Job basis. |
Related scenarios
No scenario is available for the Map/Reduce version of this component yet.
tExtractDelimitedFields properties for Apache Spark Batch
These properties are used to configure tExtractDelimitedFields running in the Spark Batch Job framework.
The Spark Batch
tExtractDelimitedFields component belongs to the Processing family.
The component in this framework is available in all subscription-based Talend products with Big Data
and Talend Data Fabric.
Basic settings
|
Schema and Edit |
A schema is a row description. It defines the number of fields Click Edit
schema to make changes to the schema. Note: If you
make changes, the schema automatically becomes built-in. |
|
Built-In: You create and store the schema locally for this component |
|
|
Repository: You have already created the schema and stored it in the |
|
|
Prev.Comp.Column list |
Select the column you need to extract data from. |
|
Die on error |
Select the check box to stop the execution of the Job when an error |
|
Field separator |
Enter character, string or regular expression to separate fields for the transferred |
|
CSV options |
Select this check box to include CSV specific parameters such as Escape char and Text |
Advanced settings
|
Custom Encoding |
You may encounter encoding issues when you process the stored data. In that Then select the encoding to be used from the list or select Custom and define it manually. |
|
Advanced separator (for number) |
Select this check box to change the separator used for numbers. By default, the thousands separator is a comma (,) and the decimal separator is a period (.). |
|
Trim all columns |
Select this check box to remove the leading and trailing whitespaces from all |
|
Check column to trim |
This table is filled automatically with the schema being used. Select the check |
|
Check each row structure against |
Select this check box to check whether the total number of columns |
|
Check date |
Select this check box to check the date format strictly against the input schema. |
|
Decode String for long, int, short, byte |
Select this check box if any of your numeric types (long, integer, short, or byte type), will |
Usage
|
Usage rule |
This component is used as an intermediate step. This component, along with the Spark Batch component Palette it belongs to, Note that in this documentation, unless otherwise explicitly stated, a |
|
Spark Connection |
In the Spark
Configuration tab in the Run view, define the connection to a given Spark cluster for the whole Job. In addition, since the Job expects its dependent jar files for execution, you must specify the directory in the file system to which these jar files are transferred so that Spark can access these files:
This connection is effective on a per-Job basis. |
Related scenarios
For a related scenario, see Performing download analysis using a Spark Batch Job.
tExtractDelimitedFields properties for Apache Spark Streaming
These properties are used to configure tExtractDelimitedFields running in the Spark Streaming Job framework.
The Spark Streaming
tExtractDelimitedFields component belongs to the Processing family.
This component is available in Talend Real Time Big Data Platform and Talend Data Fabric.
Basic settings
|
Schema and Edit |
A schema is a row description. It defines the number of fields Click Edit
schema to make changes to the schema. Note: If you
make changes, the schema automatically becomes built-in. |
|
Built-In: You create and store the schema locally for this component |
|
|
Repository: You have already created the schema and stored it in the |
|
|
Prev.Comp.Column list |
Select the column you need to extract data from. |
|
Die on error |
Select the check box to stop the execution of the Job when an error |
|
Field separator |
Enter character, string or regular expression to separate fields for the transferred |
|
CSV options |
Select this check box to include CSV specific parameters such as Escape char and Text |
Advanced settings
|
Custom Encoding |
You may encounter encoding issues when you process the stored data. In that Then select the encoding to be used from the list or select Custom and define it manually. |
|
Advanced separator (for number) |
Select this check box to change the separator used for numbers. By default, the thousands separator is a comma (,) and the decimal separator is a period (.). |
|
Trim all columns |
Select this check box to remove the leading and trailing whitespaces from all |
|
Check column to trim |
This table is filled automatically with the schema being used. Select the check |
|
Check each row structure against |
Select this check box to check whether the total number of columns |
|
Check date |
Select this check box to check the date format strictly against the input schema. |
|
Decode String for long, int, short, byte |
Select this check box if any of your numeric types (long, integer, short, or byte type), will |
Usage
|
Usage rule |
This component is used as an intermediate step. This component, along with the Spark Streaming component Palette it belongs to, appears Note that in this documentation, unless otherwise explicitly stated, a scenario presents |
|
Spark Connection |
In the Spark
Configuration tab in the Run view, define the connection to a given Spark cluster for the whole Job. In addition, since the Job expects its dependent jar files for execution, you must specify the directory in the file system to which these jar files are transferred so that Spark can access these files:
This connection is effective on a per-Job basis. |
Related scenarios
No scenario is available for the Spark Streaming version of this component
yet.