tFileInputPositional
pattern and then sends the fields as defined in the schema to the next
component.
Depending on the Talend
product you are using, this component can be used in one, some or all of the following
Job frameworks:
-
Standard: see tFileInputPositional Standard properties.
The component in this framework is available in all Talend
products. -
MapReduce: see tFileInputPositional MapReduce properties (deprecated).
The component in this framework is available in all subscription-based Talend products with Big Data
and Talend Data Fabric. -
Spark Batch: see tFileInputPositional properties for Apache Spark Batch.
The component in this framework is available in all subscription-based Talend products with Big Data
and Talend Data Fabric. -
Spark Streaming: see tFileInputPositional properties for Apache Spark Streaming.
This component is available in Talend Real Time Big Data Platform and Talend Data Fabric.
tFileInputPositional Standard properties
These properties are used to configure tFileInputPositional
running in the Standard Job framework.
The Standard
tFileInputPositional component belongs to the File family.
The component in this framework is available in all Talend
products.
Basic settings
|
Property type |
Either Built-In or Repository. |
|
|
Built-In: No property data stored centrally. |
|
|
Repository: Select the repository file where the |
| Use existing dynamic |
Select this check box to reuse an existing dynamic schema to When this check box is selected, a Component list appears allowing you to select the component |
|
File name/Stream |
File name: Name and path of the file to Warning: Use absolute path (instead of relative path) for
this field to avoid possible errors.
Stream: The data flow to be processed. This variable could be already pre-defined in your Studio or In order to avoid the inconvenience of hand writing, you could Related topic to the available variables: see Related scenario to the input stream, see Reading data from a remote file in streaming mode. |
|
Row separator |
The separator used to identify the end of a row. |
|
Use byte length as the cardinality |
Select this check box to enable the support of double-byte |
|
Customize |
Select this check box to customize the data format of the
Column: Select the column you want to Size: Enter the column size.
Padding char: Enter, between double
Alignment: Select the appropriate |
|
Pattern |
Length values separated by commas, interpreted as a string |
| Pattern Units |
The unit of the length values specified in the Pattern
|
|
Skip empty rows |
Select this check box to skip the empty rows. |
|
Uncompress as zip file |
Select this check box to uncompress the input file. |
|
Die on error |
Select the check box to stop the execution of the Job when an error Clear the check box to skip any rows on error and complete the process for |
|
Header |
Enter the number of rows to be skipped in the beginning of file. |
|
Footer |
Number of rows to be skipped at the end of the file. |
|
Limit |
Maximum number of rows to be processed. If Limit = 0, no row is |
|
Schema and Edit Schema |
A schema is a row description. It defines the number of fields Click Edit
This This This component must work with tSetDynamicSchema to leverage the dynamic schema feature. |
|
|
Built-in: The schema will be created and |
|
|
Repository: The schema already exists |
Advanced settings
|
Needed to process rows longer than 100 000 |
Select this check box if the rows to be processed in the input |
|
Advanced separator (for numbers) |
Select this check box to change the separator used for numbers. By default, the thousands separator is a comma (,) and the decimal separator is a period (.).
Thousands separator: define separators
Decimal separator: define separators for |
|
Trim all column |
Select this check box to remove leading and trailing |
|
Validate date |
Select this check box to check the date format strictly against the input schema. |
|
Encoding |
Select the encoding from the list or select Custom |
|
tStatCatcher Statistics |
Select this check box to gather the Job processing metadata at |
Global Variables
|
Global Variables |
NB_LINE: the number of rows processed. This is an After
ERROR_MESSAGE: the error message generated by the A Flow variable functions during the execution of a component while an After variable To fill up a field or expression with a variable, press Ctrl + For further information about variables, see |
Usage
|
Usage rule |
Use this component to read a file and separate fields using a |
Reading a Positional file and saving filtered results to XML
an input file that contains contract numbers, customer references, and insurance numbers
as shown below, and outputting the selected data (according to the data position) into
an XML
file.
|
1 2 3 4 5 |
Contract CustomerRef InsuranceNr 00001 8200 50330 00001 8201 50331 00002 8202 50332 00002 8203 50333 |
Dropping and linking components

-
Drop a tFileInputPositional component
from the Palette to the design workspace.
-
Drop a tFileOutputXML component as well.
This file is meant to receive the references in a structured way. -
Right-click the tFileInputPositional
component and select Row
>
Main. Then drag it onto the
tFileOutputXML component and release
when the plug symbol shows up.
Configuring data input
-
Double-click the tFileInputPositional
component to show its Basic settings view
and define its properties.
-
Define the Job Property type if needed. For this scenario, we use the
built-in Property type.As opposed to the Repository, this means that the Property type is set for
this station only. -
Fill in a path to the input file in the File
Name field. This field is mandatory. -
Define the Row separator identifying the
end of a row if needed, by default, a carriage return. -
If required, select the Use byte length as the
cardinality check box to enable the support of double-byte
character. -
Define the Pattern to delimit fields in a
row. The pattern is a series of length values corresponding to the values of
your input files. The values should be entered between quotes, and separated
by a comma. Make sure the values you enter match the schema defined. -
Fill in the Header, Footer and Limit fields
according to your input file structure and your need. In this scenario, we
only need to skip the first row when reading the input file. To do this,
fill the Header field with 1 and leave the other fields as they are.
-
Next to Schema, select Repository if the input schema is stored in the
Repository. In this use case, we use a Built-In input schema to define the data to pass on to the
tFileOutputXML component. -
You can load and/or edit the schema via the Edit
Schema function. For this schema, define three columns,
respectively Contract, CustomerRef
and InsuranceNr matching the structure of the input
file. Then, click OK to close the Schema dialog box and propagate the
changes.
Configuring data output
-
Double-click tFileOutputXML to show its
Basic settings view.
- Enter the XML output file path.
-
Define the row tag that will wrap each row of data, in this use case
ContractRef. -
Click the three-dot button next to Edit
schema to view the data structure, and click Sync columns to retrieve the data structure from
the input component if needed. -
Switch to the Advanced settings tab view
to define other settings for the XML output.
-
Click the plus button to add a line in the Root
tags table, and enter a root tag (or more) to wrap the XML
output structure, in this case ContractsList. -
Define parameters in the Output format
table if needed. For example, select the As
attribute check box for a column if you want to use its name
and value as an attribute for the parent XML element, clear the Use schema column name check box for a column to
reuse the column label from the input schema as the tag label. In this use
case, we keep all the default output format settings as they are. -
To group output rows according to the contract number, select the
Use dynamic grouping check box, add a
line in the Group by table, select
Contract from the Column list field, and enter an attribute for it in the
Attribute label field.
- Leave all the other parameters as they are.
Saving and executing the Job
-
Press Ctrl+S to save your Job to ensure
that all the configured parameters take effect. -
Press F6 or click Run on the Run tab to
execute the Job.The file is read row by row based on the length values defined in the
Pattern field and output as an XML file
as defined in the output settings. You can open it using any standard XML
editor.
Handling a positional file based on a dynamic schema
This scenario applies only to subscription-based Talend products.
This scenario describes a four-component Job that reads data from a positional
file, writes the data to another positional file, and replaces the padding characters with
space. The schema column details are not defined in the positional file components; instead,
they leverages a reusable dynamic schema. The input file used in this scenario is as
follows:
|
1 2 3 4 5 |
id----name--------city-------- 1-----Andrews-----Paris------- 2-----Mark--------London------ 3-----Marie-------Paris------- 4-----Michael-----Washington-- |
Dropping and linking components
- Drop the following components from the Palette onto the design workspace: tFixedFlowInput, tSetDynamicSchema, tFileInputPositional, and tFileOutputPositional.
-
Connect the tFixedFlowInput component to
the tSetDynamicSchema using a Row > Main
connection to form a subJob. This subJob will define a reusable dynamic
schema. -
Connect the tFileInputPositional
component to the tFileOutputPositional
component using a Row > Main connection to form another subJob. This
subJob will read data from the input positional file and write the data to
another positional file based on the dynamic schema set in the previous
subJob. -
Connect the tFixedFlowInput component to
the tFileInputPositional component using a
Trigger > On
Subjob Ok connection to link the two subJobs together.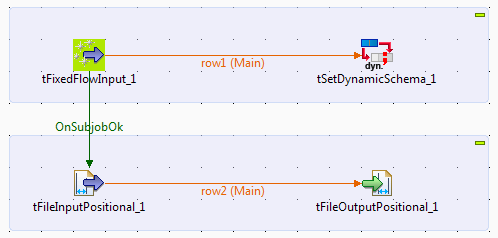
Configuring the first subJob: creating a dynamic schema
-
Double-click the tFixedFlowInput component to show its Basic settings view and define its
properties.
-
Click the […] button
next to Edit schema to open the Schema dialog box.
-
Click the [+] button to
add three columns: ColumnName, ColumnType, and ColumnLength, and set their
types to String, String, and Integer respectively to define the minimum properties required
for a positional file schema. Then, click OK to close the dialog box. -
Select the Use Inline
Table option, click the [+] button three times to add three lines, give them a name in
the ColumnName field, according to the
actual columns of the input file to read: ID, Name, and City, set their types
in the corresponding ColumnType field: id_Interger for column ID, and id_String for columns Name and City, and set the length values of the columns in the
corresponding ColumnLength field. Note
that the column names you give in this table will compose the header of the
output file. -
Double-click the tSetDynamicSchema component to open its Basic settings view.

-
Click Sync columns to
ensure that the schema structure is properly retrieved from the preceding
component. -
Under the Parameters
table, click the [+] button to add three
lines in the table. -
Click in the Property
field for each line, and select ColumnName, Type, and
Length respectively. -
Click in the Value field
for each line, and select ColumnName,
ColumnType, and ColumnLength respectively.Now, with the values set in the inline table of the tFixedFlowInput component retrieved, the
following data structure is defined in the dynamic schema:Column Name Type Length ID Integer 6 Name String 12 City String 12
Configuring the second subJob: reading and writing positional data
-
Double-click the tFileInputPositional
component to open its Basic settings
view. Warning:
The dynamic schema feature is only supported in Built-In mode and requires the input file
to have a header row. -
Select the Use existing dynamic check
box, and in from the Component List that
appears, select the tSetDynamicSchema
component you use to create the dynamic schema. In this use case, only one
tSetDynamicSchema component is used, so
it is automatically selected. -
In the File name/Stream field, enter the
path to the input positional file, or browse to the file path by clicking
the […] button. -
Fill in the Header, Footer and Limit fields
according to your input file structure and your need. In this scenario, we
only need to skip the first row when reading the input file. To do this,
fill the Header field with 1 and leave the other fields as they are.
-
Click the […] button next to Edit schema to open the Schema dialog box, define only one column, dyn in this example, and select Dynamic from the Type list. Then, click OK
to close the Schema dialog box and
propagate the changes.
-
Select the Customize check box, enter
'-'in the Padding char
field, and keep the other settings as they are. -
Double-click the tFileOutputPositional
component to open its Basic settings
view.
-
Select the Use existing dynamic check
box, specify the output file path, and select the Include header check box. -
In the Padding char field, enter
'so that the padding characters will be replaced with space in
'
the output file.
Saving and executing the Job
-
Press Ctrl+S to save your Job to ensure
that all the configured parameters take effect. -
Press F6 or click Run on the Run tab to
execute the Job. The data is read from the input positional file and written into the
output positional file, with the padding characters replaced by
space.
tFileInputPositional MapReduce properties (deprecated)
These properties are used to configure tFileInputPositional running in the MapReduce Job framework.
The MapReduce
tFileInputPositional component belongs to the MapReduce family.
The component in this framework is available in all subscription-based Talend products with Big Data
and Talend Data Fabric.
The MapReduce framework is deprecated from Talend 7.3 onwards. Use Talend Jobs for Apache Spark to accomplish your integration tasks.
Basic settings
|
Property type |
Either Built-In or Repository. |
|
Built-In: No property data stored centrally. |
|
|
Repository: Select the repository file where the The properties are stored centrally under the Hadoop The fields that come after are pre-filled in using the fetched For further information about the Hadoop |
|
|
Schema and Edit |
A schema is a row description. It defines the number of fields Click Edit
schema to make changes to the schema. Note: If you
make changes, the schema automatically becomes built-in. |
|
Built-In: You create and store the schema locally for this component |
|
|
Repository: You have already created the schema and stored it in the |
|
|
Folder/File |
Browse to, or enter the path pointing to the data to be used in the file system. If the path you set points to a folder, this component will read all of the files stored in that folder, for example,/user/talend/in; if sub-folders exist, the sub-folders are automatically ignored unless you define the property mapreduce.input.fileinputformat.input.dir.recursive to be If you want to specify more than one files or directories in this If the file to be read is a compressed one, enter the file name
Note that you need |
|
Die on error |
Select the check box to stop the execution of the Job when an error Clear the check box to skip any rows on error and complete the process for |
|
Row separator |
The separator used to identify the end of a row. |
|
Customize |
Select this check box to customize the data format of the
Column: Select the column you
Size: Enter the column
Padding char: Enter, between double quotation marks,
Alignment: Select the appropriate |
|
Pattern |
Enter between double quotes the length values separated by commas, interpreted as a |
|
Header |
Enter the number of rows to be skipped in the beginning of file. For example, enter 0 to ignore |
|
Skip empty rows |
Select this check box to skip the empty rows. |
Advanced settings
|
Custom Encoding |
You may encounter encoding issues when you process the stored data. In that Then select the encoding to be used from the list or select |
|
Advanced separator (for number) |
Select this check box to change the separator used for numbers. By default, the thousands separator is a comma (,) and the decimal separator is a period (.). |
|
Trim columns |
Select this check box to remove the leading and trailing whitespaces from all |
Global Variables
|
Global Variables |
ERROR_MESSAGE: the error message generated by the A Flow variable functions during the execution of a component while an After variable To fill up a field or expression with a variable, press Ctrl + For further information about variables, see |
Usage
|
Usage rule |
In a Once a Map/Reduce Job is opened in the workspace, tFileInputDelimited as well as the Note that in this documentation, unless otherwise |
|
Hadoop Connection |
You need to use the Hadoop Configuration tab in the This connection is effective on a per-Job basis. |
Related scenarios
No scenario is available for the Map/Reduce version of this component yet.
tFileInputPositional properties for Apache Spark Batch
These properties are used to configure tFileInputPositional running in the Spark Batch Job framework.
The Spark Batch
tFileInputPositional component belongs to the File family.
The component in this framework is available in all subscription-based Talend products with Big Data
and Talend Data Fabric.
Basic settings
|
Define a storage configuration |
Select the configuration component to be used to provide the configuration If you leave this check box clear, the target file system is the local The configuration component to be used must be present in the same Job. |
|
Property type |
Either Built-In or Repository. |
|
Built-In: No property data stored centrally. |
|
|
Repository: Select the repository file where the The properties are stored centrally under the Hadoop The fields that come after are pre-filled in using the fetched For further information about the Hadoop |
|
|
Schema and Edit |
A schema is a row description. It defines the number of fields Click Edit
schema to make changes to the schema. Note: If you
make changes, the schema automatically becomes built-in. |
|
Built-In: You create and store the schema locally for this component |
|
|
Repository: You have already created the schema and stored it in the |
|
|
Folder/File |
Browse to, or enter the path pointing to the data to be used in the file system. If the path you set points to a folder, this component will
read all of the files stored in that folder, for example, /user/talend/in; if sub-folders exist, the sub-folders are automatically ignored unless you define the property spark.hadoop.mapreduce.input.fileinputformat.input.dir.recursive to be true in the Advanced properties table in theSpark configuration tab.
If you want to specify more than one files or directories in this If the file to be read is a compressed one, enter the file name
The button for browsing does not work with the Spark tHDFSConfiguration |
|
Die on error |
Select the check box to stop the execution of the Job when an error |
|
Row separator |
The separator used to identify the end of a row. |
|
Customize |
Select this check box to customize the data format of the
Column: Select the column you
Size: Enter the column
Padding char: Enter, between double quotation marks,
Alignment: Select the appropriate |
|
Pattern |
Enter between double quotes the length values separated by commas, interpreted as a |
|
Header |
Enter the number of rows to be skipped in the beginning of file. For example, enter 0 to ignore |
|
Skip empty rows |
Select this check box to skip the empty rows. |
Advanced settings
|
Set minimum partitions |
Select this check box to control the number of partitions to be created from the input In the displayed field, enter, without quotation marks, the minimum number of partitions When you want to control the partition number, you can generally set at least as many partitions as |
|
Custom Encoding |
You may encounter encoding issues when you process the stored data. In that Select the encoding from the list or select Custom and define it manually. |
|
Advanced separator (for number) |
Select this check box to change the separator used for numbers. By default, the thousands separator is a comma (,) and the decimal separator is a period (.). |
|
Trim columns |
Select this check box to remove the leading and trailing whitespaces from all |
Usage
|
Usage rule |
This component is used as a start component and requires an output This component, along with the Spark Batch component Palette it belongs to, Note that in this documentation, unless otherwise explicitly stated, a |
|
Spark Connection |
In the Spark
Configuration tab in the Run view, define the connection to a given Spark cluster for the whole Job. In addition, since the Job expects its dependent jar files for execution, you must specify the directory in the file system to which these jar files are transferred so that Spark can access these files:
This connection is effective on a per-Job basis. |
Related scenarios
No scenario is available for the Spark Batch version of this component
yet.
tFileInputPositional properties for Apache Spark Streaming
These properties are used to configure tFileInputPositional running in the Spark Streaming Job framework.
The Spark Streaming
tFileInputPositional component belongs to the File family.
This component is available in Talend Real Time Big Data Platform and Talend Data Fabric.
Basic settings
|
Define a storage configuration |
Select the configuration component to be used to provide the configuration If you leave this check box clear, the target file system is the local The configuration component to be used must be present in the same Job. |
|
Property type |
Either Built-In or Repository. |
|
Built-In: No property data stored centrally. |
|
|
Repository: Select the repository file where the The properties are stored centrally under the Hadoop The fields that come after are pre-filled in using the fetched For further information about the Hadoop |
|
|
Schema and Edit |
A schema is a row description. It defines the number of fields Click Edit
schema to make changes to the schema. Note: If you
make changes, the schema automatically becomes built-in. |
|
Built-In: You create and store the schema locally for this component |
|
|
Repository: You have already created the schema and stored it in the |
|
|
Folder/File |
Browse to, or enter the path pointing to the data to be used in the file system. If the path you set points to a folder, this component will
read all of the files stored in that folder, for example, /user/talend/in; if sub-folders exist, the sub-folders are automatically ignored unless you define the property spark.hadoop.mapreduce.input.fileinputformat.input.dir.recursive to be true in the Advanced properties table in theSpark configuration tab.
If you want to specify more than one files or directories in this If the file to be read is a compressed one, enter the file name
The button for browsing does not work with the Spark tHDFSConfiguration |
|
Die on error |
Select the check box to stop the execution of the Job when an error |
|
Row separator |
The separator used to identify the end of a row. |
|
Customize |
Select this check box to customize the data format of the
Column: Select the column you
Size: Enter the column
Padding char: Enter, between double quotation marks,
Alignment: Select the appropriate |
|
Pattern |
Enter between double quotes the length values separated by commas, interpreted as a |
|
Header |
Enter the number of rows to be skipped in the beginning of file. For example, enter 0 to ignore |
|
Skip empty rows |
Select this check box to skip the empty rows. |
Advanced settings
|
Set minimum partitions |
Select this check box to control the number of partitions to be created from the input In the displayed field, enter, without quotation marks, the minimum number of partitions When you want to control the partition number, you can generally set at least as many partitions as |
|
Custom Encoding |
You may encounter encoding issues when you process the stored data. In that Select the encoding from the list or select Custom and define it manually. |
|
Advanced separator (for number) |
Select this check box to change the separator used for numbers. By default, the thousands separator is a comma (,) and the decimal separator is a period (.). |
|
Trim columns |
Select this check box to remove the leading and trailing whitespaces from all |
Usage
|
Usage rule |
This component is used as a start component and requires an output link. This component is only used to provide the lookup flow (the right side of a join This component, along with the Spark Streaming component Palette it belongs to, appears Note that in this documentation, unless otherwise explicitly stated, a scenario presents |
|
Spark Connection |
In the Spark
Configuration tab in the Run view, define the connection to a given Spark cluster for the whole Job. In addition, since the Job expects its dependent jar files for execution, you must specify the directory in the file system to which these jar files are transferred so that Spark can access these files:
This connection is effective on a per-Job basis. |
Related scenarios
No scenario is available for the Spark Streaming version of this component
yet.