tFTPRename
tFTPRename Standard properties
These properties are used to configure tFTPRename running in the Standard Job framework.
The Standard
tFTPRename component belongs to the Internet family.
The component in this framework is available in all Talend
products.
Basic settings
|
Property Type |
Select the way the connection details
|
|
Use an existing connection |
Select this check box and in the Component List click the relevant connection component to |
|
Host |
The IP address or hostname of the FTP server. |
|
Port |
The listening port number of the FTP server. |
|
Username and Password |
The user authentication data to access the FTP server. To enter the password, click the […] button next to the |
|
Remote directory |
The path to the FTP directory where the files to be renamed are |
|
Move to the current directory |
Select this check box to change the directory to the one specified in the This property is available only when the Use an existing |
|
Overwrite file |
Select the action to be performed when the file already
|
|
SFTP Support |
Select this check box to connect to the FTP server via an SFTP connection. Warning: This option does not work with an HTTP/HTTPS proxy. If you need a
proxy, set a SOCKS proxy in the Advanced settings tab. |
|
Authentication method |
Select the SFTP authentication method, either Public key or
This property is available only when the |
|
Filename encoding |
Select this check box to set the encoding used to convert file names from Strings to This property is available only when the |
|
FTPS Support |
Select this check box to connect to the FTP server via an FTPS If you are using an HTTP proxy, via a tSetProxy component for example, |
|
Keystore File |
The path to your keystore file, a password protected file containing several keys and This property is available only when the |
|
Keystore Password |
The password for your keystore file. This property is available only when the |
|
Security Mode |
Select the security mode from the list, either Implicit or This property is available only when the |
|
Files |
Specify the files to be renamed and their new names.
|
|
Connection mode |
Select the connection mode from the list, either Passive or |
|
Encoding |
Specify the encoding type by selecting an encoding type from the list or selecting |
|
Die on error |
Select the check box to stop the execution of the Job when an error occurs. Clear the check box to skip any error and continue the Job execution process. |
Advanced settings
|
Use Socks Proxy |
Select this check box if you are using a proxy, and in the Proxy |
|
Ignore Failure At Quit (FTP) |
Select this check box to ignore library closing errors or FTP closing errors. |
|
Data Channel Protection Level |
The data channel protection level with which data is transferred between the client and This property is available only |
|
Protection Buffer Size |
The maximum size (in bytes) of the encoded data blocks to be transferred between the This property is available only |
|
Connection timeout |
Specify the timeout value (in ms) for the connection. A value of 0 or any negative values will be ignored. In this case, the default value (that is, 60000ms) will be used. |
|
tStatCatcher Statistics |
Select this check box to gather the Job processing metadata at the Job level |
Global Variables
|
ERROR_MESSAGE |
The error message generated by the component when an error occurs. This is an After |
|
NB_FILE |
The number of the files processed. This is an After variable and it returns an integer. |
|
CURRENT_STATUS |
The execution result of the component. This is a Flow variable and it returns a |
Usage
|
Usage rule |
This component is generally used as a subJob with one |
Renaming a file located on an FTP server
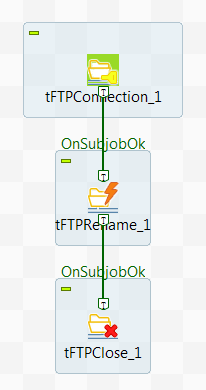
Creating a Job for renaming a file on an FTP server
Create a Job to connect to an FTP server, then rename a file on the
server, finally close the connection to the server.
scenario, an FTP server must be started and a file must be put onto the server. In this
example, the file movies.json has been put into the folder movies under the root directory of the FTP server.
-
Create a new Job and add a tFTPConnection component, a tFTPRename component, and a tFTPClose component by typing their names in the design workspace or
dropping them from the Palette. -
Link the tFTPConnection component to
the tFTPRename component using a Trigger > OnSubjobOk
connection. -
Link the tFTPRename component to the
tFTPClose component using a Trigger > OnSubjobOk
connection.
Opening a connection to the FTP server
component to open a connection to the FTP server.
-
Double-click the tFTPConnection component to open its Basic
settings view. -
In the Host and Port fields, enter the FTP server IP address and the listening port
number respectively. - In the Username and Password fields, enter the authentication details.
Renaming the file on the FTP server
component to rename the file on the FTP server.
-
Double-click the tFTPRename component
to open its Basic settings view.
-
Specify the connection details required to access the FTP server. In
this example, select the Use an existing connection
check box and from the Component list drop-down
list displayed, select the connection component to reuse its connection details you
have already defined. -
In the Remote directory field, enter
the directory on the FTP server where the file to be renamed exists. In this
example, it is /movies. -
Clear the Move to the current
directory check box. -
In the Files table, click the
[+] button to add a line, and then enter the
existing file name in the Filemask column field and
the new file name in the New name column field. In
this example, they are movies.json and action_movies.json respectively.
Closing the connection to the FTP server
component to close the connection to the FTP server.
-
Double-click the tFTPClose component
to open its Basic settings view.
-
From the Component list drop-down
list, select the tFTPConnection component that
opens the connection you need to close. In this example, only one tFTPConnection component is used and it is selected by
default.
Executing the Job to rename the file on the FTP server
the Job for renaming the file on the FTP server, you can then execute the Job and verify
the Job execution result.
-
Press Ctrl + S to save the Job and
then F6 to execute the Job. -
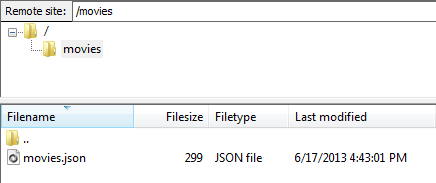
Connect to the FTP server to verify the result.
 As shown above, the file on the FTP server has been renamed from movies.json to action_movies.json.