tGSPut
them with Google Cloud Storage.
tGSPut Standard properties
These properties are used to configure tGSPut running in the Standard Job framework.
The Standard
tGSPut component belongs to the Big Data and the Cloud families.
The component in this framework is available in all Talend
products.
Basic settings
|
Use an existing |
Select this check box and in the Component |
|
Access Key and Secret Key |
Type in the authentication information obtained from Google for These keys can be consulted on the Interoperable Access tab view To enter the secret key, click the […] button next to For more information about the access key and secret key, go to The Access Key and |
|
Bucket name |
Type in the name of the bucket into which you want to upload |
|
Local directory |
Type in the full path of or browse to the local directory where |
|
Google Storage directory |
Type in the Google Storage directory to which you want to upload |
|
Use files list |
Select this check box and complete the Files table.
|
|
Die on error |
This check box is cleared by default, meaning to skip the row on |
Advanced settings
|
tStatCatcher Statistics |
Select this check box to gather the Job processing metadata at the |
Global Variables
|
Global Variables |
NB_LINE: the number of rows read by an input component or
ERROR_MESSAGE: the error message generated by the A Flow variable functions during the execution of a component while an After variable To fill up a field or expression with a variable, press Ctrl + For further information about variables, see |
Usage
|
Usage rule |
This component can be used together with other components, |
Managing files with Google Cloud Storage
The scenario describes a Job which uploads files from the local directory to a
bucket in Google Cloud Storage, then performs copy, move and delete operations on those
files, and finally lists and displays the files in relevant buckets on the console.

Prerequisites: You have purchased a Google Cloud
Storage account and created three buckets under the same Google Storage directory. In this
example, the buckets created are bighouse, bed_room, and study_room.

Dropping and linking the components
To design the Job, proceed as follows:
- Drop the following components from the Palatte to design the workspace: one tGSConnection component, one tGSPut component, two tGSCopy components, one tGSDelete component, one tGSList component, one tIterateToFlow component, one tLogRow component and one tGSClose component.
-
Connect tGSConnection to tGSPut using a Trigger > On
Subjob Ok link. -
Connect tGSPut to the first tGSCopy using a Trigger >
On Subjob Ok link. -
Do the same to connect the first tGSCopy
to the second tGSCopy, connect the second
tGSCopy to tGSDelete, connect tGSDelete to tGSList, and
connect tGSList to tGSClose. -
Connect tGSList to tIterateToFlow using a Row >
Iterate link. -
Connect tIterateToFlow to tLogRow using a Row >
Main link.
Configuring the components
Opening a connection to Google Cloud Storage
-
Double-click the tGSConnection component
to open its Basic settings view in the
Component tab.
-
Navigate to the Google APIs Console in your web browser to access the
Google project hosting the Cloud Storage services you need to use. -
Click Google Cloud Storage > Interoperable Access to open its view, and
copy the access key and secret key. -
In the Component view of the Studio,
paste the access key and secret key to the corresponding fields
respectively.
Uploading files to Google Cloud Storage
-
Double-click the tGSPut component to open
its Basic settings view in the Component tab.
-
Select the Use an existing connection
check box and then select the connection you have configured earlier. -
In the Bucket name field, enter the name
of the bucket into which you want to upload files. In this example,
bighouse. -
In the Local directory field, browse to
the directory from which the files will be uploaded, D:/Input/House in this example.The files under this directory are shown below:
- Leave other settings as they are.
Copying all files from one bucket to another bucket
-
Double-click the first tGSCopy component
to open its Basic settings view in the
Component tab.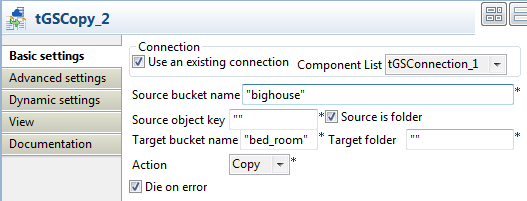
-
Select the Use an existing connection
check box and then select the connection you have configured earlier. -
In the Source bucket name field, enter
the name of the bucket from which you want to copy files, bighouse in this example. -
Select the Source is a folder check box.
All files from the bucket bighouse will
be copied. -
In the Target bucket name field, enter
the name of the bucket into which you want to copy files, bed_room in this example. - Select Copy from the Action list.
Moving a file from one bucket to another bucket and renaming it
-
Double-click the second tGSCopy component
to open its Basic settings view in the
Component tab.
-
Select the Use an existing connection
check box and then select the connection you have configured earlier. -
In the Source bucket name field, enter
the name of the bucket from which you want to move files, bighouse in this example. -
In the Source object key field, enter the
key of the object to be moved, computer_01.txt in this example. -
In the Target bucket name field, enter
the name of the bucket into which you want to move files, study_room in this example. -
Select Move from the Action list. The specified source file computer_01.txt will be moved from the bucket
bighouse to study_room. -
Select the Rename check box. In the
New name field, enter a new name for
the moved file. In this example, the new name is laptop.txt. - Leave other settings as they are.
Deleting a file in one bucket
-
Double-click the tGSDelete component to
open its Basic settings view in the
Component tab.
-
Select the Use an existing connection
check box and then select the connection you have configured earlier. -
Select the Delete object from bucket list
check box. Fill in the Bucket table with
the file information that you want to delete.In this example, the file computer_03.csv will be deleted from the bucket bed_room whose files are copied from the bucket
bighouse.
Listing all files in the three buckets
-
Double-click the tGSList component to
open its Basic settings view in the
Component tab.
-
Select the Use an existing connection
check box and then select the connection you have configured earlier. -
Select the List objects in bucket list
check box. In the Bucket table, enter the
name of the three buckets in the Bucket
name column, bighouse,
study_room, and bed_room. -
Double-click the tIterateToFlow component
to open its Basic settings view in the
Component tab.
-
Click Edit schema to define the data to
pass on to tLogRow.In this example, add two columns bucketName and key, and
set their types to Object.
-
The Mapping table will be populated with
the defined columns automatically.In the Value column, enter globalMap.get(“tGSList_2_CURRENT_BUCKET”) for
the bucketName column and globalMap.get(“tGSList_2_CURRENT_KEY”) for the
key column. You can also press
Ctrl + Space and then choose the
appopriate variable. -
Double-click the tLogRow component to
open its Basic settings view in the
Component tab. -
Select Table (print values in cells of a
table) for a better view of the results.
Closing the connection to Google Cloud Storage
-
Double-click the tGSClose component to
open its Basic settings view in the
Component tab. - Select the connection you want to close from the Component List.
Saving and executing the Job
- Press Ctrl+S to save your Job.
-
Execute the Job by pressing F6 or
clicking Run on the Run tab. The files in the three buckets are displayed. As expected, at first, the
files from the bucket bighouse are copied
to the bucket bed_room, then the file
computer_01.txt from the bucket
bighouse is moved to the bucket
study_room and renamed to be
laptop.txt, finally the file
computer_03.csv is deleted from the
bucket bed_room.