tJavaRow
Provides a code editor that lets you enter the Java code to be applied to each row
of the flow.
tJavaRow allows you to enter customized
code which you can integrate in a Talend program.
Depending on the Talend
product you are using, this component can be used in one, some or all of the following
Job frameworks:
-
Standard: see tJavaRow Standard properties.
The component in this framework is available in all Talend
products. -
Spark Batch: see tJavaRow properties for Apache Spark Batch.
The component in this framework is available in all subscription-based Talend products with Big Data
and Talend Data Fabric. -
Spark Streaming: see tJavaRow properties for Apache Spark Streaming.
This component is available in Talend Real Time Big Data Platform and Talend Data Fabric.
tJavaRow Standard properties
These properties are used to configure tJavaRow running in the Standard Job framework.
The Standard
tJavaRow component belongs to the Custom Code family.
The component in this framework is available in all Talend
products.
Basic settings
|
Schema and Edit |
A schema is a row description. It defines the number of fields This This |
|
|
Built-In: You create and store the schema locally for this component |
|
|
Repository: You have already created the schema and stored it in the When the schema to be reused has default values that are You can find more details about how to |
|
Click Edit
Click Sync |
|
|
Generate code |
Click this button to automatically generate the code in the Code field to map the columns of the input schema with those of the output The principle of this mapping is to relate the columns that have the same column name. |
|
Code |
Enter the Java code to be applied to each line of the data |
Advanced settings
|
Import |
Enter the Java code to import, if necessary, external libraries |
|
tStatCatcher Statistics |
Select this check box to collect the log data at a component |
Global Variables
|
Global Variables |
NB_LINE: the number of rows read by an input component or
ERROR_MESSAGE: the error message generated by the A Flow variable functions during the execution of a component while an After variable To fill up a field or expression with a variable, press Ctrl + For further information about variables, see To enter a global variable (for example COUNT of |
Usage
|
Usage rule |
This component is used as an intermediary between two other |
|
Function |
tJavaRow allows you to enter |
|
Purpose |
tJavaRow allows you to broaden the |
|
Limitation |
Knowledge of Java language is necessary. |
Transforming data
line by line using tJavaRow
In this scenario, the information of a few cities read from an input delimited file is
transformed using Java code through the tJavaRow
component and printed on the console.
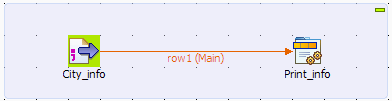
Setting up the Job
-
Drop a tFileInputDelimited component and
a tJavaRow component from the Palette onto the design workspace, and label them
to better identify their roles in the Job. -
Connect the two components using a Row >
Main connection.
Configuring the components
-
Double-click the tFileInputDelimited
component to display its Basic settings
view in the Component tab.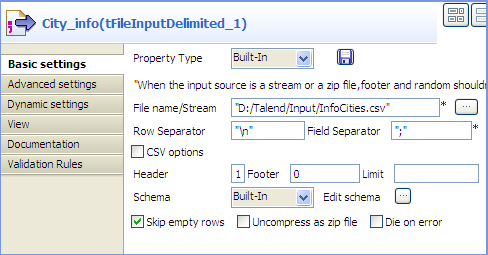
-
In the File name/Stream field, type in
the path to the input file in double quotation marks, or browse to the path
by clicking the […] button, and define
the first line of the file as the header.In this example, the input file has the following content:123456City;Population;LandArea;PopDensityBeijing;10233000;1418;7620Moscow;10452000;1081;9644Seoul;10422000;605;17215Tokyo;8731000;617;14151New York;8310000;789;10452 -
Click the […] button next to Edit
schema to open the Schema dialog box, and
define the data structure of the input file. Then, click OK to validate the schema setting and close the
dialog box.
-
Double-click the tJavaRow component to
display its Basic settings view in the
Component tab.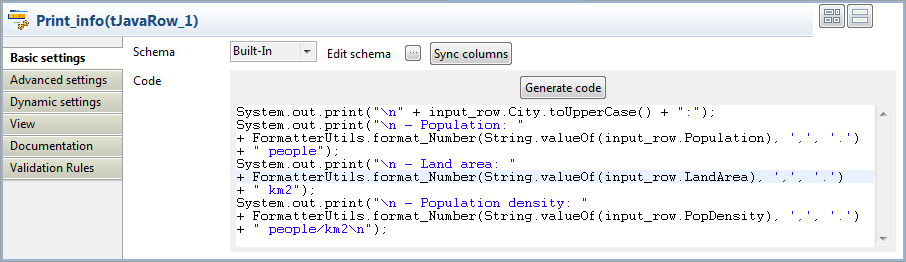
-
Click Sync columns to make sure that the
schema is correctly retrieved from the preceding component. -
In the Code field, enter the code to be
applied on each line of data based on the defined schema columns.In this example, we want to transform the city names to upper case, group
digits of numbers larger than 1000 using the thousands separator for ease of
reading, and print the data on the console:12345678910111213System.out.print("" + input_row.City.toUpperCase() + ":");System.out.print("- Population: "+ FormatterUtils.format_Number(String.valueOf(input_row.Population), ',', '.') + " people");System.out.print("- Land area: "+ FormatterUtils.format_Number(String.valueOf(input_row.LandArea), ',', '.')+ " km2");System.out.print("- Population density: "+ FormatterUtils.format_Number(String.valueOf(input_row.PopDensity), ',', '.') + " people/km2");Note:In the Code field, input_row refers to the link that connects to
tJavaRow.
Saving and executing the Job
- Press Ctrl+S to save your Job.
-
Press F6 or click Run on the Run tab to
execute the Job.The city information is transformed by the Java code set through tJavaRow and displayed on the console.
Using tJavaRow to handle file content based on a dynamic schema
This scenario applies only to subscription-based Talend products.
This scenario describes a three-component Job that uses Java code through a tJavaRow component to display the content of an input file
and pass it to the output component. As all the components in this Job support the
dynamic schema feature, we can leverage this feature to save the time of configuring
each column of the schema.
Setting up the Job
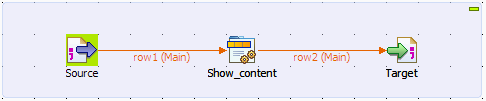
-
Drop tFileInputDelimited, tJavaRow, and tFileOutputDelimited from the Palette onto the design workspace, and label them according
to their roles in the Job. -
Connect the components in a series using Row > Main links.
Configuring the input and output components
-
Double-click the tFileInputDelimited
component, which is labeled Source, to
display its Basic settings view.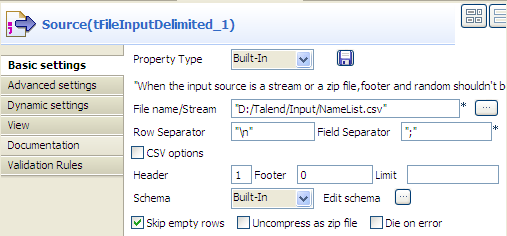 Warning:
The dynamic schema feature is only supported in Built-In mode and requires the input file
to have a header row. -
In the File name/Stream field, type in
the path to the input file in double quotation marks, or browse to the path
by clicking the […] button. -
In the Header field, type in 1 to define the first line of the file as the
header. -
Click the […] button next to Edit schema to open the Schema dialog box.
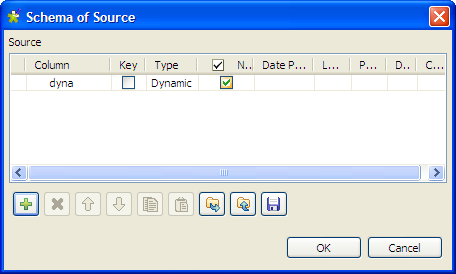
-
Click the [+] button to add a column,
give a name to the column, dyna in this
example, and select Dynamic from the
Type list. This dynamic column will
retrieve the three columns, FirstName,
LastName and Address, of the input file. -
Click OK to validate the setting and
close the dialog box. -
Double-click the tFileOutputDelimited
component, which is labeled Target, to
display its Basic settings view.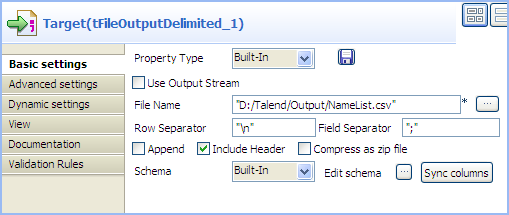
-
Define the output file path in the File
Name field. -
Select the Include Header check box to
include the header in the output file. Leave all the other settings are they
are.
Configuring the tJavaRow component
-
Double-click tJavaRow to display its
Basic settings view and define the
components properties.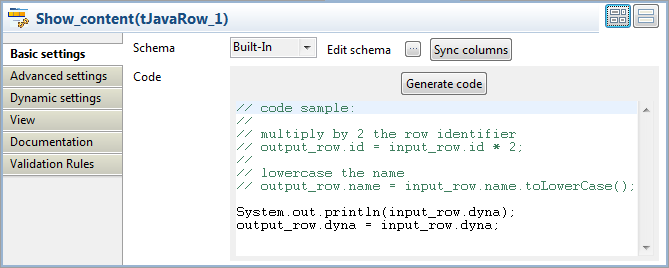
-
Click Sync columns to make sure that the
schema is correctly retrieved from the preceding component. -
In the Code field, enter the following
code to display the content of the input file and pass the data to the next
component based on the defined dynamic schema column:12System.out.println(input_row.dyna);output_row.dyna = input_row.dyna;Note:In the Code field, input_row and output_row correspond to the links to and from tJavaRow.
Saving and executing the Job
- Press Ctrl+S to save your Job.
-
Pressing F6, or click Run on the Run
tab to execute the Job.The content of the input file is displayed on the console and written to
the output file.
tJavaRow properties for Apache Spark Batch
These properties are used to configure tJavaRow running in the Spark Batch Job framework.
The Spark Batch
tJavaRow component belongs to the Custom Code family.
The component in this framework is available in all subscription-based Talend products with Big Data
and Talend Data Fabric.
Basic settings
|
Schema and Edit |
A schema is a row description. It defines the number of fields |
|
|
Built-In: You create and store the schema locally for this component |
|
|
Repository: You have already created the schema and stored it in the When the schema to be reused has default values that are You can find more details about how to |
|
Click Edit
Click Sync Note that the input schema and the output schema of this component can |
|
|
Map type |
Select the type of the Map transformation you need to write. This The available types are:
For further information about these methods, see Apache Spark’s |
|
Generate code |
Click this button to automatically generate the code in the Code field to map the columns of the input schema with those of the output The generated sample code shows what the pre-defined variables are for the input and the |
|
Code |
Write the custom body of the method you have selected from the For example, the input schema contains a user column, then you need to use the input.user variable to get the user column of each input record. For further information about the available variables in writing the |
Advanced settings
|
Import |
Enter the Java code to import, if necessary, external libraries |
Global Variables
|
Global Variables |
ERROR_MESSAGE: the error message generated by the A Flow variable functions during the execution of a component while an After variable To fill up a field or expression with a variable, press Ctrl + For further information about variables, see To enter a global variable (for example COUNT of |
Usage
|
Usage rule |
This component is used as an intermediate step. This component, along with the Spark Batch component Palette it belongs to, Note that in this documentation, unless otherwise explicitly stated, a |
|
Spark Connection |
In the Spark
Configuration tab in the Run view, define the connection to a given Spark cluster for the whole Job. In addition, since the Job expects its dependent jar files for execution, you must specify the directory in the file system to which these jar files are transferred so that Spark can access these files:
This connection is effective on a per-Job basis. |
|
Limitation |
Knowledge of Spark and Java language is necessary. |
Related scenarios
No scenario is available for the Spark Batch version of this component
yet.
tJavaRow properties for Apache Spark Streaming
These properties are used to configure tJavaRow running in the Spark Streaming Job framework.
The Spark Streaming
tJavaRow component belongs to the Custom Code family.
This component is available in Talend Real Time Big Data Platform and Talend Data Fabric.
Basic settings
|
Schema and Edit |
A schema is a row description. It defines the number of fields |
|
|
Built-In: You create and store the schema locally for this component |
|
|
Repository: You have already created the schema and stored it in the When the schema to be reused has default values that are You can find more details about how to |
|
Click Edit
Click Sync Note that the input schema and the output schema of this component can |
|
|
Map type |
Select the type of the Map transformation you need to write. This The available types are:
For further information about these methods, see Apache Spark’s |
|
Generate code |
Click this button to automatically generate the code in the Code field to map the columns of the input schema with those of the output The generated sample code shows what the pre-defined variables are for the input and the |
|
Code |
Write the custom body of the method you have selected from the For example, the input schema contains a user column, then you need to use the input.user variable to get the user column of each input record. For further information about the available variables in writing the |
Advanced settings
|
Import |
Enter the Java code to import, if necessary, external libraries |
Usage
|
Usage rule |
This component is used as an intermediate step. This component, along with the Spark Streaming component Palette it belongs to, appears Note that in this documentation, unless otherwise explicitly stated, a scenario presents |
|
Spark Connection |
In the Spark
Configuration tab in the Run view, define the connection to a given Spark cluster for the whole Job. In addition, since the Job expects its dependent jar files for execution, you must specify the directory in the file system to which these jar files are transferred so that Spark can access these files:
This connection is effective on a per-Job basis. |
|
Limitation |
Knowledge of Spark and Java language is necessary. |
Related scenarios
No scenario is available for the Spark Streaming version of this component
yet.