tJIRAInput
information based on a specified project ID from JIRA.
tJIRAInput Standard properties
These properties are used to configure tJIRAInput running in the
Standard Job framework.
The Standard
tJIRAInput component belongs to the Business family.
The component in this framework is available in all Talend
products.
Basic settings
|
Host URL |
Specify the URL used to access JIRA. |
|
User Id and Password |
Specify the user authentication data used to access JIRA. To enter the password, click the […] button next to the |
|
JIRA resource |
Select the JIRA resource from the drop-down |
|
Schema and Edit schema |
A schema is a row description. It defines the number of fields Note that the schema of this component is |
|
JQL |
Specify the JQL (JIRA Query Language) query based on which you This field is available only when ISSUE is selected from the Jira |
|
Project ID |
Enter the ID of the project whose information you want to This field is available only when PROJECT is selected from the Jira |
Advanced settings
|
Batch size |
Specify the number of issues to be processed in each batch. This field is available only when ISSUE is selected from the Jira |
|
tStatCatcher Statistics |
Select this check box to gather the Job processing metadata at the Job level |
Global Variables
|
Global Variables |
NB_LINE: the number of rows processed. This is an After
ERROR_MESSAGE: the error message generated by the A Flow variable functions during the execution of a component while an After variable To fill up a field or expression with a variable, press Ctrl + For further information about variables, see |
Usage
|
Usage rule |
This component is usually used as a start component of a Job or |
|
Limitation |
This component doesn’t support retrieving the comments of issues from JIRA. |
Retrieving the project information from JIRA application
information of a project from JIRA application, extract the information needed based on the
JSONPath query, and finally write the extracted information into a JSON file.
Creating a Job for retrieving the project information from JIRA application

A project with the key DOC has been created in JIRA
application.
-
Create a new Job and add a tJIRAInput component, a
tExtractJSONFields component, and a
tFileOutputJSON component to the Job. -
Link the tJIRAInput component to the
tExtractJSONFields component using a Row > Main connection. -
Link the tExtractJSONFields component to the
tFileOutputJSON component using a Row > Main connection.
Configuring the Job for retrieving the project information from JIRA application
-
Double-click the tJIRAInput component to open its
Basic settings view.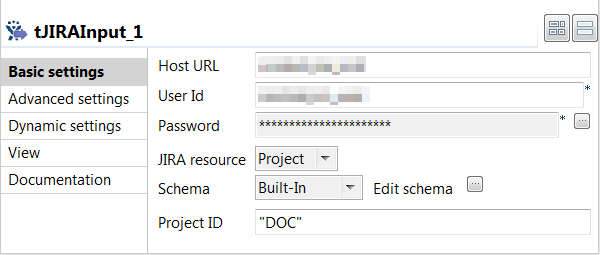
-
In the Host URL, User Id, and
Password fields, specify the user authentication
information required to access the JIRA application. -
Select Project from the JIRA
resource drop-down list, in the Project
ID field displayed, enter the key of the project, whose
information will be retrieved. In this example, it is
DOC. -
Double-click the tExtractJSONFields component to open
its Basic settings view.
-
Click the […] button next to Edit
schema, and in the schema dialog box displayed, define the
schema by adding six columns of String type, id,
key, name,
description, assigneeType, and
ProjectTypeKey, which will hold the corresponding
information of the specified project.When done, click OK to save the changes and close the
dialog box. -
Select the JSON field to be extracted from the JSON
field drop-down list. In this example, it is
json, which is passed from the
tJIRAInput component. -
In the Loop Jsonpath query field, specify the path to
the node on which the loop is based. In this example, it is
$, which is the root node of the JSON field. -
In the Mapping table, the Column
cells are automatically filled with the schema columns, and you need to specify
the corresponding JSON node that holds the desired data for each schema column.
In this example, $.id for the id
column, $.key for the key column,
$.name for the name column,
$.description for the
description column,
$.assigneeType for the
assigneeType column, and
$.projectTypeKey for the
projectTypeKey column. -
Double-click the tFileOutputJSON component to open its
Basic settings view. -
In the File Name field, specify the path to the file
into which the extracted project information will be written,
D:/JiraComponents/project_info.json in this example.
And in the Name of data block field, enter the name of
the data block, project in this example.
Executing the Job to retrieve the project information from JIRA application
- Press Ctrl + S to save the Job.
- Press F6 to execute the Job.
-
Open the JSON file project_info.json generated.
Note that all extracted project information is displayed in one line in the
generated JSON file, and you can use some editor tool to format and indent
the data into an organized manner for better display of the result.
As shown above, the desired project information has been successfully
extracted and written into the JSON file.