tJoin
Performs inner or outer joins between the main data flow and the lookup
flow.
tJoin joins two tables by doing an
exact match on several columns. It compares columns from the main flow with reference
columns from the lookup flow and outputs the main flow data and/or the rejected
data.
tJoin Standard properties
These properties are used to configure tJoin running in the Standard Job framework.
The Standard
tJoin component belongs to the Processing family.
The component in this framework is available in all Talend
products.
Basic settings
|
Schema and Edit |
A schema is a row description, it defines the number of fields to be processed and Click Edit
This This |
|
|
Built-in: You create and store |
|
|
Repository: The schema already |
|
Include lookup columns in output |
Select this check box to include the lookup columns you define in |
|
Input key attribute |
Select the column(s) from the main flow that needs to be checked |
|
Lookup key attribute |
Select the lookup key columns that you will use as a reference |
|
Inner join (with reject output) |
Select this check box to join the two tables first and gather the |
Advanced settings
|
tStat |
Select this check box to collect log data at the component |
Global Variables
|
Global Variables |
ERROR_MESSAGE: the error message generated by the A Flow variable functions during the execution of a component while an After variable To fill up a field or expression with a variable, press Ctrl + For further information about variables, see |
Usage
|
Usage rule |
This component is not startable and it requires two input |
Doing an exact match on two columns and outputting the main and rejected
data
This scenario describes a five-component Job aiming at carrying out an exact match
between the firstnameClient column of an input file against the
data of the reference input file, and the lastnameClient column
against the data of the reference input file. The outputs of this exact match are
written in two separate files: exact data are written in an Excel file, and inaccurate
data are written in a delimited file.
In this scenario, we have already stored the input schemas of
the input and reference files in the Repository. For more information about storing
schema metadata in the Repository tree view, see
Talend Studio User Guide.
Dropping and linking the components
-
In the Repository tree view, expand
Metadata and the file node where you
have stored the input schemas and drop the relevant file onto the design
workspace.The Components dialog box
appears.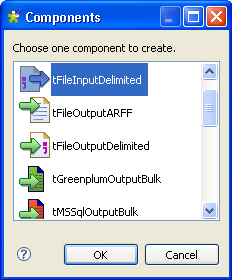
-
Select tFileInputDelimited from the list
and click OK to close the dialog
box.The tFileInputDelimited component
displays in the workspace. The input file used in this scenario is called
ClientSample. It holds four columns including the
two columns firstnameClient and
lastnameClient we want to do the exact match
on. -
Do the same for the second input file you want to use as a reference,
ClientSample_Update in this scenario. -
Drop the following components from the Palette onto the design workspace: tJoin, tFileOutputExcel,
and tFileOutputDelimited.
-
Connect the main and reference input files to tJoin using Main links. The
link between the reference input file and tJoin appears as a lookup link on the design
workspace. -
Connect tJoin to tFileOutputExcel using the Main link and tJoin to
tFileOutputDelimited using the
Inner join reject link.
Configuring the components
-
If needed, double-click the main and reference input files to display
their Basic settings views. All their
property fields are automatically filled in. If you do not define your input
files in the Repository, fill in the
details manually after selecting Built-in
in the Property Type field. -
Double click tJoin to display its
Basic settings view and define its
properties.
-
Click the Edit schema button to open a
dialog box that displays the data structure of the input files, define the
data you want to pass to the output components, three columns in this
scenario, idClient,
firstnameClient and
lastnameClient, and then click OK to validate the schema and close the dialog
box.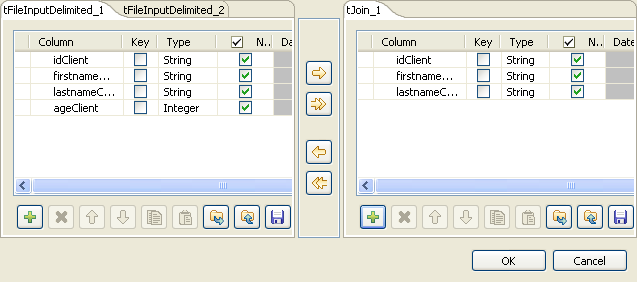
-
In the Key definition area of the
Basic settings view of tJoin, click the plus button to add two columns
to the list and then select the input columns and the output columns you
want to do the exact matching on from the Input key
attribute and Lookup key
attribute lists respectively,
firstnameClient and lastnameClient in this example. -
Select the Inner join (with reject
output) check box to define one of the outputs as inner join
reject table. -
Double click tFileOutputExcel to display
its Basic settings view and define its
properties.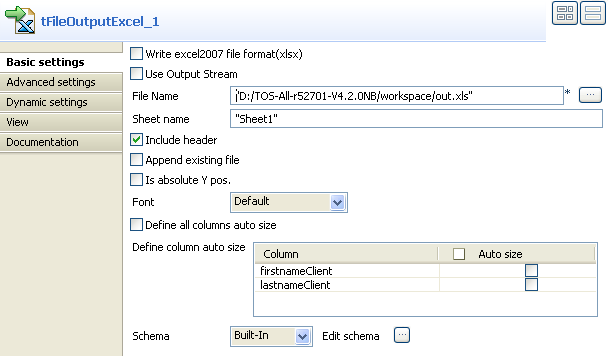
- Set the destination file name and the sheet name, and select the Include header check box.
-
Double click tFileOutputDelimited to
display its Basic settings view and define
its properties.
- Set the destination file name, and select the Include header check box.
Saving and executing the Job
- Press Ctrl+S to save your Job.
-
Press F6, or click Run on the Run tab to
execute the Job.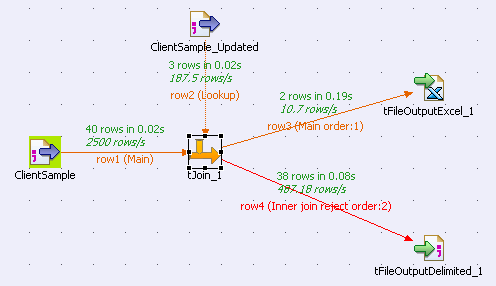 The output of the exact match on the firstnameClient
and lastnameClient columns is written to the defined
Excel file. The rejected data is written to the defined delimited file.
Matching input data against a reference file based on a dynamic
column
This scenario applies only to subscription-based Talend products.
This scenario describes a five-component Job that matches the family information
entries in the main input file against those in a reference input file, and displays the
exact matches and the rejected data in different tables on the console. The dynamic
feature is leveraged to save the time of configuring individual columns in the schema of
each component.
Dropping and linking the components
-
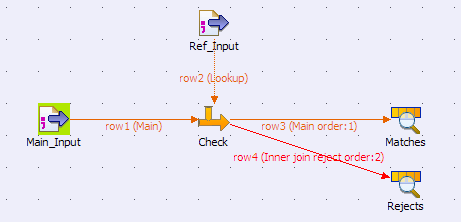
Drop two tFileInputDelimited components,
a tJoin component, and two tLogRow components from the Palette onto the design workspace, and label them to better
identify their roles in the Job, as shown above. -
Connect the tFileInputDelimited component
labelled Main_Input to the tJoin component, which is labelled Check, using a Row > Main
connection. -
Repeat the step above to connect the tFileInputDelimited component labelled Ref_Input to the tJoin component. This Row
connection automatically appears as a lookup link. -
Connect the tJoin component to the
tLogRow component labelled Matches using a Row > Main connection. This
link will gather the data of the exact matches. -
Connect the tJoin component to the
tLogRow component labelled Rejects using a Row > Inner join reject
connection. This link will gather the rejected data.
Configuring the components
-
Double-click the tFileInputDelimited
component labelled Main_Input to display
its Basic settings view. Warning:
The dynamic schema feature is only supported in Built-In mode and requires the input file to have a
header row. -
Click the […] button next to the
File Name/Stream field to browse to
your main input file, and type in 1 in
the Header field to define the first row as
the header row.In this use case, the main input file contains the following
information:1234567891011FirstName;LastName;HouseNo;Street;CityGerald;Roosevelt;48;Fairview Avenue;Oklahoma CityBenjamin;Harrison;27;Katella Avenue;Little RockBob;Clinton;11;Bowles Avenue;RaleighJames;Quincy;45;Cerrillos Road;Saint PaulGerald;Harrison;27;Katella Avenue;Little RockHarry;Madison;85;Santa Monica Road;RaleighHelen;Roosevelt;48;Fairview Avenue;Oklahoma CityMary;Clinton;11;Bowles Avenue;RaleighCathey;Quincy;45;Cerrillos Road;Saint PaulJohn;Smith;64;Market Street;Helena -
Click Edit schema to define the schema
for this component.In this use case, the main input file has five columns: FirstName, LastName, HouseNo,
Street, and City. However, as we can leverage the advantage of the
dynamic schema feature, we simply define two columns: one string type of
column for the first names of people, and one dynamic column for the family
information. To do so:-
Click the [+] button to add two
columns, and name them FirstName
and FamilyInfo
respectively. -
Select String from the Type list for the FirstName column to retrieve the first name of each
person on the name list. -
Select Dynamic from the Type list for the FamilyInfo column to retrieve the rest information
of each person on the name list: the last name, house number,
street, and city, which all together will identify a family.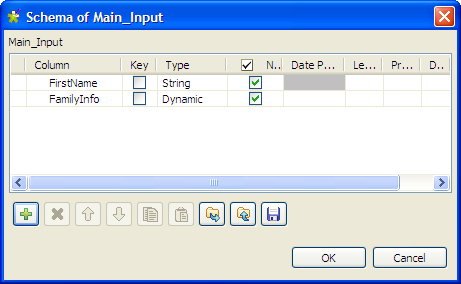
-
Click OK to propagate the schema
and close the Schema dialog
box.
-
Click the [+] button to add two
-
Following steps similar to the above, define the properties for the
tFileInputDelimited component labelled
Ref_Input: the path to the reference
input file, the header row, and the schema. This time, just define one
dynamic column, FamilyInfo, to retrieve
the four columns of the reference input file, which contains the following
information:1234LastName;HouseNo;Street;CityClinton;11;Bowles Avenue;RaleighQuincy;45;Cerrillos Road;Saint PaulSmith;64;Market Street;Helena -
Double-click the tJoin component to open
its Basic settings view.
-
Click Edit schema to open the Schema dialog box to check the data structures
of the input files and define the data you want to pass to the output
components.In this scenario, we want to pass both columns of the main input file,
FirstName and FamilyInfo, to the output files, so simply copy the schema
columns of the main input file by clicking the ->> button. Then, click OK to validate the schema and close the dialog box.
-
In the Key definition area, click the
[+] button to add one column to the
list and then select the input column you want to match from the Input key attribute list and the reference column
against which you want match the input column from Lookup key attribute list, FamilyInfo and row2.FamilyInfo respectively in this example. -
Make sure that the Inner join (with reject
output) check box is selected to define one of the outputs as
inner join reject table. -
In the Basic settings view of each
tLogRow component, select the Table option to display the output information in
table cells.
Saving and executing the Job
- Press Ctrl+S to save your Job.
-
Press F6, or click Run on the Run tab to
execute the Job.The console displays the exact matches and rejected data in two different
tables.