tMatchModel
Generates the matching model that is used by the tMatchPredict component to automatically predict the labels for the suspect
pairs and groups records which match the label(s) set in the component
properties.
For further information about the
tMatchPairing and tMatchPredict
components, see the tMatchPairing and
tMatchPredict documentation on Talend Help Center (https://help.talend.com).
tMatchModel reads the sample of the
suspect pairs outputted by tMatchPairing after you
label each second element in a pair, analyzes the data using the Random Forest algorithm
and generates a matching model.
You can use the sample suspect records labeled in a Grouping campaign
defined in Talend Data Stewardship with
tMatchModel.
This component runs with Apache Spark 1.6.0 and later
versions.
tMatchModel properties for Apache Spark Batch
These properties are used to configure tMatchModel running in the Spark Batch Job framework.
The Spark Batch
tMatchModel component belongs to the Data Quality family.
The component in this framework is available in all Talend Platform products with Big Data and in Talend Data Fabric.
Basic settings
|
Define a storage configuration |
Select the configuration component to be used to provide the configuration If you leave this check box clear, the target file system is the local The configuration component to be used must be present in the same Job. |
|
Schema and Edit |
A schema is a row description. It defines the number of fields Click Sync Click Edit
|
|
|
Built-In: You create and store the schema locally for this component |
|
|
Repository: You have already created the schema and stored it in the |
|
Matching key |
Select the columns on which you want to base the match |
|
Matching label column |
Select the column from the input flow which holds the If you select the Integration with Data |
|
Matching model location |
Select the Save the model on If you want to store the model in a specific file system, The button for browsing does not work with the Spark tHDFSConfiguration |
| Generate feature importance report | Select this check box to generate a report that contains a summary of the model and the settings. For more information, see Feature importance report. |
|
Integration with Data Stewardship |
Select this check box to set the connection parameters to the If you select this check box, tMatchModel uses the |
|
Data Stewardship Configuration |
Available when the Integration with Data
|
Advanced settings
|
Max token number for phonetic |
Set the maximum number of the tokens to be used in the When the number of tokens exceeds what has been defined |
|
Random Forest hyper-parameters |
Number of trees range: Enter a Increasing this range can improve the accuracy by
Maximum tree-depth range: Enter a Generally speaking, a deeper decision tree is more expressive and thus potentially more |
|
Checkpoint |
Set the frequency of checkpoints. It is recommended to leave the default Before setting a value for this parameter, activate checkpointing and set For further information about checkpointing the |
|
Cross-validation parameters |
Number of folds: Enter a numeric
Evaluation metric |
|
Random Forest parameters |
Subsampling rate: Enter the
Subset Strategy: Select the Each strategy takes a different number of features into
|
|
Max Bins |
Enter the numeric value to indicate the maximum number of bins used for splitting The continuous features are automatically transformed to ordered discrete features. |
|
Minimum information |
Enter the minimum number of information gain to be expected from a parent node to its The default value of the minimum number of information gain is 0.0, meaning that no further information is obtained by splitting a given node. For further information about how the information gain is calculated, see Impurity and Information gain from the Spark documentation. |
|
Min instance per |
Enter the minimum number of training instances a node should have to make it valid for The default value is 1, which means when a node has |
|
Impurity |
Select the measure used to select the best split from
For further information about how each of the measures is calculated, see Impurity measures from the Spark documentation. |
|
Set a random seed |
Enter the random seed number to be used for bootstrapping and choosing feature |
|
Data Stewardship Configuration |
Available when the Integration with Data Stewardship check box in the Campaign Name: Displays the technical name of the campaign once it is selected
Batch Size: Specify the number of records to be Do not change the default value unless you are facing performance issues. |
| Use Timestamp format for Date type |
Select the check box to output dates, hours, minutes and seconds contained in your The format used by Deltalake is |
Usage
|
Usage rule |
This component is used as an intermediate step. This component, along with the Spark Batch component Palette it belongs to, |
|
Spark Batch Connection |
In the Spark
Configuration tab in the Run view, define the connection to a given Spark cluster for the whole Job. In addition, since the Job expects its dependent jar files for execution, you must specify the directory in the file system to which these jar files are transferred so that Spark can access these files:
This connection is effective on a per-Job basis. |
Generating a matching model from a Grouping campaign
This scenario applies only to subscription-based Talend Platform products with Big Data and Talend Data Fabric.
tMatchModel reads the sample of suspect pairs computed on a list
of duplicate childhood education centers and labeled by data stewards in Talend Data Stewardship.
It generates several matching models, searches the best combination of the learning
parameters and keeps the best matching model which comes out as the result of cross
validation.
- You have generated the suspect data pairs by using the tMatchPairing component and labeled them in
Talend Data Stewardship. For further
information, see Computing suspect pairs and writing a sample in Talend Data Stewardship.For further information about
handling grouping tasks, see the documentation on Talend Help Center (https://help.talend.com).
Setting up the Job
-
Drop the tMatchModel component from the
Palette onto the design workspace. -
Check that you have defined the connection to the Spark cluster
in the Run > Spark
Configuration view as described in Selecting the Spark mode.
Selecting the Spark mode
Depending on the Spark cluster to be used, select a Spark mode for your Job.
The Spark documentation provides an exhaustive list of Spark properties and
their default values at Spark Configuration. A Spark Job designed in the Studio uses
this default configuration except for the properties you explicitly defined in the
Spark Configuration tab or the components
used in your Job.
-
Click Run to open its view and then click the
Spark Configuration tab to display its view
for configuring the Spark connection. -
Select the Use local mode check box to test your Job locally.
In the local mode, the Studio builds the Spark environment in itself on the fly in order to
run the Job in. Each processor of the local machine is used as a Spark
worker to perform the computations.In this mode, your local file system is used; therefore, deactivate the
configuration components such as tS3Configuration or
tHDFSConfiguration that provides connection
information to a remote file system, if you have placed these components
in your Job.You can launch
your Job without any further configuration. -
Clear the Use local mode check box to display the
list of the available Hadoop distributions and from this list, select
the distribution corresponding to your Spark cluster to be used.This distribution could be:-
For this distribution, Talend supports:
-
Yarn client
-
Yarn cluster
-
-
For this distribution, Talend supports:
-
Standalone
-
Yarn client
-
Yarn cluster
-
-
For this distribution, Talend supports:
-
Yarn client
-
-
For this distribution, Talend supports:
-
Yarn client
-
Yarn cluster
-
-
For this distribution, Talend supports:
-
Standalone
-
Yarn client
-
Yarn cluster
-
-
For this distribution, Talend supports:
-
Yarn cluster
-
-
Cloudera Altus
For this distribution, Talend supports:-
Yarn cluster
Your Altus cluster should run on the following Cloud
providers:-
Azure
The support for Altus on Azure is a technical
preview feature. -
AWS
-
-
As a Job relies on Avro to move data among its components, it is recommended to set your
cluster to use Kryo to handle the Avro types. This not only helps avoid
this Avro known issue but also
brings inherent preformance gains. The Spark property to be set in your
cluster is:
1spark.serializer org.apache.spark.serializer.KryoSerializerIf you cannot find the distribution corresponding to yours from this
drop-down list, this means the distribution you want to connect to is not officially
supported by
Talend
. In this situation, you can select Custom, then select the Spark
version of the cluster to be connected and click the
[+] button to display the dialog box in which you can
alternatively:-
Select Import from existing
version to import an officially supported distribution as base
and then add other required jar files which the base distribution does not
provide. -
Select Import from zip to
import the configuration zip for the custom distribution to be used. This zip
file should contain the libraries of the different Hadoop/Spark elements and the
index file of these libraries.In
Talend
Exchange, members of
Talend
community have shared some ready-for-use configuration zip files
which you can download from this Hadoop configuration
list and directly use them in your connection accordingly. However, because of
the ongoing evolution of the different Hadoop-related projects, you might not be
able to find the configuration zip corresponding to your distribution from this
list; then it is recommended to use the Import from
existing version option to take an existing distribution as base
to add the jars required by your distribution.Note that custom versions are not officially supported by
Talend
.
Talend
and its community provide you with the opportunity to connect to
custom versions from the Studio but cannot guarantee that the configuration of
whichever version you choose will be easy. As such, you should only attempt to
set up such a connection if you have sufficient Hadoop and Spark experience to
handle any issues on your own.
For a step-by-step example about how to connect to a custom
distribution and share this connection, see Hortonworks.
Configuring the connection to the file system to be used by Spark
Skip this section if you are using Google Dataproc or HDInsight, as for these two
distributions, this connection is configured in the Spark
configuration tab.
-
Double-click tHDFSConfiguration to open its Component view.
Spark uses this component to connect to the HDFS system to which the jar
files dependent on the Job are transferred. -
If you have defined the HDFS connection metadata under the Hadoop
cluster node in Repository, select
Repository from the Property
type drop-down list and then click the
[…] button to select the HDFS connection you have
defined from the Repository content wizard.For further information about setting up a reusable
HDFS connection, search for centralizing HDFS metadata on Talend Help Center
(https://help.talend.com).If you complete this step, you can skip the following steps about configuring
tHDFSConfiguration because all the required fields
should have been filled automatically. -
In the Version area, select
the Hadoop distribution you need to connect to and its version. -
In the NameNode URI field,
enter the location of the machine hosting the NameNode service of the cluster.
If you are using WebHDFS, the location should be
webhdfs://masternode:portnumber; WebHDFS with SSL is not
supported yet. -
In the Username field, enter
the authentication information used to connect to the HDFS system to be used.
Note that the user name must be the same as you have put in the Spark configuration tab.
Generating the matching model
-
Double-click tMatchModel to display the
Basic settings view and define the component
properties.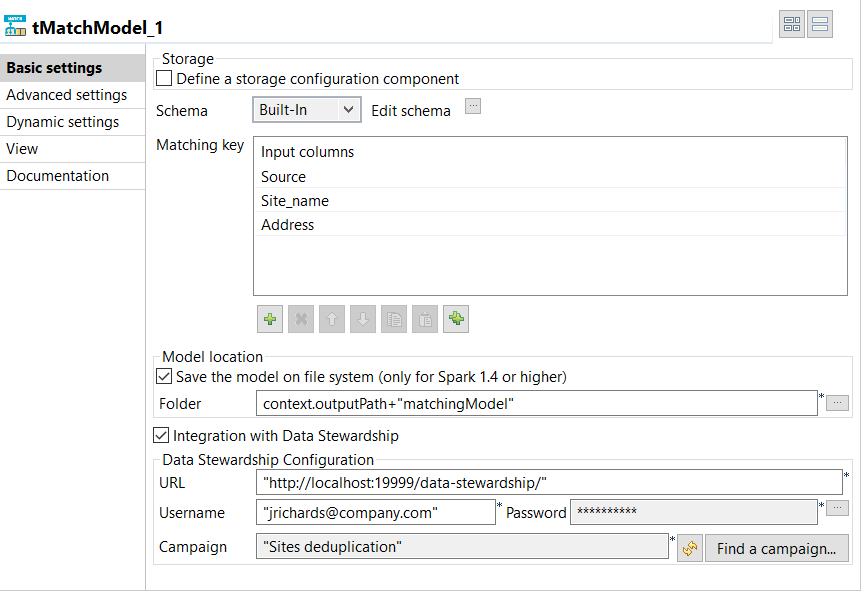
-
In the Matching Key table, click the
[+] button to add rows in the table and select the
columns on which you want to base the match computation.The Original_Id column is ignored in the computation
of the matching model. -
Select the Save the model on file system check box and
in the Folder field, set the path to the local folder
where you want to generate the matching model file. -
Select the Integration with Data Stewardship check box
and set the connection parameters to the Talend Data Stewardship server.-
In the URL field, enter the address of the application suffixed with /data-stewardship/, for example http://localhost:19999/data-stewardship/.
If you are working with Talend Cloud Data Stewardship, use one of the following
addresses to access the application:-
https://tds.us.cloud.talend.com/data-stewardship for the US
data center. -
https://tds.eu.cloud.talend.com/data-stewardship for the EU
data center. -
https://tds.ap.cloud.talend.com/data-stewardship for the
Asia-Pacific data center.
-
https://tds.us.cloud.talend.com/data-stewardship for the US
-
Enter your login information to the server in the
Username and Password
fields.To enter your password, click … next to the field, enter your
password between double quotes in the dialog box that opens and click
OK.If you
are working with Talend Cloud Data Stewardship and if:- SSO is enabled, enter an access
token in the field. - SSO is not enabled, enter either
an access token or your password in the field.
- SSO is enabled, enter an access
-
Click Find a
campaign to open a dialog box which lists the campaigns defined in
Talend Data Stewardship and for which you
are the owner or you have the access rights.
-
Select the campaign from which to read the grouping tasks,
Sites deduplication in this example, and
click OK.
-
In the URL field, enter the address of the application suffixed with /data-stewardship/, for example http://localhost:19999/data-stewardship/.
-
Click Advanced settings and set the below
parameters:-
Set the maximum number of the tokens to be used in the phonetic
comparison in the corresponding field. -
In the Random Forest hyper parameters tuning,
enter the ranges for the decision trees you want to build and their
depth.These parameters are important for the accuracy of the
model. - Leave the other by-default parameters unchanged.
-
Set the maximum number of the tokens to be used in the phonetic
-
In the Batch Size field, set the number of tasks you
want to have in each commit.There are no limits for the batch size in Talend Data Stewardship (on
premises). However, do not exceed 200 tasks per commit in Talend Cloud Data Stewardship, otherwise
the Job fails. -
Press F6 to execute the
Job and generate the matching model in the output folder.
You can now use this model with the tMatchPredict component to
label all the duplicates computed by tMatchPairing.
For further information, see the online publication about
labeling suspect pairs on Talend Help Center (https://help.talend.com).
Generating a matching model
This scenario applies only to subscription-based Talend Platform products with Big Data and Talend Data Fabric.
The tMatchModel component reads the
suspect sample pairs generated by the tMatchPairing component and manually labeled by you.
For further information, see the
tMatchPairing documentation on Talend Help Center (https://help.talend.com).
The tMatchModel component generates several matching models,
searches the best combination of the learning parameters automatically and keeps the
best matching model which comes out as the result of cross validation.
The use case described here uses the following components:
-
A tFileInputDelimited component reads the
source file, which contains the suspect data pairs generated by tMatchPairing. -
A tMatchModel component
generates the features from the suspect records, implements the Random Forest
algorithm and creates a classification model.
Setting up the Job
-
You have generated the suspect data pairs by using the
tMatchPairing component. -
You added a label next to the second record in each suspect pair to say
whether it is a duplicate record or not or whether it is a possible
duplicate as well:1234480060609;DFSS_AgencySiteLies_2012.csv;Catholic Charities of the Archdiocese of Chicago St. Joseph;4800 S. Paulina; st. joseph_1;;480060609;purple_binder_early_childhood.csv;Catholic Charities Chicago - St. Joseph;4800 S Paulina Street; st. joseph_1;0.8058642705131237;YES425760624;chapin_dfss_providers_2011_070212.csv;CHICAGO PUBLIC SCHOOLS GOLDBLATT, NATHAN R.;4257 W ADAMS; r._20;;422560653;chapin_dfss_providers_2011_070212.csv;CHICAGO PUBLIC SCHOOLS ROBINSON, JACKIE R.;4225 S LAKE PARK AVE; r._20;0.8219437219200757;NOThe labels used in this example are YES or
NO, but you can use any label you like and more
than two.
You can find an example of how to compute suspect pairs and
suspect sample from source data on Talend Help Center (https://help.talend.com).
-
Drop the following components from the Palette onto the design workspace:
tFileInputDelimited and tMatchModel. - Connect the components together using the Row > Main link.
-
Check that you have defined the connection to the Spark cluster in the Run > Spark Configuration view. For more information about selecting the Spark mode, see
the documentation on Talend Help Center (https://help.talend.com).

Selecting the Spark mode
Depending on the Spark cluster to be used, select a Spark mode for your Job.
The Spark documentation provides an exhaustive list of Spark properties and
their default values at Spark Configuration. A Spark Job designed in the Studio uses
this default configuration except for the properties you explicitly defined in the
Spark Configuration tab or the components
used in your Job.
-
Click Run to open its view and then click the
Spark Configuration tab to display its view
for configuring the Spark connection. -
Select the Use local mode check box to test your Job locally.
In the local mode, the Studio builds the Spark environment in itself on the fly in order to
run the Job in. Each processor of the local machine is used as a Spark
worker to perform the computations.In this mode, your local file system is used; therefore, deactivate the
configuration components such as tS3Configuration or
tHDFSConfiguration that provides connection
information to a remote file system, if you have placed these components
in your Job.You can launch
your Job without any further configuration. -
Clear the Use local mode check box to display the
list of the available Hadoop distributions and from this list, select
the distribution corresponding to your Spark cluster to be used.This distribution could be:-
For this distribution, Talend supports:
-
Yarn client
-
Yarn cluster
-
-
For this distribution, Talend supports:
-
Standalone
-
Yarn client
-
Yarn cluster
-
-
For this distribution, Talend supports:
-
Yarn client
-
-
For this distribution, Talend supports:
-
Yarn client
-
Yarn cluster
-
-
For this distribution, Talend supports:
-
Standalone
-
Yarn client
-
Yarn cluster
-
-
For this distribution, Talend supports:
-
Yarn cluster
-
-
Cloudera Altus
For this distribution, Talend supports:-
Yarn cluster
Your Altus cluster should run on the following Cloud
providers:-
Azure
The support for Altus on Azure is a technical
preview feature. -
AWS
-
-
As a Job relies on Avro to move data among its components, it is recommended to set your
cluster to use Kryo to handle the Avro types. This not only helps avoid
this Avro known issue but also
brings inherent preformance gains. The Spark property to be set in your
cluster is:
1spark.serializer org.apache.spark.serializer.KryoSerializerIf you cannot find the distribution corresponding to yours from this
drop-down list, this means the distribution you want to connect to is not officially
supported by
Talend
. In this situation, you can select Custom, then select the Spark
version of the cluster to be connected and click the
[+] button to display the dialog box in which you can
alternatively:-
Select Import from existing
version to import an officially supported distribution as base
and then add other required jar files which the base distribution does not
provide. -
Select Import from zip to
import the configuration zip for the custom distribution to be used. This zip
file should contain the libraries of the different Hadoop/Spark elements and the
index file of these libraries.In
Talend
Exchange, members of
Talend
community have shared some ready-for-use configuration zip files
which you can download from this Hadoop configuration
list and directly use them in your connection accordingly. However, because of
the ongoing evolution of the different Hadoop-related projects, you might not be
able to find the configuration zip corresponding to your distribution from this
list; then it is recommended to use the Import from
existing version option to take an existing distribution as base
to add the jars required by your distribution.Note that custom versions are not officially supported by
Talend
.
Talend
and its community provide you with the opportunity to connect to
custom versions from the Studio but cannot guarantee that the configuration of
whichever version you choose will be easy. As such, you should only attempt to
set up such a connection if you have sufficient Hadoop and Spark experience to
handle any issues on your own.
For a step-by-step example about how to connect to a custom
distribution and share this connection, see Hortonworks.
Configuring the connection to the file system to be used by Spark
Skip this section if you are using Google Dataproc or HDInsight, as for these two
distributions, this connection is configured in the Spark
configuration tab.
-
Double-click tHDFSConfiguration to open its Component view.
Spark uses this component to connect to the HDFS system to which the jar
files dependent on the Job are transferred. -
If you have defined the HDFS connection metadata under the Hadoop
cluster node in Repository, select
Repository from the Property
type drop-down list and then click the
[…] button to select the HDFS connection you have
defined from the Repository content wizard.For further information about setting up a reusable
HDFS connection, search for centralizing HDFS metadata on Talend Help Center
(https://help.talend.com).If you complete this step, you can skip the following steps about configuring
tHDFSConfiguration because all the required fields
should have been filled automatically. -
In the Version area, select
the Hadoop distribution you need to connect to and its version. -
In the NameNode URI field,
enter the location of the machine hosting the NameNode service of the cluster.
If you are using WebHDFS, the location should be
webhdfs://masternode:portnumber; WebHDFS with SSL is not
supported yet. -
In the Username field, enter
the authentication information used to connect to the HDFS system to be used.
Note that the user name must be the same as you have put in the Spark configuration tab.
Configuring the input component
-
Double-click tFileInputDelimited to open
its Basic settings view in the Component tab.The input data to be used with
tMatchModel is the suspect data pairs generated
by tMatchPairing. For an example of how to compute
suspect pairs and suspect sample from source data, see the documentation in
Talend Help Center (https://help.talend.com). -
Click the […] button next to Edit
schema to open a dialog box and add columns to the input schema:
Original_Id, Source,
Site_name and Address,
PAIR_ID, SCORE and
LABEL.The input schema is the same used with the sample of suspect pairs generated
by the tMatchPairing component. The column LABEL
column holds the label you manually set on every second record in a
pair.For readability purposes, you can ignore the columns PAIR_ID and SCORE.
-
Click OK in the dialog box and accept to propagate the
changes when prompted. -
In the Folder/File field, set the path to the input
file. -
Set the row and field separators in the corresponding fields and the header and
footer, if any.In this example, the number of row in the Header field
is set to 1.
Generating the matching model
-
Double-click tMatchModel to display the
Basic settings view and define the component
properties.
-
In the Matching Key table, click the
[+] button to add rows in the table and select the
columns on which you want to base the match computation.The Original_Id column is ignored in the computation
of the matching model. -
From the matching label
column list, select the column which holds the labels you added
on the suspect records. -
Select the Save the model on file system check box and
in the Folder field, set the path to the local folder
where you want to generate the matching model file. -
Click Advanced settings and set the below
parameters:-
Set the maximum number of the tokens to be used in the phonetic
comparison in the corresponding field. -
In the Random Forest hyper parameters tuning,
enter the ranges for the decision trees you want to build and their
depth.These parameters are important for the accuracy of the
model. - Leave the other by-default parameters unchanged.
-
Set the maximum number of the tokens to be used in the phonetic
-
Press F6 to execute the
Job and generate the matching model in the output folder.
You can now use this model with the tMatchPredict component to
label all the duplicates computed by tMatchPairing.
For further information, see the online publication about
labeling suspect pairs on Talend Help Center (https://help.talend.com).
Feature importance report
When using the tMatchModel component in
a Job, you can generate a report to see the feature importance in the model.
- The heat map of all features,
- The summary of the settings of the tMatchModel component and
- The model quality.
The heat map helps you quickly see the importance of:
- Each feature,
- Each matching key and
- Each metric.
The summary displays the model quality and is a reminder of the parameters
you set to generate this model.
For more information on how to generate this report, see the properties of the tMatchModel component.
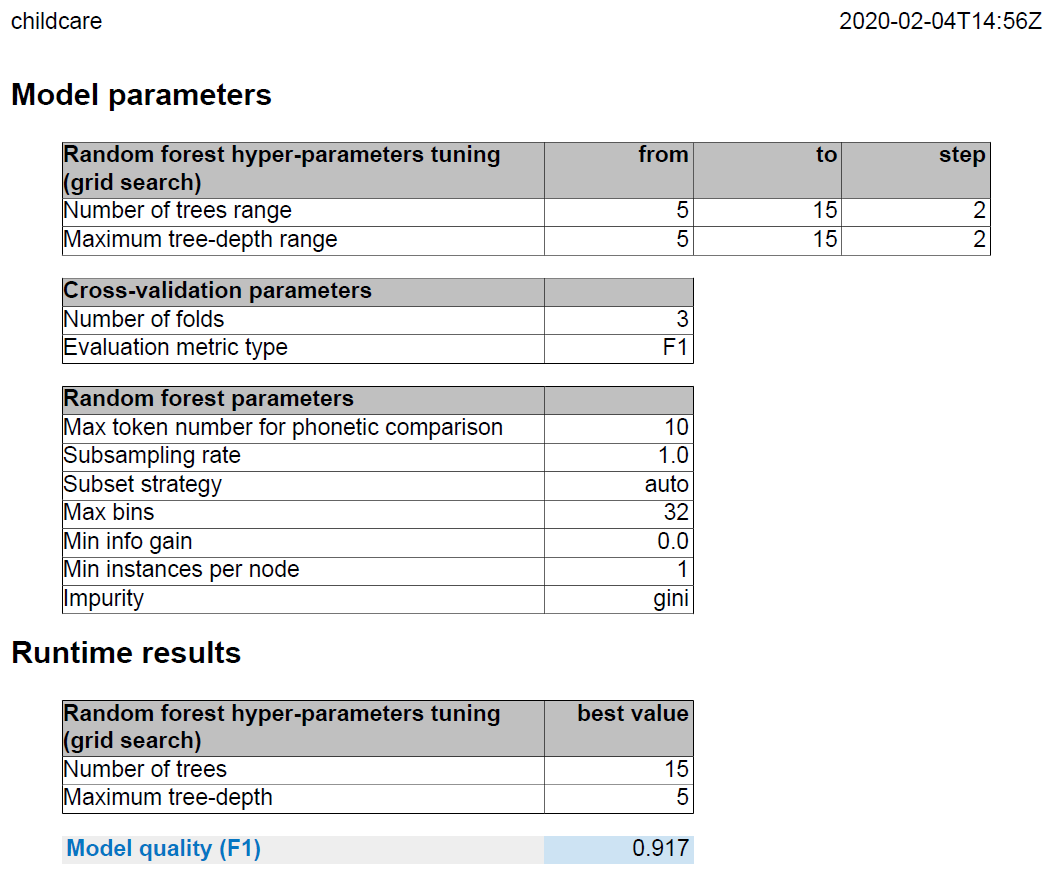
Presentation of the feature importance
report
The first page
- The Job name and the date/time (UTC) in the top left and right
respectively
- The heat map: each cell represents a feature. The color shade indicates if
a feature is important in the model. The more important is the feature, the
darker is the color.
- A number between 0 and 1.000 rounded off to three decimal digits
- 0.000: the value, for example 0.0001, is rounded to the nearest value.
- 0: the feature is not used
- N/A: the feature is not computed

For more information on the heat map, see Analyzing the heat map.
The second page
- The Job name and the date/time (UTC) in the top left and right
respectively - The parameters set in the Advanced
settings tab of the tMatchModel component, including the hyper-parameters (the
number of trees and tree-depth ranges) - The number of trees for the best model
- The maximum tree depth for the best model
- The model quality
Analyzing the heat map
The heat map helps you quickly see the importance of a feature and
matching key in a model.
In the following examples, you will see how to analyze the heat map and,
depending on the minimum model quality you want to obtain, how you can decide if a
feature is necessary to the model.
following input data:
- The site name,
- The address and
- The source of the previous data.
The database and the settings remained the same; only the matching keys
changed.
First example: the site name is the matching key
In this example, one input data is set as a matching key.

The model quality is: 0.802. It is high, but not enough to have a reliable
model.
In the following examples, more matching keys are set to see their impact on
the model quality.
Second example: the address and site name are the matching keys
In this example, one matching key is added to the previous example.

The model quality is: 0.917. It is significantly higher than the previous
example.
Adding a matching key helps you see that no features from the Site name input data are important.
Third example: the address, site name and source are the matching
keys
In this example, one matching key is added to the previous example.

The model quality is: 0.925.
You can see that no features from the Source input
data are important. If you compare this example to the previous one, the model
quality is higher but not enough to make this matching key essential to the
model.
Summary
examples.
| Example | Matching keys | Model quality |
|---|---|---|
| 1 | Site name | 0.802 |
| 2 | Address and Site name | 0.917 |
| 3 | Address, Site name and Source | 0.925 |
After setting different matching keys and running several Jobs, you can see
that some features are not important to the model.
Even if a model quality is satisfying, you can add or remove matching
keys to compare the results.
Depending on your database, a less important feature can be noise in the model.
Depending on the minimum model quality you want to obtain, you can decide if a
matching key is necessary to the model.
Improving a matching model
You can improve a matching model by changing the settings of the tMatchModel component.
As the result depends on your database, there is no ideal settings. The purpose of the
following tests is to show you that setting up the parameters differently can improve
the model quality.
settings can also affect the model quality.
the following input data:
- The site name,
- The address and
- The source of the previous data.
The reference settings are:
To perform these tests, the following method was applied: parameters were set
differently one at a time. If the model quality increased, the setting was kept and
another parameter was set differently. This is a good method to see how a parameter
impacts the model.
Only the settings changed. As tested in Analyzing the
heat map, changing the matching key impacts the model quality. Address
and Site name were set as the matching keys.
For more information on the parameters, see their description in the tMatchModel properties.
After running multiple Jobs, the highest model quality is: 0.942.
| Parameters | Reference setting | Tested settings | The model quality is better when set to |
|---|---|---|---|
| Number of trees range1 |
5 to 15 |
5 to 20, 5 to 30, 5 to 50, 5 to 100 |
5 to 30, 5 to 50 or 5 to 100 |
| Subsampling Rate |
1.0 | 0.5 | 1.0 |
| Impurity | Gini | Entropy | Entropy |
| Max Bins |
32 | 15 and 79 | 79 |
| Subset strategy |
auto | All (auto, all, sqrt and log2) |
auto |
| Min Instances per Node |
1 | 3 and 10 | 1 |
| 1 The larger is the range of the hyper-parameters (number of trees and tree depth), the longer is the Job duration. |
|||
Notice that the Evaluation metric type parameter has not
been changed. It remained set to F1. As the calculation is
different from an evaluation metric type to another, changing this setting is irrelevant
in those examples.
During the tests, no particular setting made the model quality increase from
0.917 to 0.942 but the combination of the different settings did.
The preceding results apply to a specific database. Depending on your database,
changing the settings as above does not have the same impact. The purpose is to show you
that, even if a model quality is satisfying, you can try other settings to improve the
matching model.