tNLPPredict
Uses a classifier model generated by tNLPModel to predict and
label the input text.
tNLPPredict outputs labeled text and the labels for tokens in two
separate columns.
This component can run only with Spark 1.6.
tNLPPredict properties for Apache Spark Batch
These properties are used to configure tNLPPredict running in
the Spark Batch Job framework.
The Spark Batch
tNLPPredict component belongs to the Natural Language Processing family.
The component in this framework is available in all Talend Platform products with Big Data and in Talend Data Fabric.
Basic settings
|
Schema and Edit Schema |
A schema is a row description. It defines the number of fields Click Sync Click Edit
Read-only columns are added to the output schema:
|
|
|
Built-In: You create and store the schema locally for this component |
|
|
Repository: You have already created the schema and stored it in the |
|
Define a storage configuration component |
Select the configuration component to be used to provide the configuration If you leave this check box clear, the target file system is the local The configuration component to be used must be present in the same Job. |
|
Original text column |
Select the column to be labeled in the input schema. |
|
Token column |
Select the column used for feature construction and prediction. |
|
Additional Features |
Select this check box to add additional features to the When you add features, the order must be the same as the additional |
|
NLP model path |
Set the path to the folder from where you want to retrieve the model If the model is stored in a single file, select the Use the For example: “/opt/model/<model_name>” If you want to store the model in a specific file system, for example S3 The button for browsing does not work with the Spark tHDFSConfiguration |
Usage
|
Usage rule |
This component is used as an intermediate step. This component, along with the Spark Batch component Palette it belongs to, |
|
Spark Batch Connection |
In the Spark
Configuration tab in the Run view, define the connection to a given Spark cluster for the whole Job. In addition, since the Job expects its dependent jar files for execution, you must specify the directory in the file system to which these jar files are transferred so that Spark can access these files:
This connection is effective on a per-Job basis. |
Extracting named entities using a classification model
This scenario applies only to subscription-based Talend Platform products with Big Data and Talend Data Fabric.
The tNLPPredict component predicts and automatically labels named
entities using a classification model generated by the tNLPModel
component.
You can find more information about natural language processing on
Talend Help Center (https://help.talend.com).
Creating a Job to extract named entities from text data
automatically labels text data divided into tokens, using a classification
model.
-
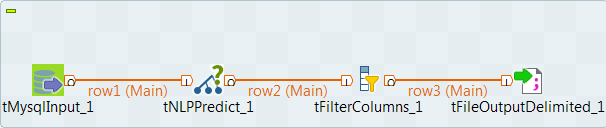
Drop the following components from the Palette onto the
design workspace: tMySQLInput,
tNLPPredict, tFilterColumns
and tFileOutputDelimited. - Connect the components using Row > Main connections.
Selecting the Spark mode
Depending on the Spark cluster to be used, select a Spark mode for your Job.
The Spark documentation provides an exhaustive list of Spark properties and
their default values at Spark Configuration. A Spark Job designed in the Studio uses
this default configuration except for the properties you explicitly defined in the
Spark Configuration tab or the components
used in your Job.
-
Click Run to open its view and then click the
Spark Configuration tab to display its view
for configuring the Spark connection. -
Select the Use local mode check box to test your Job locally.
In the local mode, the Studio builds the Spark environment in itself on the fly in order to
run the Job in. Each processor of the local machine is used as a Spark
worker to perform the computations.In this mode, your local file system is used; therefore, deactivate the
configuration components such as tS3Configuration or
tHDFSConfiguration that provides connection
information to a remote file system, if you have placed these components
in your Job.You can launch
your Job without any further configuration. -
Clear the Use local mode check box to display the
list of the available Hadoop distributions and from this list, select
the distribution corresponding to your Spark cluster to be used.This distribution could be:-
For this distribution, Talend supports:
-
Yarn client
-
Yarn cluster
-
-
For this distribution, Talend supports:
-
Standalone
-
Yarn client
-
Yarn cluster
-
-
For this distribution, Talend supports:
-
Yarn client
-
-
For this distribution, Talend supports:
-
Yarn client
-
Yarn cluster
-
-
For this distribution, Talend supports:
-
Standalone
-
Yarn client
-
Yarn cluster
-
-
For this distribution, Talend supports:
-
Yarn cluster
-
-
Cloudera Altus
For this distribution, Talend supports:-
Yarn cluster
Your Altus cluster should run on the following Cloud
providers:-
Azure
The support for Altus on Azure is a technical
preview feature. -
AWS
-
-
As a Job relies on Avro to move data among its components, it is recommended to set your
cluster to use Kryo to handle the Avro types. This not only helps avoid
this Avro known issue but also
brings inherent preformance gains. The Spark property to be set in your
cluster is:
1spark.serializer org.apache.spark.serializer.KryoSerializerIf you cannot find the distribution corresponding to yours from this
drop-down list, this means the distribution you want to connect to is not officially
supported by
Talend
. In this situation, you can select Custom, then select the Spark
version of the cluster to be connected and click the
[+] button to display the dialog box in which you can
alternatively:-
Select Import from existing
version to import an officially supported distribution as base
and then add other required jar files which the base distribution does not
provide. -
Select Import from zip to
import the configuration zip for the custom distribution to be used. This zip
file should contain the libraries of the different Hadoop/Spark elements and the
index file of these libraries.In
Talend
Exchange, members of
Talend
community have shared some ready-for-use configuration zip files
which you can download from this Hadoop configuration
list and directly use them in your connection accordingly. However, because of
the ongoing evolution of the different Hadoop-related projects, you might not be
able to find the configuration zip corresponding to your distribution from this
list; then it is recommended to use the Import from
existing version option to take an existing distribution as base
to add the jars required by your distribution.Note that custom versions are not officially supported by
Talend
.
Talend
and its community provide you with the opportunity to connect to
custom versions from the Studio but cannot guarantee that the configuration of
whichever version you choose will be easy. As such, you should only attempt to
set up such a connection if you have sufficient Hadoop and Spark experience to
handle any issues on your own.
For a step-by-step example about how to connect to a custom
distribution and share this connection, see Hortonworks.
Configuring the connection to the file system to be used by Spark
Skip this section if you are using Google Dataproc or HDInsight, as for these two
distributions, this connection is configured in the Spark
configuration tab.
-
Double-click tHDFSConfiguration to open its Component view.
Spark uses this component to connect to the HDFS system to which the jar
files dependent on the Job are transferred. -
If you have defined the HDFS connection metadata under the Hadoop
cluster node in Repository, select
Repository from the Property
type drop-down list and then click the
[…] button to select the HDFS connection you have
defined from the Repository content wizard.For further information about setting up a reusable
HDFS connection, search for centralizing HDFS metadata on Talend Help Center
(https://help.talend.com).If you complete this step, you can skip the following steps about configuring
tHDFSConfiguration because all the required fields
should have been filled automatically. -
In the Version area, select
the Hadoop distribution you need to connect to and its version. -
In the NameNode URI field,
enter the location of the machine hosting the NameNode service of the cluster.
If you are using WebHDFS, the location should be
webhdfs://masternode:portnumber; WebHDFS with SSL is not
supported yet. -
In the Username field, enter
the authentication information used to connect to the HDFS system to be used.
Note that the user name must be the same as you have put in the Spark configuration tab.
Configuring the input component
database.
-
Double click the tMysqlInput component to open its
Basic settings view and define its properties.
-
From the Property Type list, select
Repository if you have already stored the connection
to database in the Metadata node of the Repository tree view. The property
fields that follow are automatically filled in. -
Set the Schema as Built-in and click Edit
schema to define the desired schema.In this example, three columns are added to the schema:
text, tokens and
labels. -
Set the Query Type as Built-In.
In the Query box, enter the query required to retrieve
the desired columns from the table.
Extracting named entities from text data
and automatically labels text data, using a classification model generated by the
tNLPModel component.
-
Double click the tNLPPredict component to open its
Basic settings view and define its properties.
-
Click Sync columns to retrieve the
schema from the previous component connected in the Job.
-
From the Original text column list, select the
column that holds the text to be labeled, which is
text in this example. -
From the Token column list, select the column
used for feature construction and prediction, which is
tokens in this example -
From the NLP Library list, select the same
library you used for generating the model. -
If the named entity recognition model is stored in a single file,
select the Use the model file check box. -
Specify the path to the model in the NLP model
path.
-
-
Double click the tFilterColumns component to open its
Basic settings view and define its properties.-
Click Sync columns to retrieve the
schema from the previous component connected in the Job.
-
Set the Schema as Built-in and click
Edit schema to keep only the columns that
hold the original text, the labeled text and the labels.
-
-
Double click the tFileOutputDelimited component to open
its Basic settings view and define its properties.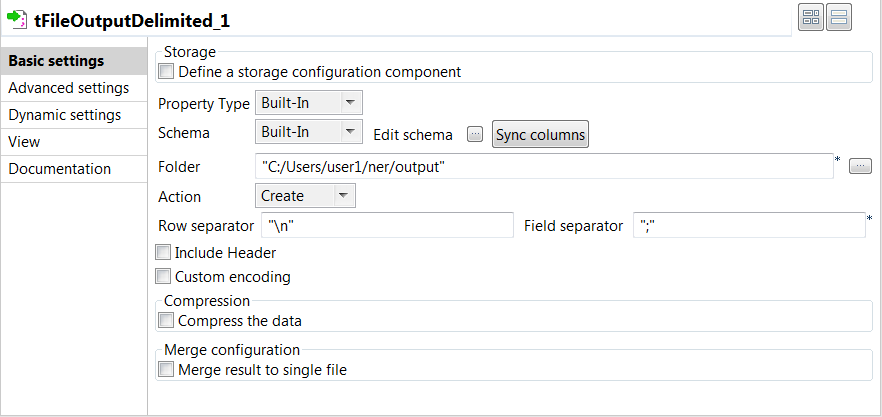
-
Click Sync columns to retrieve the
schema from the previous component connected in the Job.
-
Specify the path to the folder where you want to store the labeled text
and the labels, in the Folder field. -
Enter "
" in the Row
separator field and ";" in the
Field separator field.
-
-
Press F6 to save and execute the
Job.
The output files contain the original text, the labeled text and the labels. The
named entity recognition task was performed correctly, since person names were
extracted from the original text.
