tPostgresqlSCDELT
Addresses Slowly Changing Dimension needs through SQL queries (server-side
processing mode), and logs the changes into a dedicated DB2 SCD table.
The tPostgresqlSCDELT reflects and
tracks changes in a dedicated Postgresql SCD table.
tPostgresqlSCDELT Standard properties
These properties are used to configure tPostgresqlSCDELT running in the Standard Job framework.
The Standard
tPostgresqlSCDELT component belongs to the Business Intelligence and the Databases families.
The component in this framework is available in all Talend
products.
connector. The properties related to database settings vary depending on your database
type selection. For more information about dynamic database connectors, see Dynamic database components.
Basic settings
| Database |
Select a type of database from the list and click |
|
Property type |
Either Built-in or Repository. |
|
|
Built-in: No property data stored |
|
|
Repository: Select the repository |
|
Use an existing connection |
Select this check box and in the Component List click the relevant connection component to Note: When a Job contains the parent Job and the child Job, if you
need to share an existing connection between the two levels, for example, to share the connection created by the parent Job with the child Job, you have to:
For an example about how to share a database connection |
|
DB Version |
List of database versions. |
|
Host |
The IP address of the database server. |
|
Port |
Listening port number of database server. |
|
Database |
Name of the database |
|
Username and |
User authentication data for a dedicated database. To enter the password, click the […] button next to the |
|
Source table |
Name of the input DB2 SCD table. |
|
Table |
Name of the table to be written. Note that only one table can be |
|
Action on table |
Select to perform one of the following operations on the table
None: No action carried out on the
Drop and create table: The table is
Create table: A new table gets
Create table if not exists: A table
Clear table: The table content is
Truncate table: The table content |
|
Schema and Edit |
A schema is a row description. It defines the number of fields Click Edit
|
|
|
Built-in: The schema is created |
|
|
Repository: The schema already |
|
Surrogate Key |
Select the surrogate key column from the list. |
|
Creation |
Select the method to be used for the surrogate key For more information regarding the creation methods, see SCD management methodology. |
|
Source Keys |
Select one or more columns to be used as keys, to ensure the |
|
Use SCD Type 1 fields |
Use type 1 if tracking changes is not necessary. SCD Type 1 should |
|
Use SCD Type 2 fields |
Use type 2 if changes need to be tracked down. SCD Type 2 should |
|
SCD type 2 fields |
Click the [+] button to add as many rows as needed, each row for a column. Click This table is available only when the Use SCD type 2 fields |
|
Start date |
Specify the column that holds the start date for This list is available only when the Use SCD type 2 fields |
|
End date |
Specify the column that holds the end date for type This list is available only when the Use SCD type 2 fields Note: To avoid duplicated change records, it is recommended to
select a column that can identify each change for this field. |
|
Log active status |
Select this check box and from the This option is available only when the Use SCD type 2 fields |
|
Log versions |
Select this check box and from the Version field drop-down list displayed, select the column This option is available only when the Use SCD type 2 fields |
Advanced settings
|
Additional JDBC Parameters |
Specify additional JDBC parameters for the This property is not available when the Use an existing connection |
|
Debug mode |
Select this check box to display each step during processing |
|
tStat |
Select this check box to collect log data at the component |
Global Variables
|
Global Variables |
ERROR_MESSAGE: the error message generated by the A Flow variable functions during the execution of a component while an After variable To fill up a field or expression with a variable, press Ctrl + For further information about variables, see |
Usage
|
Usage rule |
This component is used as an output component. It requires an |
|
Dynamic settings |
Click the [+] button to add a row in the table The Dynamic settings table is For examples on using dynamic parameters, see Reading data from databases through context-based dynamic connections and Reading data from different MySQL databases using dynamically loaded connection parameters. For more information on Dynamic |
Tracking data changes in a PostgreSQL table using the tPostgreSQLSCDELT component
table using SCD (Slowly Changing Dimensions) Type 1 and Type 2 methods implemented by the
tPostgreSQLSCDELT component, and writes both the current and historical data in a SCD
dimension table.
The input data contains various employee details including name,
role, salary, and another
id column is added to help ensuring the unicity of the input
data.
At first, the following employee data is inserted to a new Snowflake table.
|
1 2 3 4 |
#id;name;role;salary 1;Mark Smith;tester;11000.00 2;Thomas Johnson;developer;12000.00 3;Teddy Brown;tester;13000.00 |
Later, the table is updated with the following renewed employee data.
|
1 2 3 4 5 |
#id;name;role;salary 1;Mark Smith;tester;15000.00 2;Thomas Johnson;tester;18000.00 3;Teddy Brown;writer;17000.00 4;John Clinton;developer;19000.00 |
You can see the role of Thomas Johnson is changed from
developer to tester, the role of Teddy is changed from
Browntester to writer, and his
salary is raised from 13000.00 to 17000.00. Besides, a new
employee record with id 4 is inserted. In this scenario,
-
the existing name and role data will be overwritten by the new data, so SCD Type 1 method
will be performed on them, and -
the full history of the salary data will be retained, and a new record with the changed
data will be always created and the previous record will be closed, so SCD Type 2 method
will be performed on it.
For more information about SCD types, see SCD management methodology.
Creating a Job for tracking data changes in a PostgreSQL table using
tPostgresqlSCDELT
-
Create a new Job and add a tPostgreSQLConnection
component, a tCreateTable component, two
tFixedFlowInput components, two
tPostgreSQL Input components, two
tPostgreSQLOutput components, two
tPostgreSQLSCDELT components, and two
tLogRow components to the Job.
-
Link the first tFixedFlowInput component to the first
tPostgreSQLOutput component using a Row > Main connection. -
Do the same to link the first tPostgreSQLInput component
to the first tLogRow component, the second
tFixedFlowInput component to the second
tPostgreSQLOutput component, and the second
tPostgreSQLInput component to the second
tLogRow component. -
Link the tPostgreSQLConnection component to the
tCreateTable component using a Trigger > On Subjob Ok connection. -
Do the same to link the first tFixedFlowInput component
to the first tPostgreSQLSCDELT component, the first
tPostgreSQLSCDELT component to the first
tPostgreSQLInput component, the first
tPostgreSQLInput component to the second
tFixedFlowInput component, the second
tFixedFlowInput component to the second
tPostgreSQLSCDELT component, the second
tPostgreSQLSCDELT component to the second
tPostgreSQLInput component.
Opening a connection to a PostgreSQL database
-
Double-click the tPostgreSQLConnection component to open
its Basic settings view.
-
In the Host, Port, Database, Schema, Username, and Password fields, enter the information required for the
connection to the PostgreSQL database.
Creating a PostgreSQL table
-
Double-click the tCreateTable component to open its
Basic settings view. -
In the Basic settings view, and from the
Database Type list, select Postgresql for this
scenario.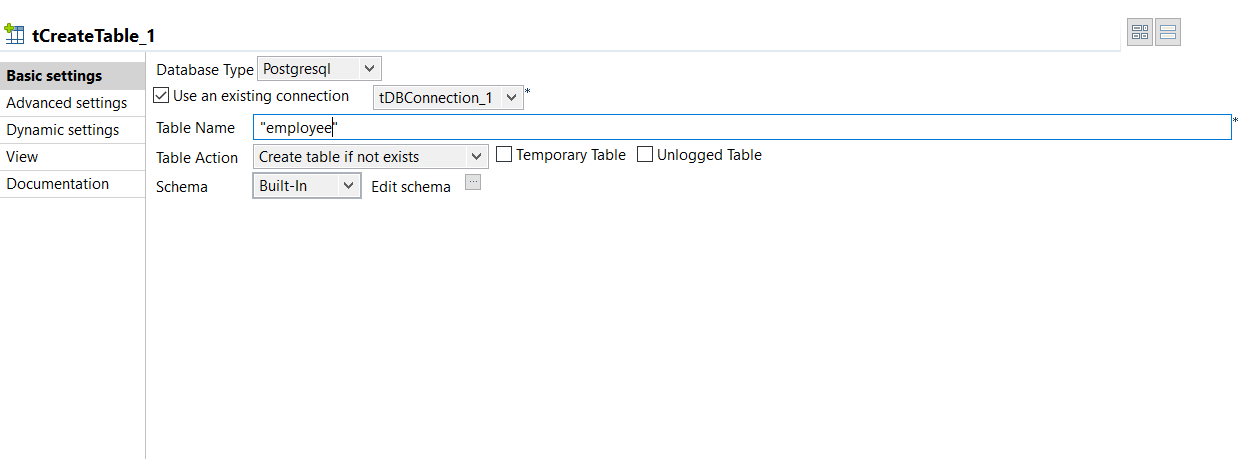
-
Select the Use an existing connection check box and from
the Component List drop-down list displayed, select the
connection component to reuse the connection created by it,
tPostgreSQLConnection_1 in this example. -
In the Table Name field, fill in a name for the table to
be created, employee in this example. -
From the Table Action list, select Create
table if not exist. -
Click the […] button next to Edit
schema and in the pop-up dialog box, define the schema by adding
four columns: id of Integer type as the primary key,
name and role of String type,
and salary of Double type.In the end, a new table employee is created to store
the employee data.
Inserting data into the new PostgreSQL table
-
Double-click the first tFixedFlowInput component to open
its Basic settings view. -
Click the […] button next to Edit
schema and in the pop-up dialog box, define the schema by adding
four columns: id of Integer type as the primary key,
name and role of String type,
and salary of Double type.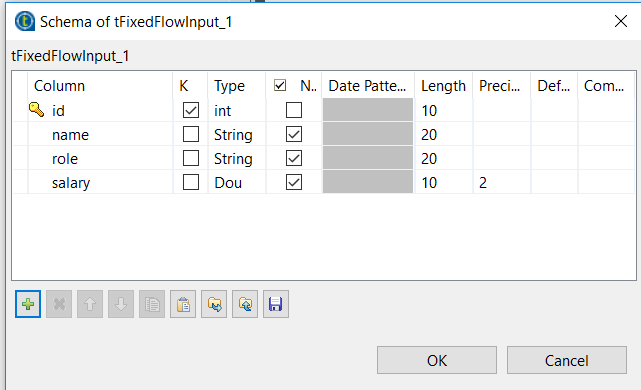
-
Click OK to save the schema changes. In the pop-up
dialog box, click Yes to propagate the
schema to the next component. -
Select Use Inline Content in the
Mode area. Then in the Content
field displayed, enter the following employee data to be inserted.1231;Mark Smith;tester;11000.002;Thomas Johnson;developer;12000.003;Teddy Brown;tester;13000.00 -
Double-click the first tPostgreSQLOutput component to
open its Basic settings view. -
Select the Use an existing connection check box and from
the Component List drop-down list displayed, and then
select the connection component to reuse the connection created by it,
tPostgreSQLConnection_1 in this example. -
In the Table field, enter the name of the table into
which the employee data will be written, employee in this
example. -
In the Action on table drop-down list, select
Default. -
In the Action on data drop-down list, select
Insert to insert the employee data transferred from
the first tFixedFlowInput component. -
Click the […] button next to Edit
schema to check whether the schema of tPostgreSQLOutput is the
same as the schema of tFixedFlowInput.
Tracking inserted data changes and writing the changes into a SCD dimension table
-
Double-click the first tPostgreSQLSCDELT component to
open its Basic settings view.
-
Select the Use an existing connection check box and from
the Component List drop-down list displayed, select the
connection component to reuse the connection created by it,
tPostgreSQLConnection_1 in this example. -
In the Source table field, enter the name of the table
whose data changes will be captured, employee in this
example. -
In the Table field, enter the name of the SCD dimension
table that will store both the current and historical employee data,
employee_scd in this example. -
Select Create table from the Action on
table drop-down list to create the SCD dimension table. -
Click the […] button next to Edit
schema and in the pop-up dialog box, define the schema by adding
nine columns: sk ( as the primary key) and
id of Integer type, name and
role of String type, salary of
Double type, start_date and
end_date of Date type with the Date Pattern
dd-MM-yyyy, and active_status
and version of Integer type. When done, click
OK to save the changes and close the dialog
box.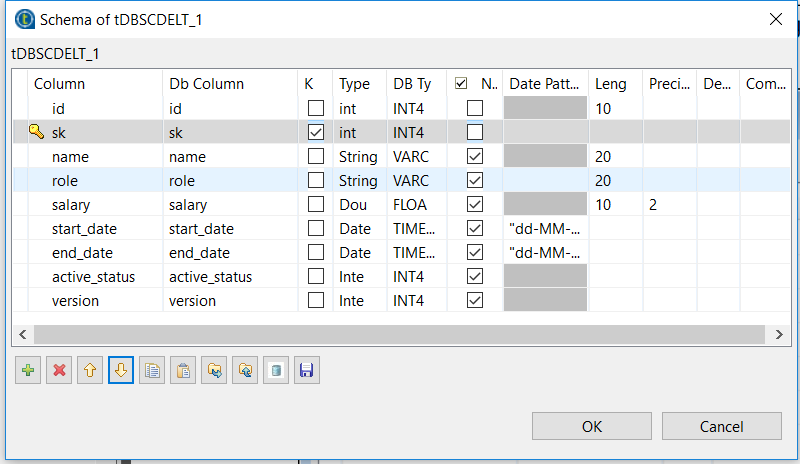
-
From the Surrogate key drop-down list, select the name
of the column that will be used as the primary key of the SCD dimension table,
sk in this example. -
Select DB sequence from the
Creation drop-down list and in the
Sequence field displayed, enter the name of the
PostgreSQL sequence used to generate the surrogate key for the SCD Type 2
method, employee_sequence in this example. -
Click the [+] button below the Source
keys table to add a new line, and click the
Name cell and select the key column of the source
table from the drop-down list, id in this example. -
Select the Use SCD type 1 fields check box, click the
[+] button below the SCD type 1
fields table twice to add two lines. Then click each cell and
from the drop-down list, select the column on which the SCD Type 1 method will
be performed. In this example, they are name and
role. -
Select the Use SCD type 2 fields check box, click the
[+] button below the SCD type 2
fields table to add a line. Then click the cell and select the
column on which the SCD Type 2 method will be performed. In this example, it is
salary. -
From the Start date and End date
drop-down lists, select the columns used to hold the start date and end date
values for the SCD Type 2 method respectively, start_date
and end_date in this example. -
Select the Log active status check box and from the
Active field drop-down list displayed, select the
column used to hold the active status value for the SCD Type 2 method, which
helps identify the active records, active_status in this
example. -
Select the Log versions check box and from the
Version field drop-down list, select the column used
to hold the version number of the records for the SCD Type 2 method,
version in this example.
Retrieving the data updates from the SCD dimension table
-
Double-click the first tPostgreSQLInput component to
open its Basic settings view. -
Select the Use an existing connection check box and from
the Component List drop-down list displayed, select the
connection component to reuse the connection created by it,
tPostgreSQLConnection_1 in this example. -
Click the […] button next to Edit
schema and in the pop-up dialog box, define the schema by adding
nine columns: sk and id of Integer
type as the primary key, name and
role of String type, salary of
Double type, start_date and
end_date of Date type with the Date Pattern
yyyy-MM-dd, and active_status
and version of Integer type. When done, click
OK to save the changes and close the dialog
box.The schema of the first tPostgreSQLInput component is
the same as the schema of the tPostgreSQLSCDELT1
component, you can just copy and paste it. -
In the Query field, enter the SQL command used to
retrieve data from the SCD dimension table, select * from
employee_scd in this example. -
In the Table Name field, enter the name of the SCD
dimension table where you will retrieve the data updates,
employee_scd in this example. -
Double-click the first tLogRow component and in the
Mode area on its Basic
settings view, select Table to display
the retrieved data in a table.
Updating data in the Postgresql table
-
Double-click the second tFixedFlowInput component to
open its Basic settings view. -
Click the […] button next to Edit
schema and in the pop-up dialog box, define the schema by adding
four columns: id of Integer type as the primary key,
name and role of String type,
and salary of Double type.This schema is the same as the schema of the first
tFixedFlowInput component, you can just copy and
paste it. -
Click OK to save the schema changes. In the pop-up
dialog box, click Yes to propagate the
schema to the next component. -
Select Use Inline Content in the
Mode area. Then in the Content
field displayed, enter the following employee data to update the existing
data.12341;Mark Smith;tester;15000.002;Thomas Johnson;tester;18000.003;Teddy Brown;writer;17000.004;John Clinton;developer;19000.00 -
Double-click the second tPostgreSQLOutput component to
open its Basic settings view. -
Select the Use an existing connection check box and from
the Component List drop-down list displayed, select the
connection component to reuse the connection created by it,
tPostgreSQLConnection_1 in this example. -
In the Table field, enter the name of the table, in
which the data will be updated, employee in this
example. -
Select Default from the Action on
table drop-down list. -
Select Insert or update from the Action on
data drop-down list.
Tracking data update changes and writing the changes into the SCD dimension table
-
Double-click the second tPostgreSQLSCDELT component to
open its Basic settings view. -
Repeat 2 through 14 in the procedure Tracking inserted data changes and writing the changes into a SCD dimension table to configure the second tPostgreSQLSCDELT
component.
Retrieve the data update changes from the SCD dimension table
-
Double-click the second tPostgreSQLInput component to
open its Basic settings view. - Repeat 2 through 5 in the procedure Retrieving the data updates from the SCD dimension table to configure the second tPostgreSQLInput component.
-
Double-click the second tLogRow component and in the
Mode area on its Basic
settings view, select Table to display
the retrieved data in a table.
Executing the Job to track data changes in a PostgreSQL table using tPostgreSQLSCDELT
-
Press Ctrl + S to save
the Job. -
Press F6 to execute the
Job.
As shown above, the old role developer for
Thomas Johnson is overwritten directly by the new
role tester because SCD Type 1 is performed on the
role column, and a new record with the surrogate
key value set to 26 is created for Teddy
Brown‘s salary update from 13000.00
to 17000.00 because SCD Type 2 is performed on the
salary column.
Related Scenario
For related topics, see tMysqlSCD andTracking data changes in a Snowflake table using the tJDBCSCDELT component.