tMysqlOutput
Writes, updates, makes changes or suppresses entries in a database.
tMysqlOutput executes the action defined on the table
and/or on the data contained in the table, based on the flow incoming from the preceding
component in the Job.
Depending on the Talend solution you
are using, this component can be used in one, some or all of the following Job
frameworks:
-
Standard: see tMysqlOutput Standard properties.
The component in this framework is generally available.
-
MapReduce: see tMysqlOutput MapReduce properties.
The component in this framework is available only if you have subscribed to one
of the
Talend
solutions with Big Data. -
Spark Batch: see tMysqlOutput properties for Apache Spark Batch.
This component can also be used to write data to a RDS Aurora or a RDS MySQL
database.The component in this framework is available only if you have subscribed to one
of the
Talend
solutions with Big Data. -
Spark Streaming: see tMysqlOutput properties for Apache Spark Streaming.
This component can also be used to write data to a RDS Aurora or a RDS MySQL
database.The component in this framework is available only if you have subscribed to Talend Real-time Big Data Platform or Talend Data
Fabric.
tMysqlOutput Standard properties
These properties are used to configure tMysqlOutput running in the Standard Job framework.
The Standard
tMysqlOutput component belongs to the Databases family.
The component in this framework is generally available.
Basic settings
|
Property type |
Either Built-In or Repository. Built-In: No property data stored centrally.
Repository: Select the repository file where the |
|
DB Version |
Select the MySQL version you are using. |
|
|
Click this icon to open a database connection wizard and store the For more information about setting up and storing database connection |
|
Use an existing connection |
Select this check box and in the Component Note:
When a Job contains the parent Job and the child Job, if you need to share an
existing connection between the two levels, for example, to share the connection created by the parent Job with the child Job, you have to:
For an example about how to share a database connection across Job levels, see |
|
Host |
Database server IP address. |
|
Port |
Listening port number of DB server. |
|
Database |
Name of the database. |
|
Username and Password |
DB user authentication data. To enter the password, click the […] button next to the |
|
Table |
Name of the table to be written. Note that only one table can be |
|
Action on table |
On the table defined, you can perform one of the following
Default: No operation is carried
Drop and create a table: The table is
Create a table: The table does not
Create a table if not exists: The table
Drop a table if exists and create: The
Clear a table: The table content is
Truncate table: The table content is |
|
Action on data |
On the data of the table defined, you can perform:
Insert: Add new entries to the table.
Update: Make changes to existing Insert or update: Insert a new record. If Update or insert: Update the record with the
Delete: Remove entries corresponding to
Replace: Add new entries to the table.
Insert or update on duplicate key or unique
Insert Ignore: Add only new rows to Warning:
You must specify at least one Note:
The dynamic schema feature can be used in the |
|
Schema and Edit |
A schema is a row description. It defines the number of fields (columns) to This component offers the This dynamic schema |
|
|
Built-In: You create and store the |
|
|
Repository: You have already created When the schema to be reused has default values that are integers or You can find more details about how to verify default |
|
Click Edit schema to make changes to the schema.
|
|
|
Die on error |
This check box is selected by default. Clear the check box to skip the |
| Specify a data source alias |
Select this check box and specify the alias of a data source created on the Warning:
If you use the component’s own DB configuration, your data source connection will be This check box is not available when the Use an existing |
Advanced settings
|
Additional JDBC parameters |
Specify additional connection properties for the DB connection you are Note:
You can press Ctrl+Space to |
|
Extend Insert |
Select this check box to carry out a bulk insert of a defined set of
Number of rows per insert: enter the Note:
This option is not compatible with the Reject link. You should therefore clear the check Warning:
If you are using this component with |
|
Use Batch |
Select this check box to activate the batch mode for data processing. Note:
This check box is available only when you have selected, the |
|
Batch Size |
Specify the number of records to be processed in each batch.. This field appears only when the Use batch mode |
|
Commit every |
Number of rows to be included in the batch before it is committed to |
|
Additional Columns |
This option is not available if you have just created the DB table |
|
|
Name: Type in the name of the schema |
|
|
SQL expression: Type in the SQL |
|
|
Position: Select Before, Replace or After, |
|
|
Reference column: Type in a reference |
|
Use field options |
Select this check box to customize a request, particularly if multiple |
|
Use Hint Options |
Select this check box to activate the hint configuration area which – HINT: specify the hint you need, – POSITION: specify where you put – SQL STMT: select the SQL statement |
|
Enable debug mode |
Select this check box to display each step involved in the process of |
|
Use duplicate key update mode insert |
Updates the values of the columns specified, in the event of duplicate
Column: Between double quotation marks,
Value: Enter the action you want to Note:
To use this option you must first of all select the Insert mode in the Action on data list found in the Basic Settings view. |
|
tStatCatcher Statistics |
Select this check box to collect log data at the component |
|
Enable parallel execution |
Select this check box to perform high-speed data processing, by treating multiple data flows
simultaneously. Note that this feature depends on the database or the application ability to handle multiple inserts in parallel as well as the number of CPU affected. In the Number of parallel executions field, either:
Note that when parallel execution is enabled, it is not possible to use global variables to Warning:
|
Global Variables
|
Global Variables |
NB_LINE: the number of rows read by an input component or
NB_LINE_UPDATED: the number of rows updated. This is an
NB_LINE_INSERTED: the number of rows inserted. This is an
NB_LINE_DELETED: the number of rows deleted. This is an
NB_LINE_REJECTED: the number of rows rejected. This is an
QUERY: the query statement processed. This is an After To fill up a field or expression with a variable, press Ctrl + For further information about variables, see A Flow variable functions during the execution of a component while an After variable |
Usage
|
Usage rule |
This component offers the flexibility benefit of the DB query and This component must be used as an output component. It allows you to |
|
Dynamic settings |
Click the [+] button to add a The Dynamic settings table is For examples on using dynamic parameters, see Scenario: Reading data from databases through context-based dynamic connections and Scenario: Reading data from different MySQL databases using dynamically loaded connection parameters. For more information on Dynamic |
Scenario: Inserting a column and altering data using tMysqlOutput
This Java scenario is a three-component job that aims at creating random data using a
tRowGenerator, duplicating a column to be altered
using the tMap component, and eventually altering the
data to be inserted based on an SQL expression using the tMysqlOutput component.
-
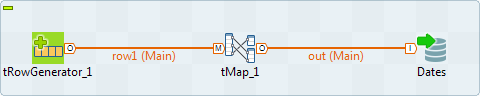
Drop the following components from the Palette onto the design workspace: tRowGenerator, tMap and
tMySQLOutput. -
Connect tRowGenerator, tMap, and tMysqlOutput using
the Row Main link.
-
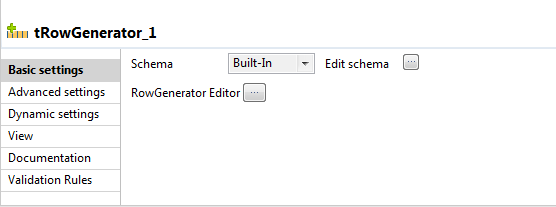
In the design workspace, select tRowGenerator to display its Basic
settings view.
-
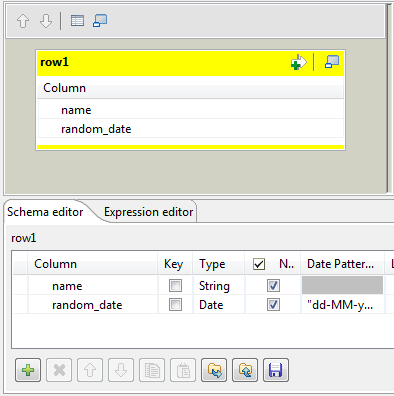
Click the Edit schema three-dot button to
define the data to pass on to the tMap
component, two columns in this scenario, name and
random_date.
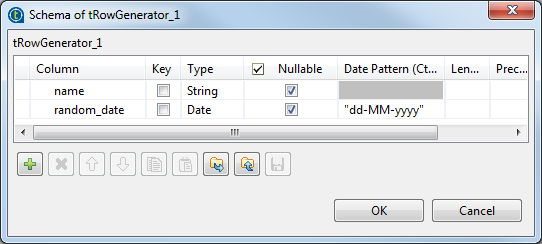
-
Click OK to close the dialog box.
-
Click the RowGenerator Editor three-dot
button to open the editor and define the data to be generated.
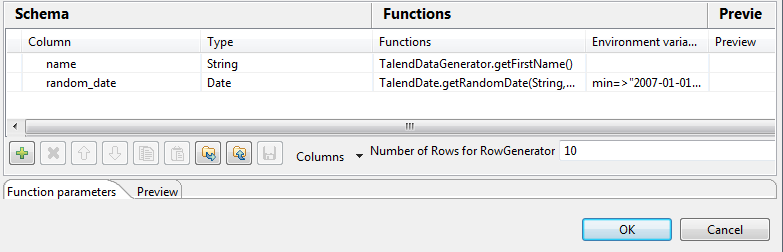
-
Click in the corresponding Functions fields
and select a function for each of the two columns,getFirstNamefor
the first column andgetrandomDatefor the second column. -
In the Number of Rows for Rowgenerator
field, enter 10 to generate ten first name rows and click Ok to close the editor. -
Double-click the tMap component to open the
Map editor. The Map editor opens displaying the input metadata of the tRowGenerator component.
-
In the Schema editor panel of the Map
editor, click the plus button of the output table to add two rows and define the
first as random_date and the second as
random_date1.
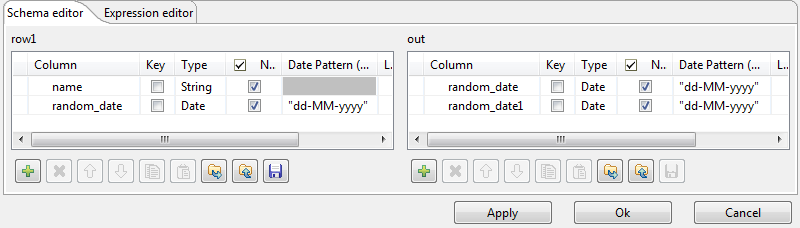
In this scenario, we want to duplicate the random_date column and
adapt the schema in order to alter the data in the output component.
-
In the Map editor, drag the random_date row from the
input table to the random_date and random_date1
rows in the output table.
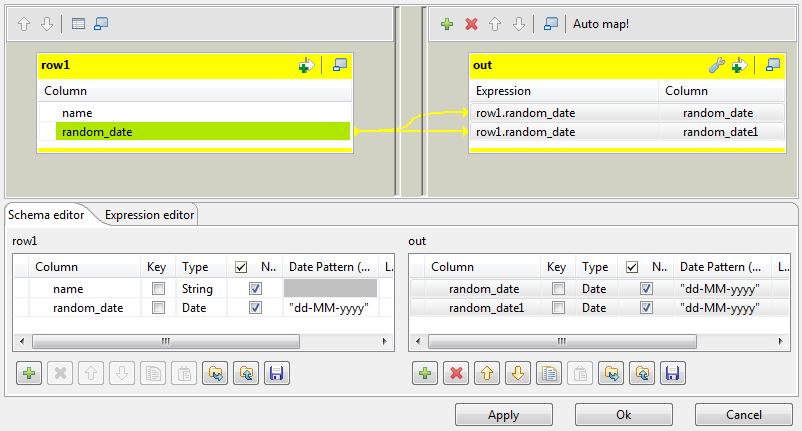
-
Click OK to close the editor.
-
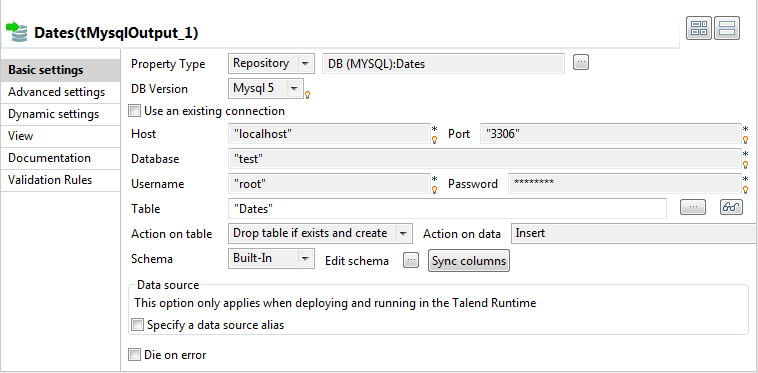
In the design workspace, double-click the tMysqlOutput component to display its Basic settings view and set its parameters.
-
Set Property Type to Repository and then click the three-dot button to open the
[Repository content] dialog box and select
the correct DB connection. The connection details display automatically in the
corresponding fields.Note:If you have not stored the DB connection details in the Metadata entry in the Repository, select Built-in
on the property type list and set the connection detail manually. -
Click the three-dot button next to the Table
field and select the table to be altered, Dates in this
scenario. -
On the Action on table list, select
Drop table if exists and create, select
Insert on the Action on
data list. -
If needed, click Sync columns to synchronize
with the columns coming from the tMap
component. -
Click the Advanced settings tab to display
the corresponding view and set the advanced parameters.
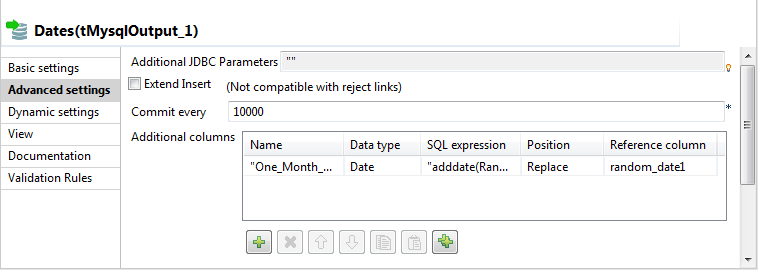
-
In the Additional Columns area, set the
alteration to be performed on columns.In this scenario, the One_month_later column replaces
random_date_1. Also, the data itself gets altered using
an SQL expression that adds one month to the randomly picked-up date of the
random_date_1 column. ex: 2007-08-12 becomes
2007-09-12.-Enter One_Month_Later in the Name cell.
-In the SQL expression cell, enter the
relevant addition script to be performed,"adddate(Random_date, interval 1in this scenario.
month)"-Select Replace on the Position list.
-Enter Random_date1 on the Reference column list.
For this job we duplicated the random_date_1 column in the DB
table before replacing one instance of it with the
One_Month_Later column. The aim of this workaround was to
be able to view upfront the modification performed.
-
Save your job and press F6 to execute
it.
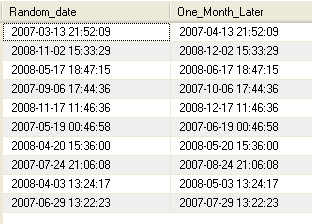
The new One_month_later column replaces the
random_date1 column in the DB table and adds one month to each
of the randomly generated dates.
See also Procedure of
the tDBOutput component.
Scenario: Updating data using tMysqlOutput
This Java scenario describes a two-component Job that updates data in a MySQL table
according to that in a delimited file.
-
Drop tFileInputDelimited and tMysqlOutput from the Palette onto the design workspace.
-
Connect the two components together using a Row
Main link.

-
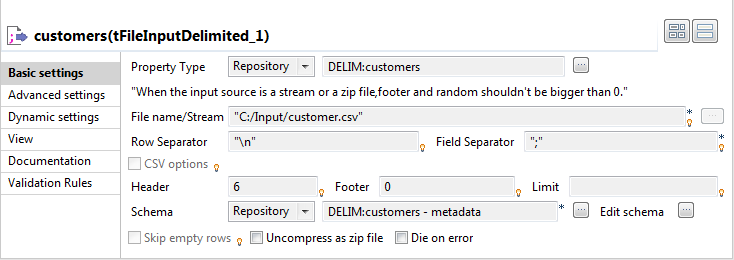
Double-click tFileInputDelimited to display
its Basic settings view and define the
component properties. -
From the Property Type list, select Repository if you have already stored the metadata of
the delimited file in the Metadata node in the
Repository tree view. Otherwise, select
Built-In to define manually the metadata of
the delimited file.For more information about storing metadata, see
Talend Studio
User Guide.
-
In the File Name field, click the three-dot
button and browse to the source delimited file that contains the modifications
to propagate in the MySQL table.In this example, we use the customer_update file that
holds four columns: id, CustomerName,
CustomerAddress and idState. Some
of the data in these four columns is different from that in the MySQL
table.

-
Define the row and field separators used in the source file in the
corresponding fields. -
If needed, set Header, Footer and Limit.
In this example, Header is set to 1 since the
first row holds the names of columns, therefore it should be ignored. Also, the
number of processed lines is limited to 2000. -
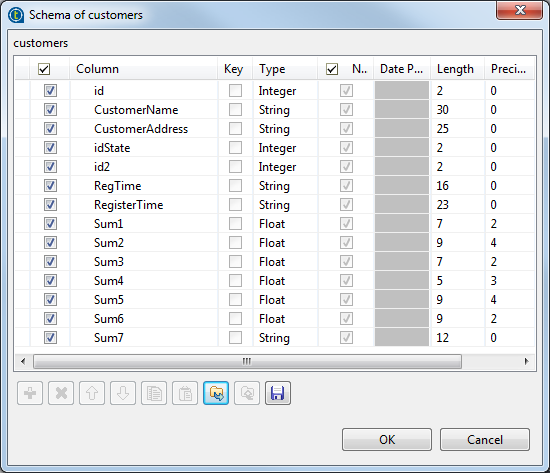
Click
the three-dot button next to Edit Schema to
open a dialog box where you can describe the data structure of the source
delimited file that you want to pass to the component that follows.
-
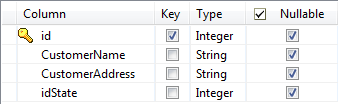
Select the Key check box(es) next to the
column name(s) you want to define as key column(s).
It is necessary to define at least one column as a key column for the Job to be
executed correctly. Otherwise, the Job is automatically interrupted and an error
message displays on the console.
-
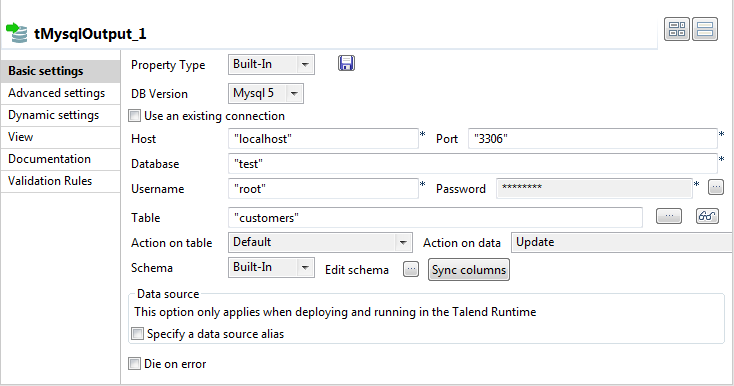
In the design workspace, double-click tMysqlOutput to open its Basic
settings view where you can define its properties.
-
Click Sync columns to retrieve the schema of
the preceding component. If needed, click the three-dot button next to Edit schema to open a dialog box where you can check
the retrieved schema. -
From the Property Type list, select Repository if you have already stored the connection
metadata in the Metadata node in the Repository tree view. Otherwise, select Built-In to define manually the connection
information.For more information about storing metadata, see
Talend Studio
User Guide. -
Fill in the database connection information in the corresponding
fields. -
In the Table field, enter the name of the
table to update. -
From the Action on table list, select the
operation you want to perform, Default in this
example since the table already exists. -
From the Action on data list, select the
operation you want to perform on the data, Update in this example. -
Save your Job and press F6 to execute it.

Using you DB browser, you can verify if the MySQL table, customers,
has been modified according to the delimited file.
In the above example, the database table has always the four columns
id, CustomerName,
CustomerAddress and idState, but certain
fields have been modified according to the data in the delimited file used.
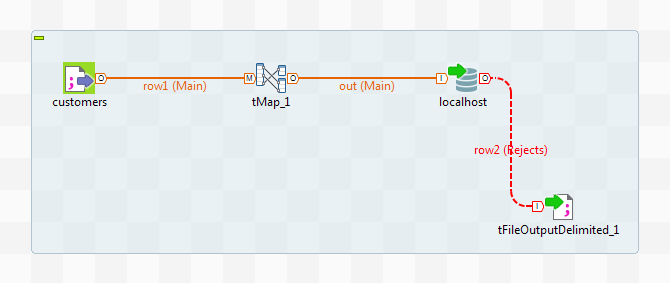
Scenario: Retrieving data in error with a Reject link
This scenario describes a four-component Job that carries out migration from a
customer file to a MySQL database table and redirects data in error towards a CSV file
using a Reject link.
-
In the Repository, select the customer file
metadata that you want to migrate and drop it onto the workspace. In the
[Components] dialog box, select tFileInputDelimited and click OK. The component properties will be filled in
automatically. -
If you have not stored the information about your customer file under
the Metadata node in the Repository. Drop a tFileInputDelimited component from the family File > Input, in
the Palette, and fill in its properties
manually in the Component tab. -
From the Palette, drop a tMap from the Processing family onto the workspace.
-
In the Repository, expand the Metadata node, followed by the Db Connections node and select the connection required to
migrate your data to the appropriate database. Drop it onto the workspace. In
the [Components] dialog box, select tMysqlOutput and click OK. The database connection properties will be automatically
filled in. -
If you have not stored the database connection details under the Db Connections node in the Repository, drop a tMysqlOutput
from the Databases family in the Palette and fill in its properties manually in the
Component tab.
For more information, see
Talend Studio
User Guide.
-
From the Palette, select a tFileOutputDelimited from the File > Output family, and
drop it onto the workspace. -
Link the customers component to the
tMap component, and the tMap and Localhost
with a Row Main link. Name this second link
out. -
Link the Localhost to the tFileOutputDelimited using a Row > Reject link.
-
Double-click the customers component to
display the Component view.
-
In the Property Type list, select Repository and click the […]
button in order to select the metadata containing the connection
to your file. You can also select the Built-in
mode and fill in the fields manually. -
Click the […] button next to the File Name field, and fill in the path and the name of
the file you want to use. -
In the Row and Field
Separator fields, type in between inverted commas the row and
field separator used in the file. -
In the Header, Footer and Limit fields, type
in the number of headers and footers to ignore, and the number of rows to which
processing should be limited. -
In the Schema list, select Repository and click the […] button in order to select the schema of your file, if it
is stored under the Metadata node in the
Repository. You can also click the
[…] button next to the Edit schema field, and set the schema manually.
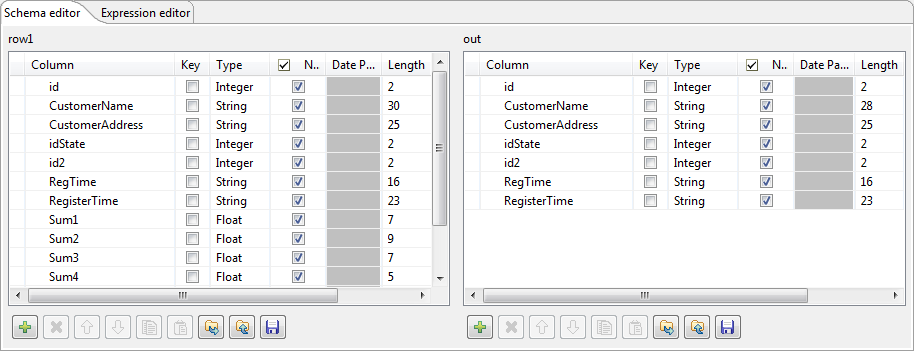
The schema is as follows:
-
Double-click the tMap component to open its
editor.

-
Select the id, CustomerName,
CustomerAddress, idSate,
id2, RegTime and
RegisterTime columns on the table on the left and drop
them on the out table, on the right.
-
In the Schema editor area, at the bottom of
the tMap editor, in the right table, change the
length of the CustomerName column to
28 to create an error. Thus, any data for which the
length is greater than 28 will create errors, retrieved with the Reject link. -
Click OK.
-
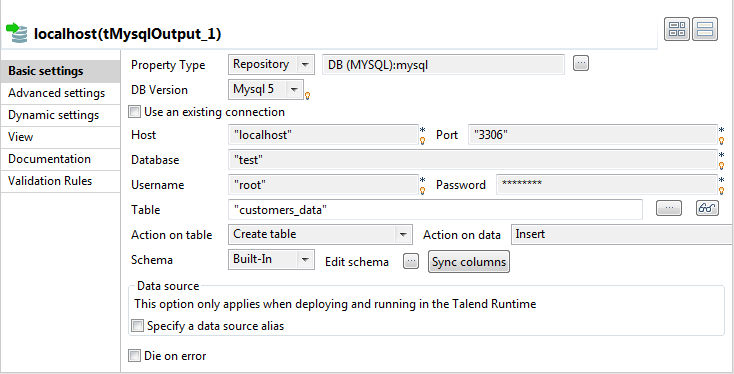
In the workspace, double-click the output Localhost component to display its Component view.
-
In the Property Type list, select Repository and click the […] button to select the connection to the database metadata.
The connection details will be automatically filled in. You can also select the
Built-in mode and set the fields
manually. -
In the Table field, type in the name of the
table to be created. In this scenario, we call it
customers_data. -
In the Action on data list, select the
Create table option. -
Click the Sync columns button to retrieve
the schema from the previous component. -
Make sure the Die on error check box isn’t
selected, so that the Job can be executed despite the error you just
created. -
Click the Advanced settings tab of the
Component view to set the advanced
parameters of the component.
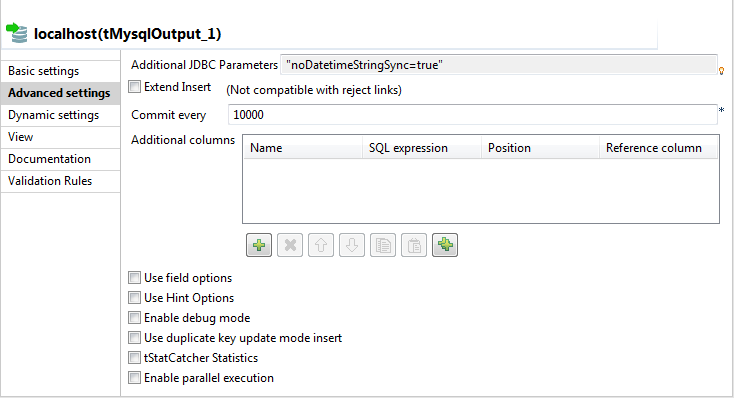
-
Deselect the Extend Insert check box which
enables you to insert rows in batch, because this option is not compatible with
the Reject link. -
Double-click the tFileOutputDelimited
component to set its properties in the Component view.
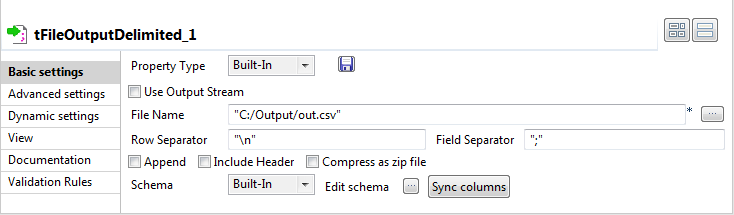
-
Click the […] button next to the File Name field to fill in the path and name of the
output file. -
Click the Sync columns button to retrieve
the schema of the previous component. -
Save your Job and press F6 to execute it.
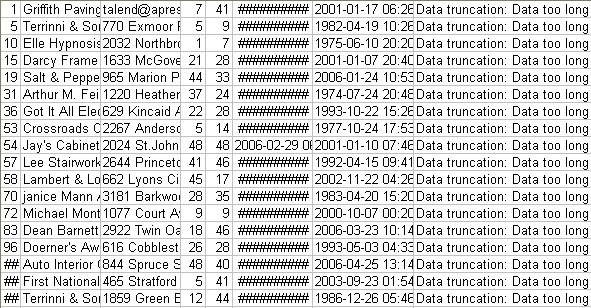
The data in error are sent to the delimited file, as well as the error type met. Here,
we have: Data truncation.
Scenario: Writing dynamic columns from a source file to a database
This scenario applies only to a subscription-based Talend solution.
In this scenario, MySQL is used for demonstration purposes. You will read dynamic columns from a source file, map them and then
write them to a table in a MySQL database. By defining
a dynamic column alongside known column names, we can retrieve all of the columns from
the source file, including the unknown columns.
-
Drop a tFileInputDelimited, a tMap and a tMysqlOutput component onto the workspace.

-
Link tFileInputDelimited to tMap using a Row >
Main connection. -
Link tMap to tMysqlOutput using a Row > *New Output*
(Main) connection. -
Double-click tFileInputDelimited to open its
Basic Settings view in the Component tab.
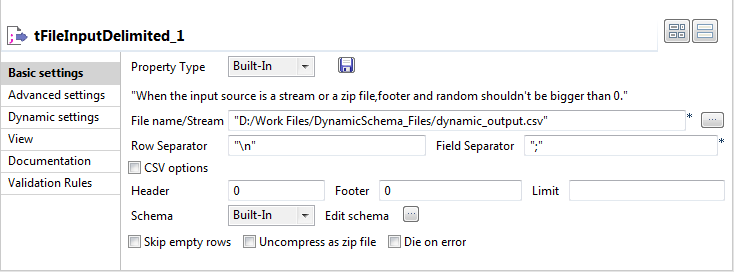
The dynamic schema feature is only supported in Built-In mode.
-
Select Built-In from the Property Type list.
-
Click the […] button next to the File name/Stream field and browse to the input
file. -
Enter the characters you want to use as separators next to the Row Separator and Field
Separator fields. -
Click Edit Schema to define the source file
schema.The [Edit Schema] dialog box opens.

-
Add as many rows as required or delete rows using the

and

buttons.
-
Modify the order of the columns using the

and

buttons.
-
Under Column, enter the names of each known
column on separate rows. -
In the last row, under Column, enter a name
for the dynamic column. -
Under Type, click the field to define the
type of data in the corresponding column.Click the arrow to select the correct data type.
Under Type, the dynamic
column type must be set as Dynamic.
The dynamic column must be defined in the last row of the schema.
-
Click OK to close the dialog box when you
have finished defining the source schema. -
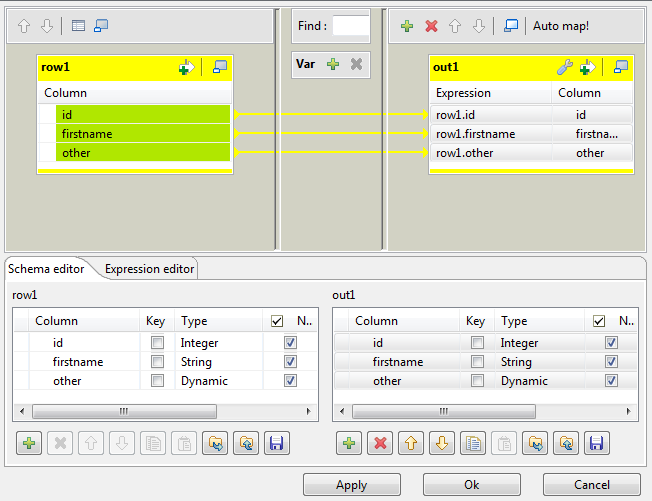
Click tMap to open its Basic Settings view in the Component tab.

-
Click […] next to Map Editor to map the columns from the source file.

-
On the toolbar on top of the Output Panel on
the top right of the window, click thebutton.
The [Add an Output] schema dialog box
appears.

-
Next to New output, enter a name for the
output schema. -
Click OK to close the dialog box.
-
Using the Ctrl + click technique, highlight
all off the column names in the input schema on the left and drop them onto the
output schema.The columns dropped on the output columns retain their original values and
they are automatically mapped on a one to one basis.
-
In the output schema, click the relevant row under Expression if you want to use the Expression Builder to set advanced parameters for the
corresponding column in the output. -
Click the […] button which appears to open
the Expression Builder and set the parameters
as required.
For further information about using the Expression
Builder, see
Talend Studio
User Guide.
The dynamic column must be mapped on a one to one basis and cannot undergo
any transformations. It cannot be used in a filter expression or in a variables
section. It cannot be renamed in the output table and cannot be used as a join
condition.
-
Click OK to close the Map Editor.
-
Double click tMysqlOutput to set its
Basic Settings in the Component tab.

-
Select Built-in as the Property Type.
-
Select the DB Version from the corresponding
list. -
Next to Host, enter the database server IP
address. -
Next to Port, enter the listening port
number of the database server. -
Enter your authentication data in the Username and Password
fields. -
Next to Action on table, select the required
action. -
Next to Action on data, select the required
action. -
Set the Schema type as
Built-in and click Edit schema
to modify the schema if required. -
Press F6 to run the Job.
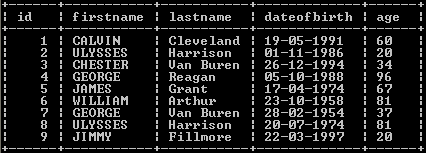
The table is written to the MySQL database along with the data and the column
names of the previously unknown columns:
The Job can also be run in the Traces Debug mode,
which allows you to view the rows as they are written to the output file, in the
workspace.
For further information about defining and mapping dynamic schemas, see
Talend Studio
User Guide.
For an example of how to write dynamic columns to an output file, see Scenario 5: Writing dynamic columns from a database to an output file.
tMysqlOutput MapReduce properties
These properties are used to configure tMysqlOutput running in the MapReduce Job framework.
The MapReduce
tMysqlOutput component belongs to the Databases family.
The component in this framework is available only if you have subscribed to one
of the
Talend
solutions with Big Data.
Basic settings
|
Property type |
Either Built-In or Repository. Built-In: No property data stored centrally.
Repository: Select the repository file where the |
|
DB Version |
Select the version of the database to be used. |
|
|
Click this icon to open a database connection wizard and store the For more information about setting up and storing database connection |
|
Host |
Database server IP address. |
|
Port |
Listening port number of DB server. |
|
Database |
Name of the database. |
|
Username and Password |
DB user authentication data. To enter the password, click the […] button next to the |
|
Table |
Name of the table to be written. Note that only one table can be |
|
Schema and Edit |
A schema is a row description. It defines the number of fields (columns) to |
|
|
Built-In: You create and store the |
|
|
Repository: You have already created When the schema to be reused has default values that are integers or You can find more details about how to verify default |
|
Click Edit schema to make changes to the schema.
|
|
|
Die on error |
This check box is selected by default. Clear the check box to skip the |
Usage
|
Usage rule |
In a Note that in this documentation, unless otherwise |
|
Hadoop Connection |
You need to use the Hadoop Configuration tab in the This connection is effective on a per-Job basis. |
Related scenarios
No scenario is available for the Map/Reduce version of this component yet.
tMysqlOutput properties for Apache Spark Batch
These properties are used to configure tMysqlOutput running in the Spark Batch Job framework.
The Spark Batch
tMysqlOutput component belongs to the Databases family.
This component can also be used to write data to a RDS Aurora or a RDS MySQL
database.
The component in this framework is available only if you have subscribed to one
of the
Talend
solutions with Big Data.
Basic settings
|
Property type |
Either Built-In or Repository. Built-In: No property data stored centrally.
Repository: Select the repository file where the |
|
DB Version |
Select the MySQL version you are using. When the database to be used is RDS Aurora, you need to select Mysql 5. |
|
|
Click this icon to open a database connection wizard and store the For more information about setting up and storing database connection |
|
Use an existing connection |
Select this check box and in the Component |
|
Host |
Database server IP address. |
|
Port |
Listening port number of DB server. |
|
Database |
Name of the database. |
|
Username and Password |
DB user authentication data. To enter the password, click the […] button next to the |
|
Table |
Name of the table to be written. Note that only one table can be |
|
Schema and Edit |
A schema is a row description. It defines the number of fields (columns) to |
|
|
Built-In: You create and store the |
|
|
Repository: You have already created When the schema to be reused has default values that are integers or You can find more details about how to verify default |
|
Click Edit schema to make changes to the schema.
|
Advanced settings
|
Additional JDBC parameters |
Specify additional connection properties for the database connection you are |
|
Use Batch per partition |
Select this check box to activate the batch mode for data processing. Note:
This check box is available only when you have selected, the |
|
Batch Size |
Specify the number of records to be processed in each batch.. This field appears only when the Use batch mode |
|
Connection pool |
In this area, you configure, for each Spark executor, the connection pool used to control
|
|
Evict connections |
Select this check box to define criteria to destroy connections in the connection pool. The
|
Usage
|
Usage rule |
This component is used as an end component and requires an input link. This component should use a tMysqlConfiguration component This component, along with the Spark Batch component Palette it belongs to, appears only Note that in this documentation, unless otherwise |
|
Spark Connection |
You need to use the Spark Configuration tab in
the Run view to define the connection to a given Spark cluster for the whole Job. In addition, since the Job expects its dependent jar files for execution, you must specify the directory in the file system to which these jar files are transferred so that Spark can access these files:
This connection is effective on a per-Job basis. |
Related scenarios
For a scenario about how to use the same type of component in a Spark Batch Job, see Writing and reading data from MongoDB using a Spark Batch Job.
tMysqlOutput properties for Apache Spark Streaming
These properties are used to configure tMysqlOutput running in the Spark Streaming Job framework.
The Spark Streaming
tMysqlOutput component belongs to the Databases family.
This component can also be used to write data to a RDS Aurora or a RDS MySQL
database.
The component in this framework is available only if you have subscribed to Talend Real-time Big Data Platform or Talend Data
Fabric.
Basic settings
|
Property type |
Either Built-In or Repository. Built-In: No property data stored centrally.
Repository: Select the repository file where the |
|
DB Version |
Select the version of the database to be used. When the database to be used is RDS Aurora, you need to select Mysql 5. |
|
|
Click this icon to open a database connection wizard and store the For more information about setting up and storing database connection |
|
Use an existing connection |
Select this check box and in the Component |
|
Host |
Database server IP address. |
|
Port |
Listening port number of DB server. |
|
Database |
Name of the database. |
|
Username and Password |
DB user authentication data. To enter the password, click the […] button next to the |
|
Table |
Name of the table to be written. Note that only one table can be |
|
Action on table |
On the table defined, you can perform one of the following
Default: No operation is carried
Drop and create a table: The table is
Create a table: The table does not
Create a table if not exists: The table
Drop a table if exists and create: The
Clear a table: The table content is
Truncate table: The table content is |
|
Schema and Edit |
A schema is a row description. It defines the number of fields (columns) to |
|
|
Built-In: You create and store the |
|
|
Repository: You have already created When the schema to be reused has default values that are integers or You can find more details about how to verify default |
|
Click Edit schema to make changes to the schema.
|
|
|
Die on error |
This check box is selected by default. Clear the check box to skip the |
Advanced settings
|
Additional JDBC parameters |
Specify additional connection properties for the DB connection you are Note:
You can press Ctrl+Space to |
|
Use Batch |
Select this check box to activate the batch mode for data processing. Note:
This check box is available only when you have selected, the |
|
Batch Size |
Specify the number of records to be processed in each batch.. This field appears only when the Use batch mode |
|
Connection pool |
In this area, you configure, for each Spark executor, the connection pool used to control
|
|
Evict connections |
Select this check box to define criteria to destroy connections in the connection pool. The
|
Usage
|
Usage rule |
This component is used as an end component and requires an input link. This component should use a tMysqlConfiguration component This component, along with the Spark Streaming component Palette it belongs to, appears Note that in this documentation, unless otherwise explicitly stated, a scenario presents |
|
Spark Connection |
You need to use the Spark Configuration tab in
the Run view to define the connection to a given Spark cluster for the whole Job. In addition, since the Job expects its dependent jar files for execution, you must specify the directory in the file system to which these jar files are transferred so that Spark can access these files:
This connection is effective on a per-Job basis. |
Related scenarios
For a scenario about how to use the same type of component in a Spark Streaming Job, see
Reading and writing data in MongoDB using a Spark Streaming Job.