tOracleInput
Reads an Oracle database and extracts fields based on a query.
tOracleInput executes a database query
with a strictly defined order which must correspond to the schema definition. Then it
passes on the field list to the next component via a Main row link.
Depending on the Talend solution you
are using, this component can be used in one, some or all of the following Job
frameworks:
-
Standard: see tOracleInput Standard properties.
The component in this framework is generally available.
-
MapReduce: see tOracleInput MapReduce properties.
The component in this framework is available only if you have subscribed to one
of the
Talend
solutions with Big Data. -
Spark Batch: see tOracleInput properties for Apache Spark Batch.
This component also allows you to connect and read data from a RDS Oracle database.
The component in this framework is available only if you have subscribed to one
of the
Talend
solutions with Big Data.
tOracleInput Standard properties
These properties are used to configure tOracleInput running in the Standard Job framework.
The Standard
tOracleInput component belongs to the Databases family.
The component in this framework is generally available.
Basic settings
|
Property type |
Either Built-In or Repository. Built-In: No property data stored centrally.
Repository: Select the repository file where the |
|
|
Click this icon to open a database connection wizard and store the For more information about setting up and storing database connection |
|
Use an existing connection |
Select this check box and in the Component Note:
When a Job contains the parent Job and the child Job, if you need to share an
existing connection between the two levels, for example, to share the connection created by the parent Job with the child Job, you have to:
For an example about how to share a database connection across Job levels, see |
|
Connection type |
Drop-down list of available drivers:
Oracle OCI: Select this connection type
Oracle Custom: Select this connection
Oracle Service Name: Select this
WALLET: Select this connection type to
Oracle SID: Select this connection type |
|
DB Version |
Select the Oracle version in use. |
|
Host |
Database server IP address. |
|
Port |
Listening port number of DB server. |
|
Database |
Name of the database. |
|
Oracle schema |
Oracle schema name. |
|
Username and Password |
DB user authentication data. To enter the password, click the […] button next to the |
|
Schema and Edit |
A schema is a row description. It defines the number of fields (columns) to Click Edit schema to make changes to the schema.
This component offers the This dynamic schema |
|
|
Built-In: You create and store the |
|
|
Repository: You have already created |
|
Table name |
Database table name. |
|
Query type and Query |
Enter your DB query paying particularly attention to properly sequence
If using the dynamic schema feature, the SELECT |
| Specify a data source alias |
Select this check box and specify the alias of a data source created on the If you use the component’s own DB configuration, your data source connection will be This check box is not available when the Use an existing |

Advanced settings
|
Additional JDBC parameters |
Specify additional connection properties for the database connection you are This field is not available if the Use an existing |
|
tStatCatcher Statistics |
Select this check box to collect log data at the component |
|
Use cursor |
Select this check box and in the Cursor |
|
Trim all the String/Char columns |
Select this check box to remove leading and trailing whitespace from |
|
Trim column |
Remove leading and trailing whitespace from defined columns. |
|
No null values |
Check this box to improve the performance if there are no null values. |
Global Variables
|
Global Variables |
NB_LINE: the number of rows processed. This is an After
QUERY: the query statement being processed. This is a Flow
ERROR_MESSAGE: the error message generated by the A Flow variable functions during the execution of a component while an After variable To fill up a field or expression with a variable, press Ctrl + For further information about variables, see |
Usage
|
Usage rule |
This component covers all possible SQL queries for Oracle |
|
Dynamic settings |
Click the [+] button to add a The Dynamic settings table is For examples on using dynamic parameters, see Scenario: Reading data from databases through context-based dynamic connections and Scenario: Reading data from different MySQL databases using dynamically loaded connection parameters. For more information on Dynamic |
| Limitation |
Due to license incompatibility, one or more JARs required to use this component are not |
Scenario 1: Using context parameters when reading a table from an Oracle database
In this scenario, we will read a table from an Oracle database using a context parameter to
refer to the table name.
Dropping and linking the components
-
Create a new Job and add the following components by typing their names in the design
workspace or dropping them from the Palette: a tOracleInput
component and a tLogRow component. -
Connect tOracleInput to tLogRow using a Row > Main
link.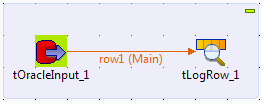
Configuring the components
-
Double-click tOracleInput to open its
Basic Settings view in the Component tab.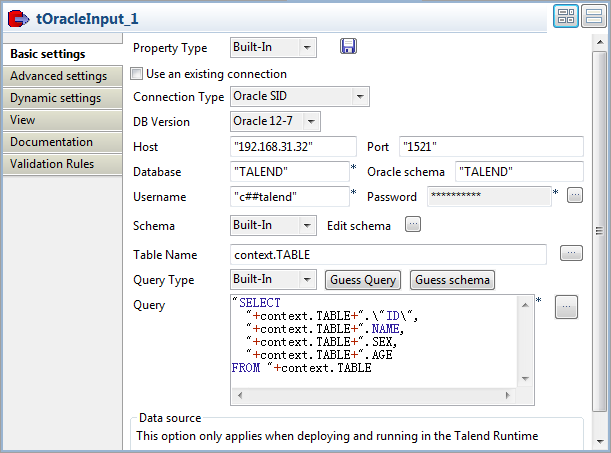
-
Select a connection type from the Connection
Type drop-down list. In this example, it is Oracle SID.Select the version of the Oracle database to be used from the DB Version drop-down list. In this example, it is
Oracle 12-7.In the Host field, enter the Oracle
database server’s IP address. In this example, it is 192.168.31.32.In the Database field, enter the database
name. In this example, it is TALEND.In the Oracle schema field, enter the
Oracle schema name. In this example, it is TALEND.In the Username and Password fields, enter the authentication details. -
Click the […] button next to Edit schema to open the schema editor.
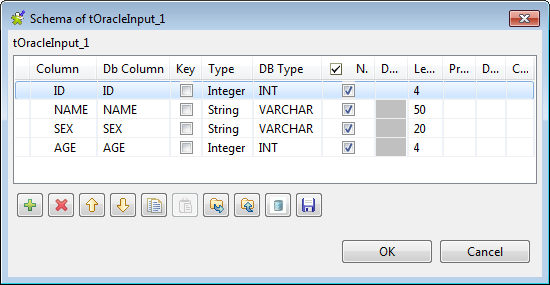
-
Click the [+] button to add four
columns: ID and AGE of the integer type, NAME and SEX of the
string type.Click OK to close the schema editor and
accept the propagation prompted by the pop-up dialog box. -
Put the cursor in the Table Name field
and press F5 for context parameter setting.
The dialog box [New Context Parameter] pops
up.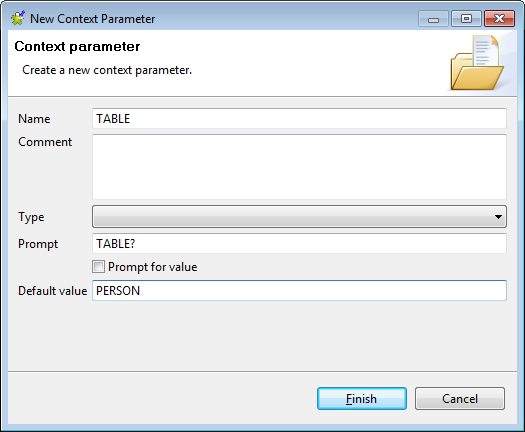 For more information about context settings, see
Talend Studio User Guide. -
In the Name field, enter the context
parameter name. In this example, it is TABLE.In the Default value field, enter the
name of the Oracle database table to be queried. In this example, it is
PERSON. -
Click Finish to validate the setting.
The context parameter context.TABLE
automatically appears in the Table Name
field. -
In the Query Type list, select Built-In. Then, click Guess
Query to get the query statement.123456"SELECT"+context.TABLE+"."ID","+context.TABLE+".NAME,"+context.TABLE+".SEX,"+context.TABLE+".AGEFROM "+context.TABLE -
Double-click tLogRow to open its
Basic settings view in the Component tab.
-
In the Mode area, select Table (print values in cells of a table) for a
better display of the results.
Saving and executing the Job
- Press Ctrl + S to save the Job.
-
Press F6 to run the Job.
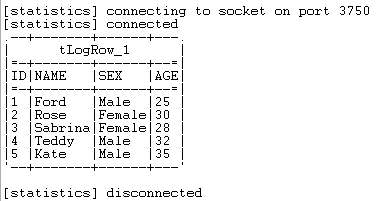 As shown above, the data in the Oracle database table PERSON is displayed on the console.
Related scenarios
tOracleInput MapReduce properties
These properties are used to configure tOracleInput running in the MapReduce Job framework.
The MapReduce
tOracleInput component belongs to the Databases family.
The component in this framework is available only if you have subscribed to one
of the
Talend
solutions with Big Data.
Basic settings
|
Property type |
Either Built-In or Repository. Built-In: No property data stored centrally.
Repository: Select the repository file where the |
|
|
Click this icon to open a database connection wizard and store the For more information about setting up and storing database |
|
Connection type |
Drop-down list of available drivers:
Oracle OCI: Select this connection
Oracle Custom: Select this
Oracle Service Name: Select this
WALLET: Select this connection type
Oracle SID: Select this connection |
|
DB Version |
Select the Oracle version in use. |
|
Host |
Database server IP address. |
|
Port |
Listening port number of DB server. |
|
Database |
Name of the database. |
|
Oracle schema |
Oracle schema name. |
|
Username and |
DB user authentication data. To enter the password, click the […] button next to the |
|
Schema and Edit |
A schema is a row description, it defines the number of fields to Click Edit schema to make changes to the schema.
|
|
|
Built-In: You create and store the |
|
|
Repository: You have already created |
|
Table name |
Database table name. |
|
Query type and |
Enter your DB query paying particularly attention to properly |
|
Die on error |
Select the check box to stop the execution of the Job when an error Clear the check box to skip any rows on error and complete the process for |
Usage
|
Usage rule |
In a You need to use the Hadoop Configuration tab in the Note that in this documentation, unless otherwise |
|
Hadoop Connection |
You need to use the Hadoop Configuration tab in the This connection is effective on a per-Job basis. |
Related scenarios
No scenario is available for the Map/Reduce version of this component yet.
tOracleInput properties for Apache Spark Batch
These properties are used to configure tOracleInput running in the Spark Batch Job framework.
The Spark Batch
tOracleInput component belongs to the Databases family.
This component also allows you to connect and read data from a RDS Oracle database.
The component in this framework is available only if you have subscribed to one
of the
Talend
solutions with Big Data.
Basic settings
|
Property type |
Either Built-In or Repository. Built-In: No property data stored centrally.
Repository: Select the repository file where the |
|
|
Click this icon to open a database connection wizard and store the For more information about setting up and storing database connection |
|
Use an existing connection |
Select this check box and in the Component Note:
When a Job contains the parent Job and the child Job, if you need to share an
existing connection between the two levels, for example, to share the connection created by the parent Job with the child Job, you have to:
For an example about how to share a database connection across Job levels, see |
|
Connection type |
The available drivers are:
|
|
DB Version |
Select the Oracle version in use. |
|
Host |
Database server IP address. |
|
Port |
Listening port number of DB server. |
|
Database |
Name of the database. |
|
Oracle schema |
Oracle schema name. |
|
Username and Password |
DB user authentication data. To enter the password, click the […] button next to the |
|
Schema and Edit |
A schema is a row description, it defines the number of fields to be Click Edit schema to make changes to the schema.
|
|
|
Built-In: You create and store the |
|
|
Repository: You have already created |
|
Table Name |
Type in the name of the table from which you need to read data. |
|
Query type and Query |
Specify the database query statement paying particularly attention to the If you are using Spark V2.0 onwards, the Spark SQL does not recognize the For example, if you need to perform a query in a table system.mytable, in which the system prefix indicates the |
Advanced settings
|
Additional JDBC parameters |
Specify additional connection properties for the database connection you are This field is not available if the Use an existing |
|
Spark SQL JDBC parameters |
Add the JDBC properties supported by Spark SQL to this table. For a list of This component automatically set the url, dbtable and driver properties by using the configuration |
|
Trim all the String/Char columns |
Select this check box to remove leading and trailing whitespace from |
|
Trim column |
Remove leading and trailing whitespace from defined columns. |
|
Enable partitioning |
Select this check box to read data in partitions. Define, within double quotation marks, the following parameters to configure
the partitioning:
The average size of the partitions is the result of the difference between the For example, to partition 1000 rows into 4 partitions, if you enter 0 for the |
Usage
|
Usage rule |
This component is used as a start component and requires an output link.. This component should use a tOracleConfiguration This component, along with the Spark Batch component Palette it belongs to, appears only Note that in this documentation, unless otherwise |
|
Spark Connection |
You need to use the Spark Configuration tab in
the Run view to define the connection to a given Spark cluster for the whole Job. In addition, since the Job expects its dependent jar files for execution, you must specify the directory in the file system to which these jar files are transferred so that Spark can access these files:
This connection is effective on a per-Job basis. |
Related scenarios
For a scenario about how to use the same type of component in a Spark Batch Job, see Writing and reading data from MongoDB using a Spark Batch Job.