tPigReplicate
Performs different operations on the same schema.
The tPigReplicate, used after an
input Pig component, duplicates the incoming schema into as many identical output flows as
needed.
tPigReplicate Standard properties
These properties are used to configure tPigReplicate running in the Standard Job framework.
The Standard
tPigReplicate component belongs to the Big Data and the Processing families.
The component in this framework is available when you are using one of the Talend solutions with Big Data.
Basic settings
|
Schema and Edit |
A schema is a row description. It defines the number of fields (columns) to Click Edit schema to make changes to the schema.
Click Sync columns to retrieve the schema from |
|
|
Built-In: You create and store the |
|
|
Repository: You have already created |
Advanced settings
|
tStatCatcher Statistics |
Select this check box to gather the Job processing metadata at the |
Global Variables
|
Global Variables |
ERROR_MESSAGE: the error message generated by the A Flow variable functions during the execution of a component while an After variable To fill up a field or expression with a variable, press Ctrl + For further information about variables, see |
Usage
|
Usage rule |
This component is not startable (green background); it requires |
|
Prerequisites |
The Hadoop distribution must be properly installed, so as to guarantee the interaction
For further information about how to install a Hadoop distribution, see the manuals |
|
Connections |
Outgoing links (from this component to another):
Row: Pig combine. This link joins Incoming links (from one component to this one): Row: Pig combine. For further information regarding connections, see |
Scenario: Replicating a flow and sorting two identical flows respectively
This scenario applies only to a Talend solution with Big Data.
The Job in this scenario uses Pig components to handle names and states loaded from a
given HDFS system. It reads and replicates the input flow, then sorts the two identical
flows based on name and state respectively, and writes the results back into that
HDFS.

Before starting to replicate this Job, ensure that you have the appropriate right to
read and write data in the Hadoop distribution to be used and that Pig is properly
installed in that distribution.
Linking the components
-
In the
Integration
perspective
of
Talend Studio
,
create an empty Job, named Replicate for
example, from the Job Designs node in the
Repository tree view.For further information about how to create a Job, see the
Talend Studio
User
Guide. -
Drop tPigLoad, tPigReplicate, two tPigSort
and two tPigStoreResult onto the
workspace.The tPigLoad component reads data from
the given HDFS system. The sample data used in this scenario reads as
follows:
123456789101112Andrew Kennedy;MississippiBenjamin Carter;LouisianaBenjamin Monroe;West VirginiaBill Harrison;TennesseeCalvin Grant;VirginiaChester Harrison;Rhode IslandChester Hoover;KansasChester Kennedy;MarylandChester Polk;IndianaDwight Nixon;NevadaDwight Roosevelt;MississippiFranklin Grant;NebraskaThe location of the data in this scenario is /user/ychen/raw/Name&State.csv. -
Connect them using the Row > Pig combine
links.
Configuring tPigLoad
-
Double-click tPigLoad to open its
Component view.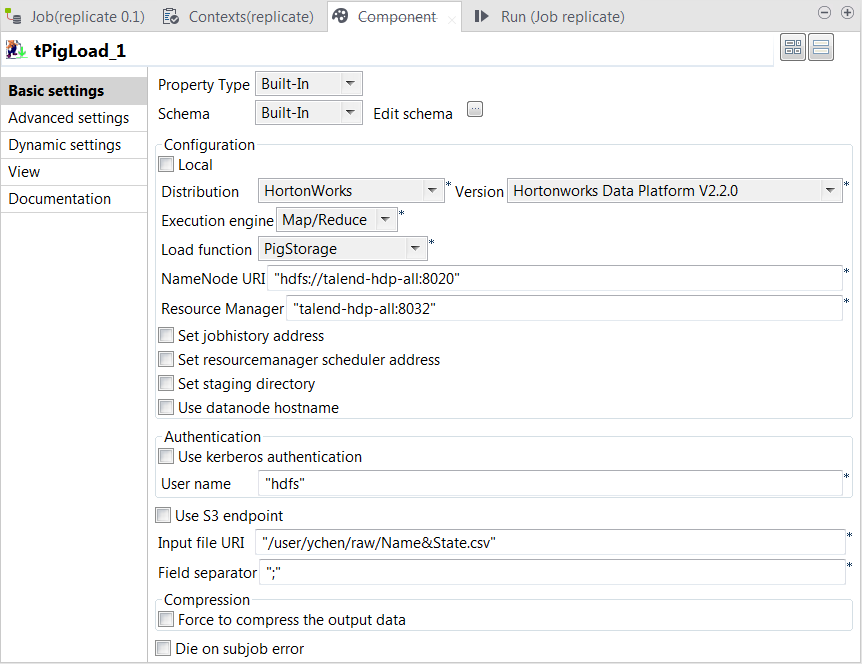
-
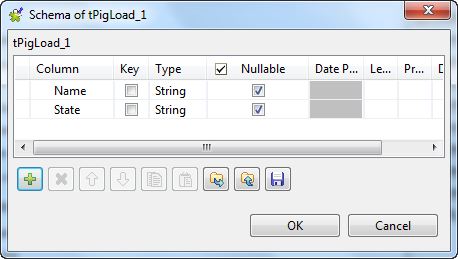
Click the
 button next to Edit schema to open the schema editor.
-
Click the

button twice to add two rows and name them Name and State, respectively.
-
Click OK to validate these changes and
accept the propagation prompted by the pop-up dialog box. -
In the Mode area, select Map/Reduce because the Hadoop to be used in this
scenario is installed in a remote machine. Once selecting it, the parameters
to be set appear. -
In the Distribution and the Version lists, select the Hadoop distribution to
be used. -
In the Load function list, select
PigStorage
-
In the NameNode URI field
and the Resource Manager field, enter the
locations of the NameNode and the ResourceManager to be used for Map/Reduce,
respectively. If you are using WebHDFS, the location should be
webhdfs://masternode:portnumber; if this WebHDFS is secured
with SSL, the scheme should be swebhdfs and you need to use
a tLibraryLoad in the Job to load the library required by
the secured WebHDFS. -
In the Input file URI field, enter the
location of the data to be read from HDFS. In this example, the location is
/user/ychen/raw/NameState.csv. -
In the Field separator field, enter the
semicolon ;.
Configuring tPigReplicate
-
Double-click tPigReplicate to open its
Component view.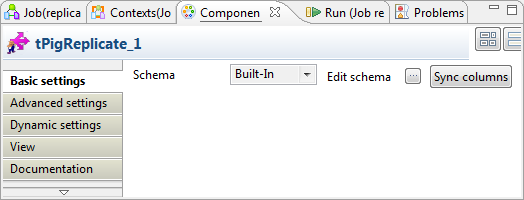
-
Click the button next to Edit schema to open the schema editor to verify
whether its schema is identical with that of its preceding component.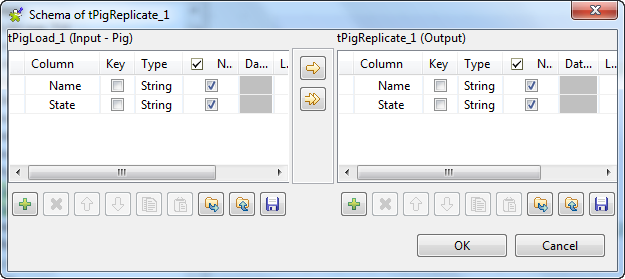 Note:
Note:If this component does not have the same schema of the preceding
component, a warning icon appears. In this case, click the Sync columns button to retrieve the schema
from the preceding one and once done, the warning icon disappears.
Configuring tPigSort
Two tPigSort components are used to sort the two
identical output flows: one based on the Name
column and the other on the State column.
-
Double-click the first tPigSort component
to open its Component view to define the
sorting by name.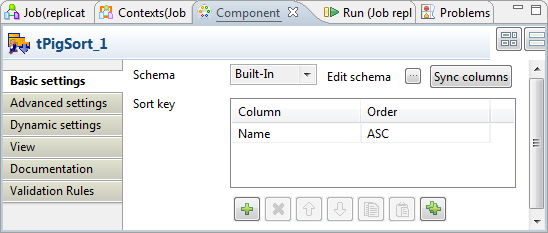
-
In the Sort key table, add one row by
clicking thebutton under this table.
-
In the Column column, select Name from the drop-down list and select
ASC in the Order column. -
Double-click the other tPigSort to open
its Component view to define the sorting by
state.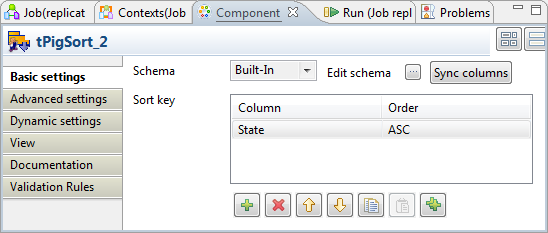
-
In the Sort key table, add one row, then
select Name from the drop-down list in
the Column column and select ASC in the Order
column.
Configuring tPigStoreResult
Two tPigStoreResult components are used to write
each of the sorted data into HDFS.
-
Double-click either the first tPigStoreResult component to open its Component view to write the data sorted by name.
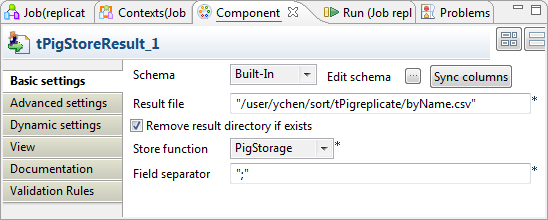
-
In the Result file field, enter the
directory where the data will be written. This directory will be created if
it does not exist. In this scenario, we put /user/ychen/sort/tPigreplicate/byName.csv. -
Select Remove result directory if
exists. -
In the Store function list, select
PigStorage. -
In the Field separator field, enter the
semicolon ;. -
Do the same for the other tPigStoreResult
component but set another directory for the data sorted by state. In this
scenario, it is /user/ychen/sort/tPigreplicate/byState.csv.
Executing the Job
Then you can run this Job.
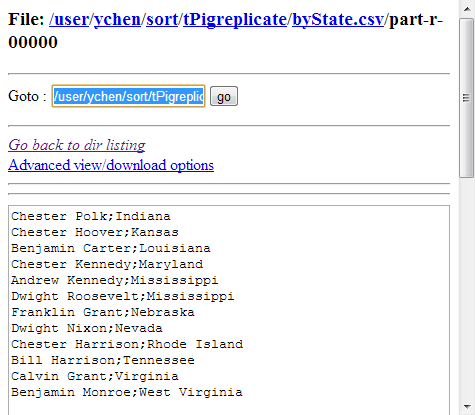
Once done, browse to the locations where the results were written in HDFS.
The following image presents the results sorted by name:

The following image presents the results sorted by state:
If you need to obtain more details about the Job, it is recommended to use the web console
of the Jobtracker provided by the Hadoop distribution you are using.
In JobHistory, you can easily find the execution status of your Pig Job because the name of
the Job is automatically created by concatenating the name of the project that contains the
Job, the name and version of the Job itself and the label of the first tPigLoad component used in it. The naming convention of a Pig Job in JobHistory
is ProjectName_JobNameVersion_FirstComponentName.