
|
Component Family |
Messaging |
|
|
Function |
cAMQP sends messages to, or |
|
|
Purpose |
cAMQP is used to exchange |
|
|
Basic settings |
URI/Type |
Select the messaging type, either queue or topic. |
|
|
URI/Destination |
Type in a name for the message queue or topic in the message |
|
ConnectionFactory |
Click […] and select an MQ |
|
| Advanced settings | Parameters |
Set the optional parameters in the corresponding table. Click Be sure to set the |
|
Usage |
cAMQP can be a start, middle or |
|
|
Limitation |
n/a |
|
This scenario will show you how to use the cAMQP component
to send messages to and consume messages from a JMS Queue or Topic. To do this, two
Routes are built, a message producer Route, and a consumer Route. Messages are sent to
the AMQP broker in the producer Route and then consumed in the consumer Route.
In this use case, Apache ActiveMQ is used as the message broker which supports the AMQP 1.0
protocol. You need to launch the ActiveMQ server before executing the Route. For more
information about installing and launching ActiveMQ server, see the site http://activemq.apache.org/index.html.
Dropping and linking the components
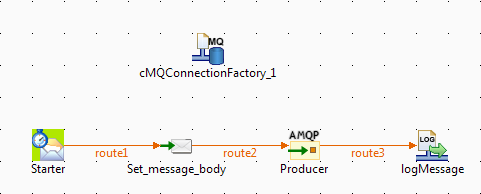
-
From the Palette, drag and drop a cMQConnectionFactory, a cTimer, a cSetBody, a
cAMQP, and a cLog component onto the design workspace. -
Label the components for better identification of their roles and link
them with the Row > Route connection as shown above.
Configuring the components
-
Double-click the cMQConnectionFactory component to
display its Basic settings view in the
Component tab.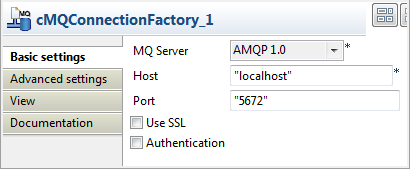
-
From the MQ Server list, select AMQP 1.0 to handle messages. Keep the default
settings of the other options. -
Double-click the cTimer component to open its Basic settings view in the Component tab.
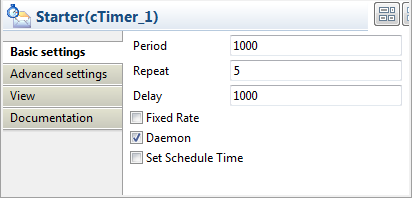
-
In the Repeat field, enter
5to generate
the message exchange five times. Keep the default settings of the other
options. -
Double-click the cSetBody component to
open its Basic settings view in the
Component tab.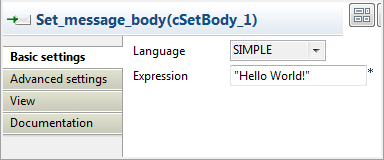
-
Select SIMPLE from the Language drop-down list and type in
"Helloin the Expression field
world"
as the message body. -
Double-click the cAMQP component to open its Basic settings view in the Component tab.
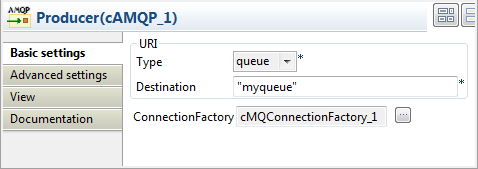
-
From the Type list, select queue or topic to send the
messages to a JMS queue or topic. In this use case, queue is used.In the Destination field, type in a name for the queue,
for example"myqueue".In the ConnectionFactory field, click […] and select the MQ connection factory that
you have just configured to handle messages. -
Keep the default settings of the cLog component to
log the message exchanges.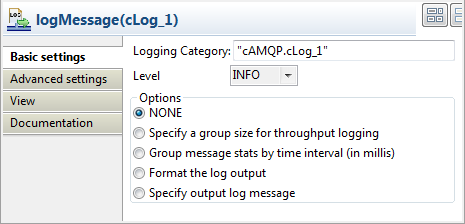
-
Press Ctrl+S to save your Route.
Viewing the code and executing the Route
-
Click the Code tab at the bottom of the
design workspace to check the generated code.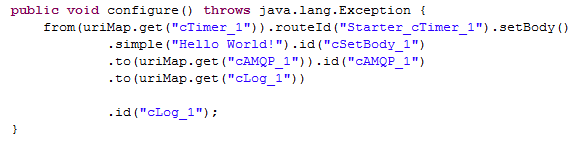
As shown above, the message flow from
cTimer_1is given a payload by
cSetBody_1and then sent tocAMQP_1and
cLog_1. -
Press F6 to execute the Route. The logs of the message
exchange are printed in the console.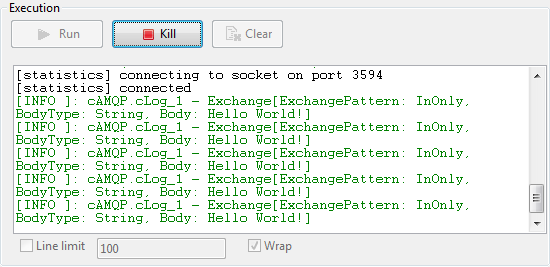
-
In the ActiveMQ Web Console, you can see that the message queue
myqueuehas been created.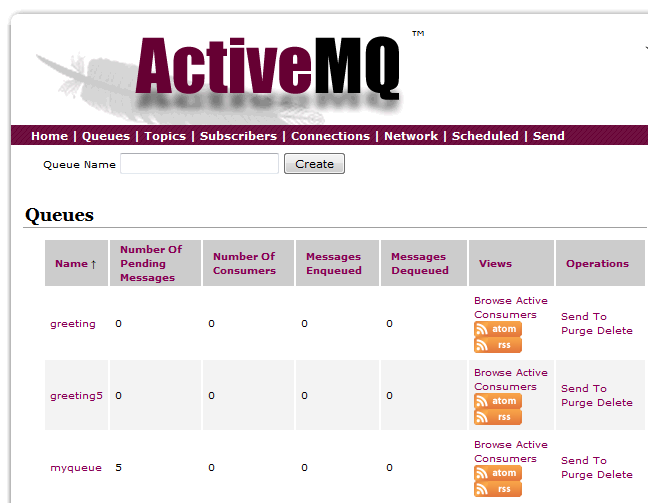
Dropping and linking the components
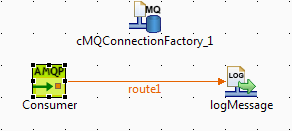
-
From the Palette, drag and drop a cMQConnectionFactory, a cAMQP, and a cLog component
onto the design workspace. -
Label the components for better identification of their roles and link
them with the Row > Route connection as shown above.
Configuring the components
-
Double-click the cMQConnectionFactory
component to display its Basic settings
view in the Component tab. -
From the MQ Server list, select AMQP 1.0 to handle messages. Keep the default
settings of the other options. -
Double-click the cAMQP component to
display its Basic settings view in the
Component tab.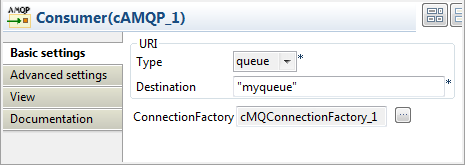
-
Specify the same URI Type and Destination in the consumer cAMQP component as in the producer.
In the ConnectionFactory field. click
[…] and select the MQ connection
factory that you have just configured to handle messages. -
Keep the default settings of the cLog component to
log the message exchanges.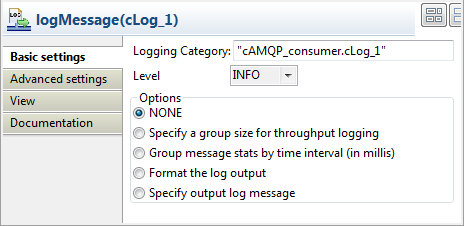
-
Press Ctrl+S to save your Route.
Viewing the code and executing the Route
-
Click the Code tab at the bottom of the
design workspace to check the generated code.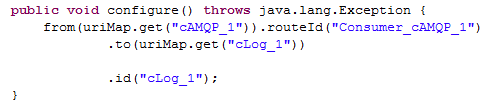
As shown above, the message flow is routed from
cAMQP_1to
cLog_1. -
Press F6 to execute the Route. The logs of the message
exchange are printed in the console.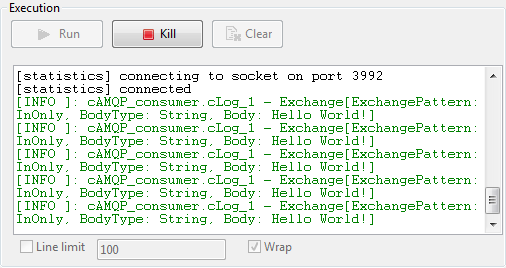
-
In the ActiveMQ Web Console, you can see that the messages in
myqueue have been consumed.