
|
Component Family |
Routing |
|
|
Function |
cRoutingSlip allows you to route |
|
|
Purpose |
cRoutingSlip is used to route a |
|
|
Basic settings |
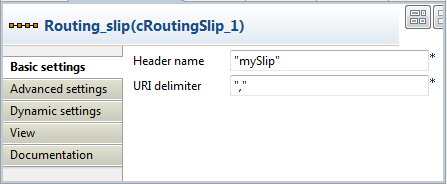
Header name |
Type in name of the message header as defined in the preceding |
| URI delimiter | Delimiter used to separate multiple endpoint URIs carried in the message header, comma (,) by default. |
|
|
Usage |
cRoutingSlip is used as a middle |
|
|
Limitation |
n/a |
|
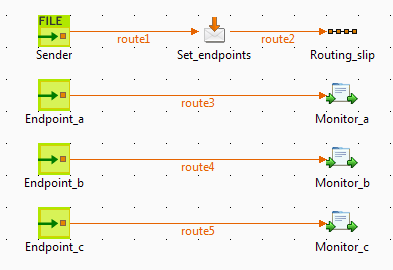
In this scenario, messages from a file system is routed consecutively to a series of
endpoints according to the URIs carried in the message header.
This use case requires a cFile component as the
message sender, a cSetHeader component to define a
series of endpoints, a cRoutingSlip component to
route messages to the endpoints consecutively, three cMessagingEndpoint components to retrieve messages routed to the
endpoints, and three cProcessor components to
monitor messages routed to the connected messaging endpoints.
-
From the Palette, expand the Messaging folder, drop one cFile and three cMessagingEndpoint components onto the design workspace, and
label them to better identify their roles in the Route, as shown
above. -
From the Transformation folder, drop a
cSetHeader component onto the design
workspace, and label it to better identify its role in the Route. -
From the Routing folder, drop a cRoutingSlip component onto the design workspace,
and label it to better identify its role in the Route. -
From the Processor folder, drop three
cProcessor components onto the design
workspace, and label them to better identify their roles in the
Route. -
Right-click the cFile component, select
Row > Route from the contextual menu and click the cSetHeader component. -
Right-click the cSetHeader component,
select Row > Route from the contextual menu and click the cRoutingSlip component. -
Repeat this operation to connect the cMessagingEndpoint components to the corresponding cProcessor components.
-
Double-click the cFile component, which
is labelled Sender, to display its Basic settings view in the Component tab.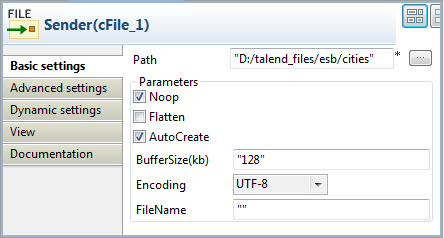
-
In the Path field, fill in or browse to the path to the
folder that holds the source files Beijing.xml, London.xml,
Paris.xml, and Washington.xml.From the Encoding list, select the
encoding type of your source files. Leave the other parameters as they
are. -
Double-click the cSetHeader component,
which is labelled Set_endpoints, to
display its Basic settings view in the
Component tab.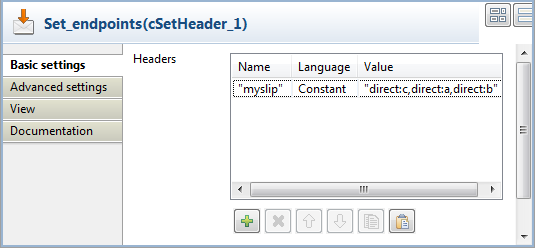
-
Click [+] to add a row to the Headers table.
In the Name field, type in the name of
the header you want to add to each message.In this use case, we simply use mySlip, which is the
default value filled in the Header name
field of the cRoutingSlip component. -
From the Language list box, select the Constant or Simple, and in the Value
field, type in the URIs you wish the message to be routed consecutively to,
separated by a comma, which is the default value of the URI delimiter field of the cRoutingSlip component.In this use case, we want the message to be routed first to endpoint
c, then to endpoint a, and
finally to endpoint b. -
Double-click the cRoutingSlip component,
which is labelled Routing_slip, to
display its Basic settings view in the
Component tab, and define the message
header in the Header name field and the URI
delimiter in the URI delimiter field.In this use case, we simply use the default settings.
-
Double-click the cMessagingEndpoint
component labelled Endpoint_a to display its Basic settings view in the Component tab, and type in the URI in the URI field for the destination of your messages.Here, we want to use this component to retrieve the message routed to the
URI direct:a.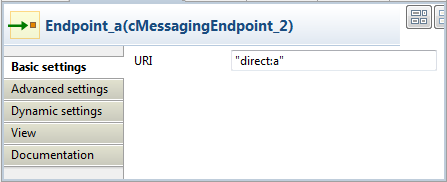
Repeat this step to set the endpoint URIs in the other cMessagingEndpoint components:
direct:b and direct:c
respectively. -
Double-click the cProcessor component,
which is labelled Monitor_a, to display
its Basic settings view in the Component tab, and customize the code so that the
console will display information the way you wish.Here, we want to use this component to monitor the messages routed to the
connected endpoint a and display the file name, so we
customize the code accordingly, as follows:12System.out.println("Message received on endpoint a: "+exchange.getIn().getHeader("CamelFileName"));Repeat this step to customize the code for the other two cProcessor components, for messages routed to the
connected endpoints b and c
respectively.12System.out.println("Message received on endpoint b: "+exchange.getIn().getHeader("CamelFileName"));12System.out.println("Message received on endpoint c: "+exchange.getIn().getHeader("CamelFileName")); -
Press Ctrl+S to save your Route.
-
Click the Code tab at the bottom of the
design workspace to have a look at the generated code.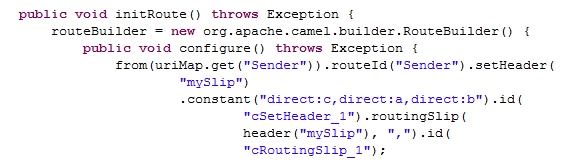
In this partially shown code, messages from the sender are given a header
according to.setHeader, which carries a list of URIs
("direct:c,direct:a,direct:b"), and then routed in the slip
pattern according bycRoutingSlip_1. -
Click the Run view to display it and
click the Run button to launch the
execution of your Route.You can also press F6 to execute it.
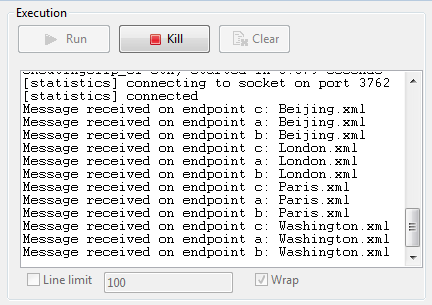
RESULT: The source file messages are routed consecutively to the defined
endpoints: c, then a, and then
b.
In this scenario, which is based on the previous scenario, each message from a file
system is routed consecutively to different endpoints according to the city name it
contains.
All files used in this use case are named after the city name they contain. The
following are the extracts of two examples:
Beijing.xml:
|
1 2 3 4 5 |
<person> <firstName>Nicolas</firstName> <lastName>Yang</lastName> <city>Beijing</city> </person> |
Paris.xml:
|
1 2 3 4 5 |
<person> <firstName>Pierre</firstName> <lastName>Dupont</lastName> <city>Paris</city> </person> |
A predefined Java Bean, setEndpoints, is called in this use case
to return endpoint URIs according to the city name contained in each message, so that
the messages will be routed as follows:
-
The message containing the city name Paris will be routed
first to endpoint a, then to endpoint
b, and finally to endpoint c. -
The message containing the city name Beijing will be
routed first to endpoint c, then to endpoint
a, and finally to endpoint b. -
Any other messages will be routed to endpoint b and then
to endpoint c.
For more information about creating and using Java Beans, see Talend Studio User
Guide.
|
1 2 3 4 5 6 7 8 9 10 11 12 13 14 15 16 17 18 19 20 |
package beans; import org.w3c.dom.Document; import org.w3c.dom.Element; import org.w3c.dom.NodeList; public class setEndpoints { public String helloExample(Document document) { NodeList cities = document.getDocumentElement().getElementsByTagName( "city"); Element city = (Element) cities.item(0); String textContent = city.getTextContent(); if ("Paris".equals(textContent)) { return "direct:a,direct:b,direct:c"; } else if ("Beijing".equals(textContent)) { return "direct:c,direct:a,direct:b"; } else return "direct:b,direct:c"; } } |
In this scenario, we will reuse the Route set up in the previous scenario, without
adding or removing any components or modifying any connections.
In this scenario, we only need to configure the cSetHeader component to call the predefined Java Bean, and keep the
settings of all the other components are they are in the previous scenario.
-
Double-click the cSetHeader component to
display its Basic settings view in the
Component tab.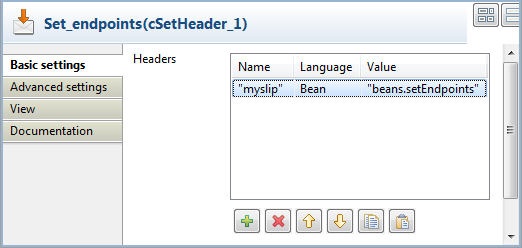
-
Select Bean from the Language list box, and in the Value field, specify the Java Bean that will return the
endpoint URIs. In this use case, type in:beans.setEndpoints -
Press Ctrl+S to save your Route.
-
Click the Code tab at the bottom of the
design workspace to have a look at the generated code.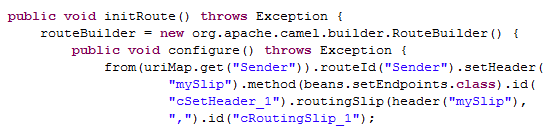
In this partially shown code, messages from the sender are given a header
according to.setHeader, which carries a list of URIs returned
by thebeans.setEndpoints.class, and then routed to the
cRoutingSlip_1. -
Click the Run view to display it and
click the Run button to launch the
execution of your Route.You can also press F6 to execute it.
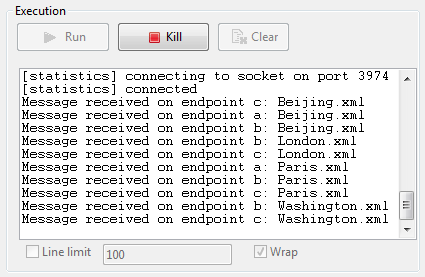
RESULT: The sources are routed consecutively to the defined endpoints: the
message containing the city name Beijing is routed
first to endpoint c, then to endpoint
a, and finally to endpoint b;
the message containing the city name Paris is routed
first to endpoint a, then to endpoint
b, and finally to endpoint c;
the other messages are routed to endpoint b and then to
endpoint c.