Warning
This component requires an Oracle JDK to be functional.
|
Component family |
File/Input |
Note that this component is deprecated. The EBCDIC handling capabilities are now fully |
|
Function |
tFileInputEBCDIC reads an EBCDIC |
|
|
Purpose |
tFileInputEBCDIC opens a file and |
|
|
Basic settings |
Property type |
Either Built-in or Repository. Since version 5.6, both the Built-In mode and the Repository mode are |
|
|
|
Built-in: No property data stored |
|
|
|
Repository: Select the repository |
|
|
Schema(s) |
Click [+] to add one or more |
|
|
Data file |
Click […] to browse to or type |
|
|
Edit schema |
Click […] to edit the Built-in NoteThis button is enabled when you select the Custom set Original Length in Schema |
|
|
|
Built-in: Select this option to |
|
|
|
Repository: Select this option to |
|
|
Xc2j file |
Click […] to browse to or type NoteThis field will be disabled and xc2j file will not be |
|
|
Custom set Original Length in Schema |
Select this check box to improve the speed of reading NoteWhen you select this check box, the Xc2j |
|
Advanced settings |
Encoding |
Select the encoding type from the list or select Custom and define it manually. This field |
|
|
Trim all column |
Select this check box to remove leading and trailing whitespaces |
|
tStatCatcher Statistics |
Select this check box to gather the processing metadata at the Job |
|
|
Global Variables |
NB_LINE: the number of rows processed. This is an After ERROR_MESSAGE: the error message generated by the A Flow variable functions during the execution of a component while an After variable To fill up a field or expression with a variable, press Ctrl + For further information about variables, see Talend Studio |
|
|
Usage |
Use this component to read an EBCDIC file and to output the data |
|
|
Log4j |
The activity of this component can be logged using the log4j feature. For more information on this feature, see Talend Studio User For more information on the log4j logging levels, see the Apache documentation at http://logging.apache.org/log4j/1.2/apidocs/org/apache/log4j/Level.html. |
|
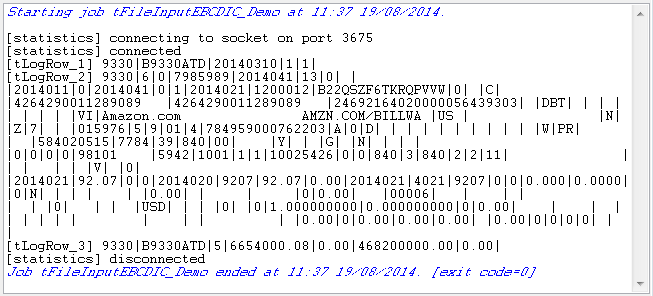
This scenario describes a Job that reads an EBCDIC file, extracts the data and then
displays the data based on its three different schemas.
Note
This scenario uses the [EBCDIC Connection] wizard
that guides the user through several steps to create a connection to a Copybook file
which describes the structure of the corresponding EBCDIC file and then retrieve its
various schemas. This wizard is available only for users who have subscribed to one
of the Talend solutions. For more information about how to use this
wizard, please see Talend Studio
User Guide.
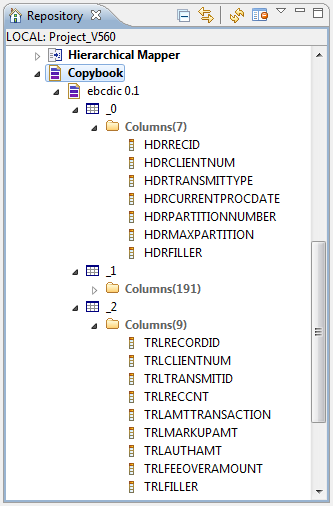
In this scenario, the EBCDIC connection is called ebcdic, and it contains three different schemas called _0, _1, and
_2, which are used in the
tExtractEBCDICFields components in the Job.
-
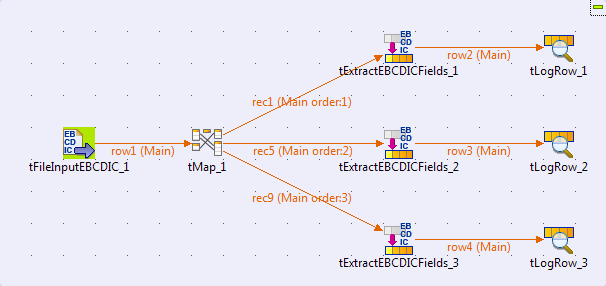
Create a Job and add the following components by typing their names in the
design workspace or dropping them from the Palette: one tFileInputEBCDIC component, one tMap component, three tExtractEBCDICFields components, and three tLogRow components.
-
Double-click tFileInputEBCDIC to open its
Basic settings view.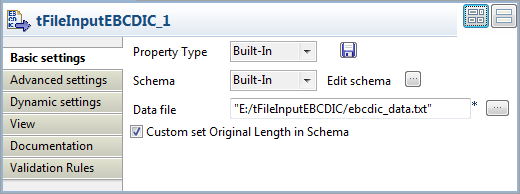
-
Select the Custom set Original Length in
Schema check box. -
Click the […] button next to Edit schema to open the schema editor of
tFileInputEBCDIC.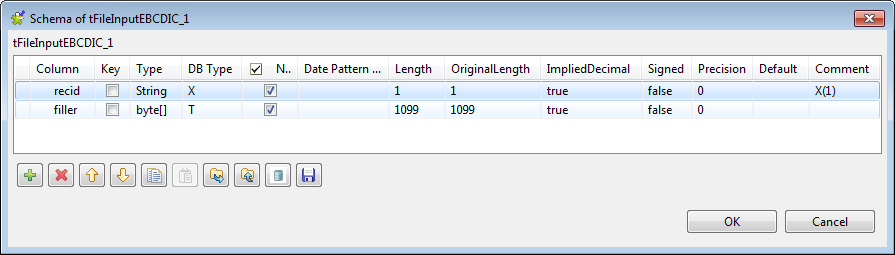
-
Click the [+] button to add two columns
recid and filler to extract the ID field of each schema in the
recid column and leave other fields
in the filler column.Note that you need to set the right value for the following fields for
each column:-
Type: Select the type of the
schema column. -
DB Type: Select the type of the
corresponding field in the EBCDIC file. -
Length: Specify the length of the
schema column. -
OriginalLength: Specify the
length of the corresponding field in the EBCDIC file. In this
example, 1099 is the total length
of other fields except the ID field in each schema. -
ImpliedDecimal: Fill true or
false to indicate whether there is a decimal point implied at a
specified location in a field in the EBCDIC file. -
Signed: Fill true or false to
indicate whether a field is signed or not in the EBCDIC file. -
Precision: Specify the number of
digits to the right of the decimal point.
-
-
Click OK to save the settings and close
the schema editor. -
Click the […] button next to the
Data file field and browse to the
EBCDIC file holding the data to be processed, E:/tFileInputEBCDIC/ebcdic_data.txt in this example. -
Connect tFileInputEBCDIC to tMap using a Row
> Main connection.
-
Right-click tMap and then select
Row> *New Output*
(Main) from the contexual menu and click the first tExtractEBCDICFields. Enter rec1 in the pop-up dialog box and click
OK to connect tMap to the first tExtractEBCDICFields using a link named rec1.Repeat this step to connect tMap to the
second and third tExtractEBCDICFields
components using rec5 and rec9 links respectively. -
Double-click tMap to open its map
editor.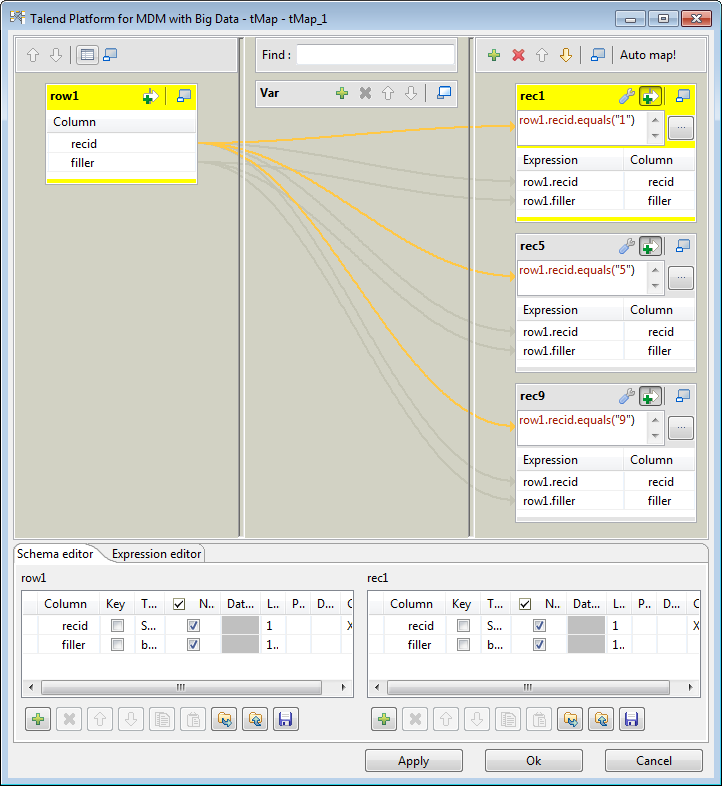
-
Drag all columns from the input table row1 to the output tables rec1, rec5, and rec9 respectively.
-
Click the
 button on the upper right corner of the output table
rec1 to activate the expression
filter and then fill it with the condition row1.recid.equals(“1”).Repeat this step to activate the expression filter of the output tables
rec5 and rec9 and then fill them with the conditions row1.recid.equals(“5”) and row1.recid.equals(“9”) respectively. This way,
the data with three different schemas will be separated to three
destinations respectively according to their ID value. -
Click OK to save the settings and close
the map editor.
-
Double-click the first tExtractEBCDICFields to open its Basic
settings view.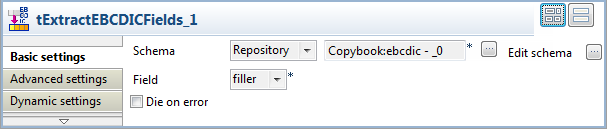
-
Select Repository from the Schema list and then click the […] button to open the [Repository Content] dialog box where you can select the
repository schema for this component.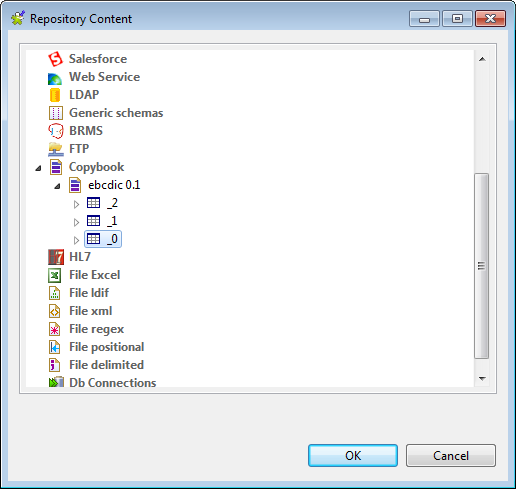
-
Select the schema _0 under the
ebcdic connection for the first
tExtractEBCDICFields and click
OK to save the setting and close the
dialog box. -
Click the […] button next to Edit schema, select View
schema in the pop-up dialog box and click OK to open the schema editor.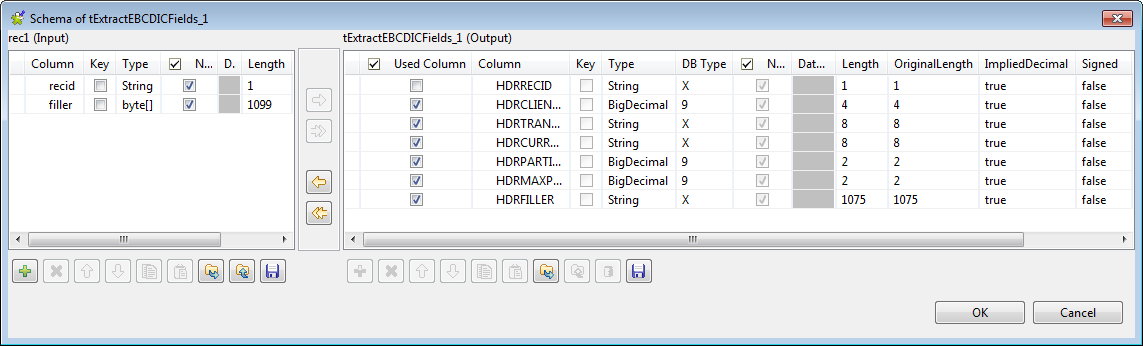
-
Clear the check box in Used Column for
the HDRRECID column which has already
been extracted from tFileInputEBCDIC to
remove it from the schema, and then click OK to save the setting and close the schema editor. -
Select filler from the Field list to extract the data from this field in
EBCDIC encoding. -
Repeat the previous steps, from Step 1 to
Step 6, to set the repository schema
_1 for the second tExtractEBCDICFields, remove the DTLRECID column from the schema, and select
filler from the Field list. -
Repeat the previous steps, from Step 1 to
Step 6, to set the repository schema
_2 for the third tExtractEBCDICFields, remove the TRLRECORDID column from the schema, and select
filler from the Field list. -
Connect each tExtractEBCDICFields to each
tLogRow using a Row > Main connection
respectively.
-
Double-click the first tLogRow to open
its Basic settings view.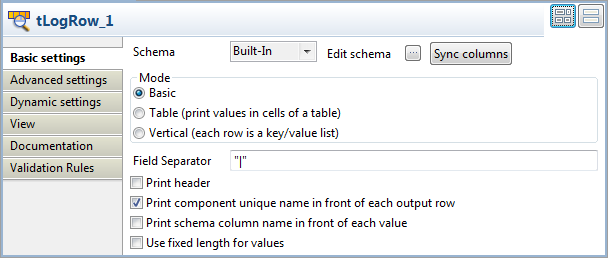
-
Select the Print component unique name in front of
each output row check box for a better display of the
results. -
Repeat the previous two steps to configure the second and third tLogRow components.