
|
Component family |
Internet |
|
|
Function |
tSetKeystore submits |
|
|
Purpose |
This component allows you to set the authentication data type |
|
|
Basic settings |
TrustStore type |
Select the type of the TrustStore to be used. It may be PKCS 12 or JKS. |
|
|
TrustStore file |
Type in the path, or browse to the certificate TrustStore file |
|
|
TrustStore password |
Type in the password used to check the integrity of the TrustStore |
|
|
Need Client authentication |
Select this check box to validate the keystore data. Once doing – KeyStore type: select the type – KeyStore file: type in the – KeyStore password: type in the |
|
Advanced settings |
tStatCatcher Statistics |
Select this check box to gather the Job processing metadata at a |
|
Global Variables |
ERROR_MESSAGE: the error message generated by the A Flow variable functions during the execution of a component while an After variable To fill up a field or expression with a variable, press Ctrl + For further information about variables, see Talend Studio |
|
|
Usage |
This component is used standalone. |
|
|
Connections |
Outgoing links (from this component to another):
Trigger: Run if; On Subjob Ok, On Incoming links (from one component to this one):
Trigger: Run if, On Subjob Ok, On For further information regarding connections, see |
|
|
Limitation |
n/a. |
|
This scenario describes a three-component Job that connects to a private WSDL file in
order to extract customer information.
The WSDL file used in this Job accesses the corresponding web service under the SSL
protocol. For this purpose, the most relative code in this file reads as follows
:
|
1 2 3 4 |
<wsdl:port name="CustomerServiceHttpSoap11Endpoint" binding="ns:CustomerServiceSoap11Binding"><span></span> <soap:address location="https://192.168.0.22:8443/axis2/services/CustomerService.CustomerServiceHttpSoap11Endpoint/"/><span></span> </wsdl:port> |
Accordingly, we enter the following code in the server.xml file
of Tomcat:
|
1 2 3 4 5 6 7 8 |
<Connector port="8443" protocol="HTTP/1.1" SSLEnabled="true"<span></span> maxThreads="150" scheme="https" secure="true"<span></span> clientAuth="true" sslProtocol="TLS" <span></span> keystoreFile="D:/server.keystore" keystorePass="password"<span></span> keystoreType="JKS"<span></span> truststoreFile="D:/server.p12" truststorePass="password"<span></span> truststoreType="PKCS12"<span></span> /> |
So we need keystore files to connect to this WSDL file. To replicate this Job, proceed
as follows:
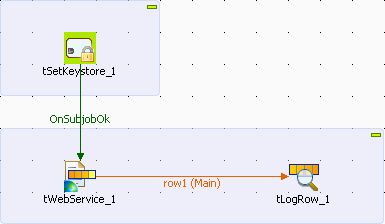
-
Drop the following components from the Palette onto the design workspace: tSetKeystore, tWebService, and
tLogRow.
-
Right-click tSetKeystore to open its
contextual menu. -
In this menu, select Trigger > On Subjob Ok to connect this component to tWebService.
-
Right-click tWebService to open its
contextual menu. -
In this menu, select Row > Main to connect this component to tLogRow.
-
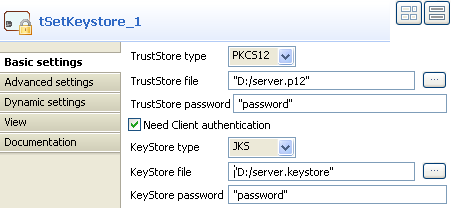
Double-click tSetKeystore to open its
Basic settings view and define the
component properties.
-
In the TrustStore type field, select
PKCS12 from the drop-down list. -
In the TrustStore file field, browse to the
corresponding truststore file. Here, it is
server.p12. -
In the TrustStore password field, type in the
password for this truststore file. In this example, it is
password. -
Select the Need Client authentication check
box to activate the keystore configuration fields. -
In the KeyStore type field, select JKS from the drop-down list.
-
In the KeyStore file field, browse to the
corresponding keystore file. Here, it is
server.keystore. -
Double-click tWebService to open the
component editor, or select the component in the design workspace and in the
Basic settings view, click the three-dot
button next to Service configuration.
-
In the WSDL field, browse to the private WSDL
file to be used. In this example, it is
CustomerService.wsdl. -
Click the refresh button next to the WSDL
field to retrieve the WSDL description and display it in the fields that
follow. -
In the Port Name list, select the port you
want to use, CustomerServiceHttpSoap11Endpoint in this
example. -
In the Operation list, select the service you
want to use. In this example the selected service is
getCustomer(parameters):Customer. -
Click Next to open a new view in the
editor.
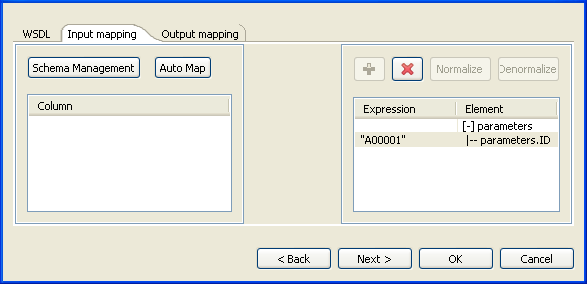
In the panel to the right of the Input mapping view,
the input parameter of the service displays automatically. However, you can add other
parameters if you select [+] parameters and then click
the plus button on top to display the [Parameter Tree]
dialog box where you can select any of the listed parameters.
The Web service in this example has only one input parameter, ID.
-
In the Expression column of the
parameters.ID row, type in the customer ID of your
interest between quotation marks. In this example, it is
A00001. -
Click Next to open a new view in the
editor.
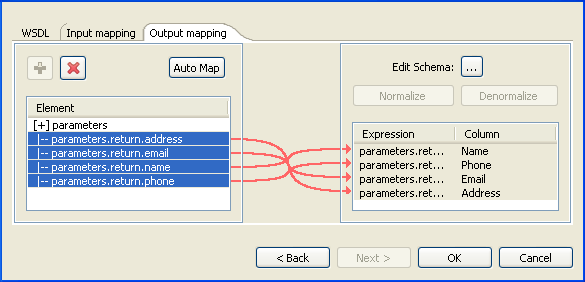
In the Element list to the left of the view, the
output parameter of the web service displays automatically. However, you can add other
parameters if you select [+] parameters and then click
the plus button on top to display the [Parameter Tree]
dialog box where you can select any of the parameters listed.
The Web service in this example has four output parameter:
return.address, return.email,
return.name and return.phone.
You now need to create a connection between the output parameter of the defined Web
service and the schema of the output component. To do so:
-
In the panel to the right of the view, click the three-dot button next to
Edit Schema to open a dialog box in which
you can define the output schema.
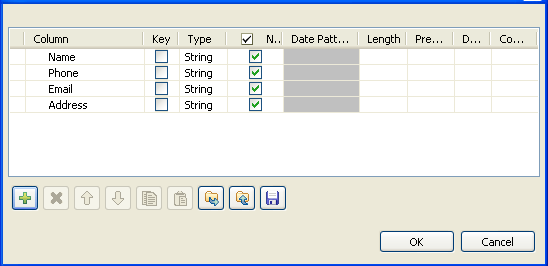
-
In the schema editing dialog box, click the plus button to add four columns to
the output schema. -
Click in each column and type in the new names, Name,
Phone, Email and
Address in this example. This will retrieve the
customer information of your interest. -
Click OK to validate your changes and to
close the schema editing dialog box. -
In the Element list to the right of the
editor, drag each parameter to the field that corresponds to the column you have
defined in the schema editing dialog box.
Note
If available, use the Auto map! button, located
at the bottom left of the interface, to carry out the mapping operation
automatically.
-
Click OK to validate your changes and to
close the editor. -
In the design workspace, double-click tLogRow
to open its Basic settings view and define its
properties. -
Click Sync columns to retrieve the schema
from the preceding component. -
Save your Job and press F6 to execute
it.
The information of the customer with ID A00001 is returned and
displayed in the console of Talend Studio.
