|
Component Family |
Messaging |
|
|
Function |
The cDataset component allows you to create a new |
|
|
Purpose |
The cDataset component provides a mechanism to easily |
|
|
Basic settings |
Id |
The ID of the Dataset bean. |
| Produce Delay | Specify a delay in milliseconds to cause producers to pause. | |
| Consume Delay | Specify a delay in milliseconds to cause consumers to pause. | |
| Preload Size | Specify how many messages should be sent before the Route completes its initialization. |
|
| Initial Delay | Specify the time in milliseconds to wait before starting sending messages. | |
| Minimum Rate | Specify the least number of messages that the dataset should contain before starting sending messages. |
|
| Register new Bean | Select this check box to register a new bean. | |
| Bean Class | Enter the class of the bean. This field appears when the Register new Bean check box is selected. |
|
| Arguments | Set the optional arguments in the corresponding table. Click [+] as many times as required to add arguments to the table. This table appears when the Register new Bean check box is selected. |
|
|
Usage |
cDataset can be a start, middle, or end component of a |
|
|
Limitation |
n/a |
|
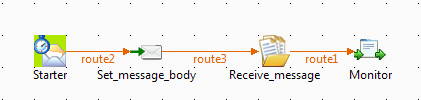
In this scenario, a cDataset component is used to receive
messages triggered by a cTimer.
-
From the Messaging folder of the Palette, drag and drop a cTimer and a cDataset
component onto the design workspace. -
From the Transformation folder, drag and drop a
cSetBody component onto the design
workspace. -
From the Processor folder, drag and drop one cProcessor component onto the design
workspace. -
Connect the components using Row >
Route connections. -
Label the components to better identify their roles in the Route, as shown
above.
-
Double-click the first cTimer component, which is
labelled Starter, to open its Basic settings view in the Component tab.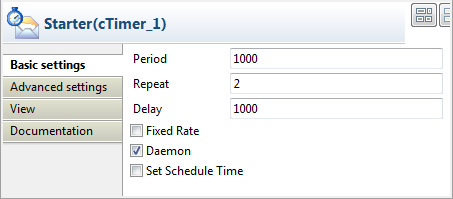
-
In the Repeat field, enter
2to generate
the message exchange twice. Keep the default settings of the other options. -
Double-click the cSetBody component,
which is labelled Set_message_body, to
open its Basic settings view in the
Component tab.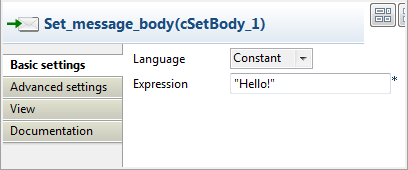
-
Select Constant in the Language list and enter
"Hello!"in
the Expression field as the message
body. -
Double-click the cDataset component, which is labelled
Receive_message, to open its
Basic settings view in the Component tab.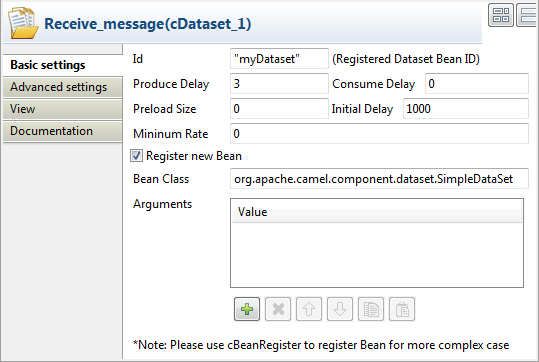
-
In the Id field, enter
"myDataset"as the
dataset bean ID. Keep the default settings of the other options.In the Bean Class field, the default implementation that
is shipped by Camel
org.apache.camel.component.dataset.SimpleDataSetis set. In
this use case, a new dataset bean is registered. -
Double-click the first cProcessor component, which is
labelled Monitor, to open its Basics settings view in the Component tab.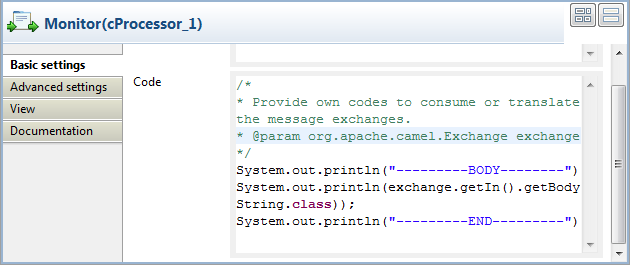
-
In the Code area, customize the code to show the body of
the message exchanges.123System.out.println("---------BODY--------");System.out.println(exchange.getIn().getBody(String.class));System.out.println("---------END---------") -
Press Ctrl+S to save your Route.
-
Click the Code tab at the
bottom of the design workspace to have a look at the generated code.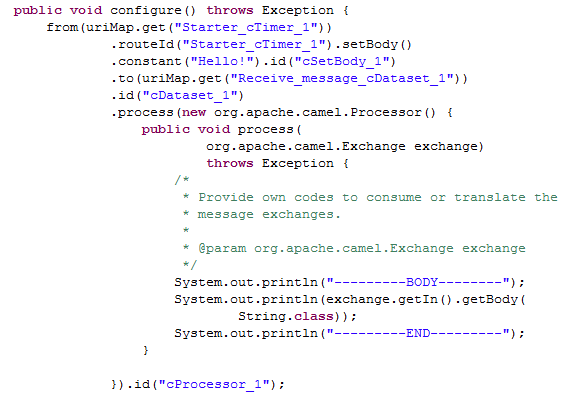
As shown in the code, the Route is built
fromthe
Starter_cTimer_1endpoint, set the message body as
"Hello!"bycSetBody_1, routed
.to
cDataset_1, and then processed by
cProcessor_1. -
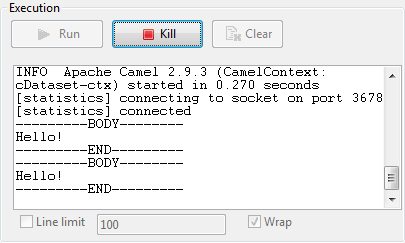
Press F6 to execute the Route.
RESULT: The message body is displayed twice in the execution console.