
Warning
This component is relevant only when used with one of the
Talend solutions with ESB, as it should be used with
the Service Repository node and the Data Service creation related wizard(s).
|
Component family |
ESB/Web Services |
|
|
Function |
Wraps Talend |
|
|
Purpose |
Waits for a request message from a consumer and passes it to the |
|
|
Basic settings |
Property Type |
Either Built-in or Repository. Since version 5.6, both the Built-In mode and the Repository mode are |
|
|
|
Built-in: No WSDL file is |
|
|
|
Repository: Select the desired |
|
Schema and Edit schema |
A schema is a row description. It defines the number of fields to be processed and passed on Click Edit schema to make changes to the schema. If the
|
|
|
|
|
Built-in: The schema is created |
|
|
|
Repository: The schema is created |
|
|
Keep listening |
Check this box when you want to ensure that the provider (and |
| Advanced settings |
Log messages (Studio only) | Select this check box to log the message exchange between the service provider and the consumer. This option works in the Studio only. |
|
tStatCatcher Statistics |
Select this check box to gather the Job processing metadata at a |
|
|
Dynamic settings |
Click the [+] button to add a row When a dynamic parameter is defined, the corresponding Keep listening option in the Basic settings view becomes unusable. For more information on Dynamic settings and context |
|
|
Global Variables |
NB_LINE: the number of rows processed. This is an After CORRELATION_ID: the correlation ID by which chained SECURITY_TOKEN: the user identity information in the HEADERS_SOAP: the headers of the SOAP request. This is a HEADERS_HTTP: the headers of the HTTP request. This is a ERROR_MESSAGE: the error message generated by the A Flow variable functions during the execution of a component while an After variable To fill up a field or expression with a variable, press Ctrl + For further information about variables, see Talend Studio |
|
|
Usage |
This component covers the possibility that a Talend Job can be The tESBProviderResponse The tESBProviderRequest component When the SAML Token or the Service Registry is enabled in the The tESBProviderRequest component Note that the Service Registry option is only available if you |
|
|
Limitation |
A JDK is required for this component to operate. |
|
The Jobs, which are built upon the components under the ESB/Web Services family, act
as the implementations of web services defined in the Services node of the Repository. They
require the creation of and association with relevant services. For more information
about services, see the related topics in the Talend Studio User
Guide.
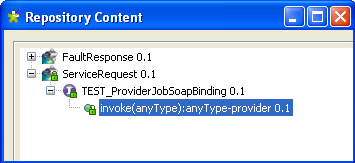
In this scenario, a provider Job and a consumer Job are needed. In the meantime, the
related service should already exist in the Services
node, with the WSDL URI being
http://127.0.0.1.8088/esb/provider/?WSDL, the port name being
TEST_ProviderJobSoapBinding and the operation
being invoke(anyType):anyType.
The provider Job consists of a tESBProviderRequest, a
tXMLMap, and two tLogRow components.

-
Drop the following components from the Palette onto the design workspace: a tESBProviderRequest, a tXMLMap,
and two tLogRow. -
Double-click tESBProviderRequest_1 in the
design workspace to display its Component view
and set its Basic settings.

-
Select Repository from the Property Type list and click the three-dot button to
choose the service, to the granularity of port name and operation.
-
Click OK.
-
Click the three-dot button next to Edit
schema to view the schema of tESBProviderRequest_1.

-
Click OK.
-
Connect tESBProviderRequest_1 to tLogRow_1.
-
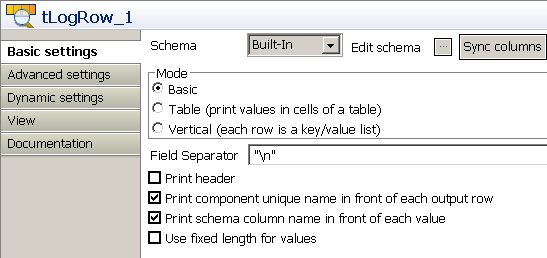
Double-click tLogRow_1 in the design
workspace to display its Component view and set
its Basic settings.
-
Click the three-dot button next to Edit
schema. and define the schema as follow.

-
Connect tLogRow_1 to tXMLMap_1.
-
Connect tXMLMap_1 to tLogRow_2 and name this row as
payload. -
In the design workspace, double-click tXMLMap_1 to open the Map
Editor. -
On the lower right part of the map editor, click the plus button to add one
row to the payload table and name this row as
payload. -
In the Type column of this
payload row, select Document as the data type. The corresponding XML root is added
automatically to the top table on the right side which represents the output
flow. -
In the payload table, right-click
root to open the contextual menu. -
From the contextual menu, select Create
Sub-Element and type in response in the
popup dialog box. -
Right-click the response node and select As loop element from the contextual menu.
-
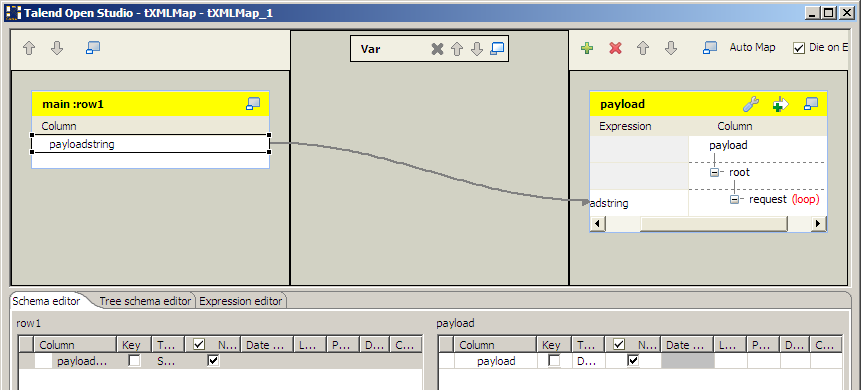
Repeat this operation to create a sub-element request of
the root node in the input table and set the
request node as loop element. -
Click the request node in the input table and drop it to
the Expression column in the row of the
response node in the output table.

-
Click OK to validate the mapping and close
the map editor. -
Double-click tLogRow_2 in the design
workspace to display its Component view and set
its Basic settings.

-
Click the three-dot button next to Edit
Schema and define the schema as follow.

-
Save the Job.
The consumer Job consists of a tFixedFlowInput, a
tXMLMap, a tESBConsumer, and two tLogRow
components.

-
Drop the following components from the Palette onto the design workspace: a tFixedFlowInput, a tXMLMap, a
tESBConsumer, and two tLogRow. -
Double-click tFixedFlowInput_1 in the design
workspace to display its Component view and set
its Basic settings.

-
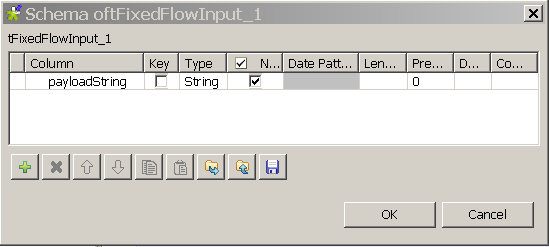
Edit the schema of the tFixedFlowInput_1
component.
-
Click the plus button to add a new line of string type and name it
payloadString. -
Click OK.
-
In the Number of rows field, set the number
of rows as 1. -
In the Mode area, select Use Single Table and input
worldin
quotations into the Value field. -
Connect tFixedFlowInput_1 to tXMLMap_1.
-
Connect tXMLMap_1 to tESBConsumer_1 and name this row as
payload. -
In the design workspace, double-click tXMLMap_1 to open the Map
Editor. -
In the output table, right-click the root node to open
the contextual menu. -
From the contextual menu, select Create
Sub-Element and type in request in the popup
dialog box. -
Right-click the request node and select As loop element from the contextual menu.
-
Click the payloadstring node in the input table and drop
it to the Expression column in the row of the
request node in the output table.
-
Click OK to validate the mapping and close
the Map Editor. -
Start the Provider Job. In the executing log you can see:
123...<span></span>web service [endpoint: http://127.0.0.1:8088/esb/provider] published<span></span>... -
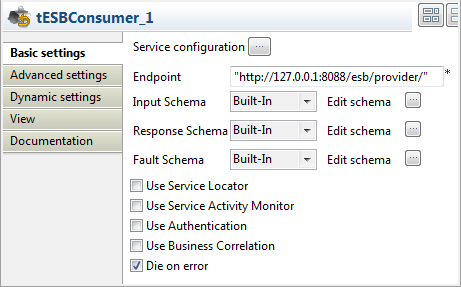
In the tESBConsumer_1
Component view, set its Basic settings.
-
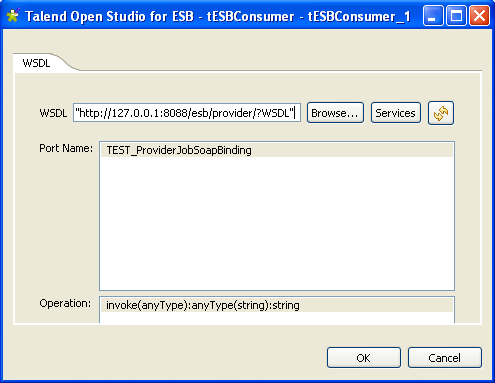
Click the three-dot button next to the Service
Configuration to open the editor.
-
In the WSDL field, type in:
http://127.0.0.1:8088/esb/provider?WSDL. -
Click the Refresh button to retrieve port name and operation name.
-
Click OK.
-
In the Basic settings of the tESBConsumer, set the Input
Schema as follow:

-
Set the Response Schema as follow:

-
Set the Fault Schema as follow:

-
Connect tESBConsumer_1 to tLogRow_1 and tLogRow_2.
-
In the design workspace, double-click the tLogRow_1 component to display its Component view and set its Basic
settings.

-
Click the three-dot button next to Edit
Schema and define the schema as follow:

-
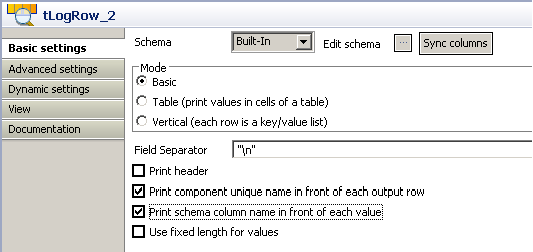
In the Job Design, double-click tLogRow_2 to
display its Component view and set its
Basic settings.
-
Click the three-dot button next to Edit
Schema and define the schema as follow.

-
Save the Job.
-
Run the provider Job. In the execution log you will see:
INFO: Setting the server’s publish address to be
http://127.0.0.1:8088/esb/provider2011-04-21 14:14:36.793:INFO::jetty-7.2.2.v20101205
2011-04-21 14:14:37.856:INFO::Started
SelectChannelConnector@127.0.0.1:8088
web service [endpoint: http://127.0.0.1:8088/esb/provider] published
-
Run the consumer Job. In the execution log of the Job you will see:
1234567891011121314Starting job CallProvider at 14:15 21/04/2011.<span></span><span></span>[statistics] connecting to socket on port 3942<span></span>[statistics] connected<span></span>TEST_ESBProvider2<span></span>TEST_ESBProvider2SoapBingding<span></span>|<span></span>[tLogRow_2] payloadString: <request>world</request><span></span>{http://talend.org/esb/service/job}TEST_ESBProvider2<span></span>{http://talend.org/esb/service/job}TEST_ESBProvider2SoapBinding<span></span>invoke<span></span>[tLogRow_1] payload: null<span></span>[statistics] disconnected<span></span>Job CallProvider2 ended at 14:16 21/04/2011. [exit code=0] -
In the provider’s log you will see the trace log:
1234567891011web service [endpoint: http://127.0.0.1:8088/esb/provider]published<span></span>[tLogRow_1] payload: <?xml version="1.0" encoding="UTF-8"?><span></span><request>world</request><span></span>### world<span></span>[tLogRow_2] content: world<span></span>[tLogRow_3] payload: <?xml version="1.0" encoding="UTF-8"?><span></span><response xmlns="http://talend.org/esb/service/job">Hello, world!</response><span></span>web service [endpoint: http://127.0.0.1:8088/esb/provider] unpublished<span></span>[statistics] disconnected<span></span>Job ESBProvider2 ended at 14:16 21/04/2011. [exit code=0]