
|
Component family |
Cloud / Google Drive |
|
|
Function |
This component uploads data from an input data flow or a local file to Google |
|
|
Purpose |
This component allows you to upload data to Google Drive. |
|
|
Basic settings |
Use Existing Connection |
Select this check box and from the list that appears select the relevant connection |
|
|
Application Name |
Enter the application name required by Google Drive to get access to its APIs. |
|
|
Access Token |
Enter the access token required by Google Drive to access a Google Drive account and operate |
|
|
Use HTTP Proxy |
Select this check box if you are working behind an HTTP proxy. |
|
|
Proxy Host |
Enter the IP address of the HTTP proxy server. This field is available only when the Use |
|
|
Proxy Port |
Enter the port number of the HTTP proxy server. This field is available only when the Use |
|
|
Use SSL |
Select this check box if an SSL connection is used to access Google Drive. |
|
|
Algorithm |
Enter the name of the SSL cryptography algorithm. This field is available only when the Use |
|
|
TrustStore File |
Browse to or enter the path to the certificate TrustStore file that contains the list of This field is available only when the Use |
|
|
Password |
Enter the password used to check the integrity of the TrustStore data. This field is available only when the Use |
|
|
File Title |
Enter the name for the file after being uploaded. |
|
|
Destination Folder Name |
Enter the name of the folder in which the file will be stored. |
|
|
Replace if Existing |
Select this check box to overwrite any existing file with the newly uploaded |
|
|
Upload Incoming content as File |
Select this option button if you upload data from an input flow of the preceding |
|
|
Schema and Edit schema |
A schema is a row description. It defines the number of fields to The schema of this component is read-only. You can click the The Schema list and the Edit |
|
|
Upload Local File |
Select this option button when you upload data from a local file. |
|
|
File |
Browse to or enter the path to the file to be uploaded. This field appears only when the Upload |
|
|
Expose As OutputStream |
Select this option button to expose the output stream of this component, which can be |
|
Advanced settings |
tStatCatcher Statistics |
Select this check box to gather the Job processing metadata at the Job level as well as |
|
Global Variables |
ERROR_MESSAGE: the error message generated by the A Flow variable functions during the execution of a component while an After variable To fill up a field or expression with a variable, press Ctrl + For further information about variables, see Talend Studio |
|
|
Usage |
This component can be used as a standalone component to upload a local file to Google |
|
|
Limitation |
n/a |
|
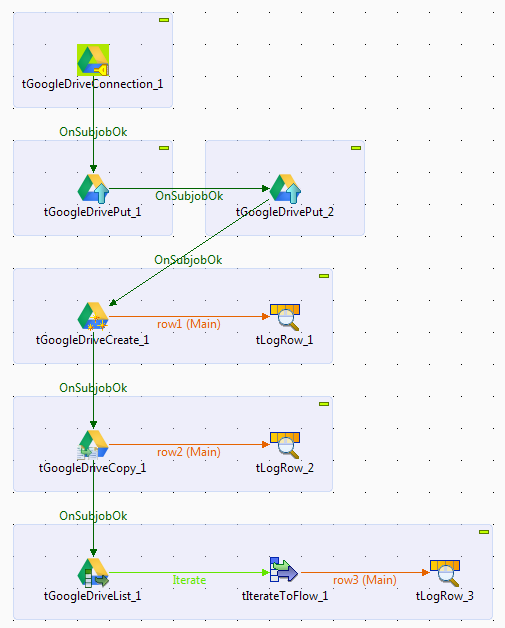
This scenario describes a Job that uploads two local files to an empty folder Talend in the root directory of Google Drive, then creates
a new folder Backup in the folder Talend and copies a file to the Backup folder, and finally lists and displays all files and folders in
the root directory of Google Drive on the console.
Prerequisites:
-
A Google account has been created and the access token that gives authentication for your
request has been generated. For how to get the access token, see Obtaining an access token for Google Drive. -
An empty folder Talend has been created in the root
directory of Google Drive.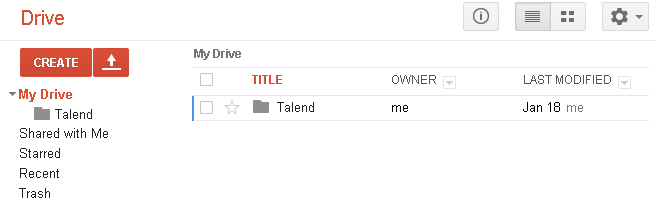
-
Create a new Job and add the following components by typing their names in the design
workspace or dropping them from the Palette:-
a tGoogleDriveConnection
component, -
two tGoogleDrivePut
components, -
a tGoogleDriveCreate
component, -
a tGoogleDriveCopy
component, -
a tGoogleDriveList
component, -
a tIterateToFlow component,
and -
three tLogRow
components.
-
-
Link tGoogleDriveCreate to the first tLogRow using a Row > Main
connection. -
Link tGoogleDriveCopy to the second
tLogRow using a Row > Main
connection. -
Link tGoogleDriveList to tIterateToFlow using a Row > Iterate
connection. -
Link tIterateToFlow to the third
tLogRow using a Row > Main
connection. -
Link tGoogleDriveConnection to the first
tGoogleDrivePut using a Trigger > On Subjob
Ok connection. -
Do the same to link the first tGoogleDrivePut to the second tGoogleDrivePut, link the second tGoogleDrivePut to tGoogleDriveCreate, link tGoogleDriveCreate to tGoogleDriveCopy, and link tGoogleDriveCopy to tGoogleDriveList.
Opening a connection to Google Drive
-
Double-click tGoogleDriveConnection to open its
Basic settings view in the Component tab.
-
In the Application Name field, enter the application
name required by Google Drive to get access to its API. In this example, it
is TalendProduct. -
In the Access Token field, enter the
access token required by Google Drive to access a Google Drive
account.
Uploading files to Google Drive
-
Double-click the first tGoogleDrivePut to open its
Basic settings view in the Component tab.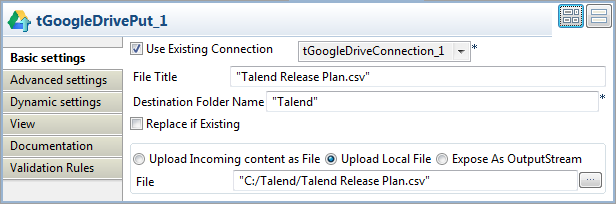
-
Select the Use Existing Connection check
box and from the list that appears select the component you have configured
to open your Google Drive connection. In this example, it is tGoogleDriveConnection_1. -
Select the Upload Local File option
button and in the File field, browse to or
enter the path to the file to be uploaded. In this example, it is C:/Talend/Talend Release Plan.csv. -
In the File Title field, enter the name
for the file after being uploaded. In this example, it is Talend Release Plan.csv. -
In the Destination Folder Name field,
enter the name of the folder in which the file will be stored in Google
Drive. In this example, it is Talend. -
Double-click the second tGoogleDrivePut to open its
Basic settings view in the Component tab.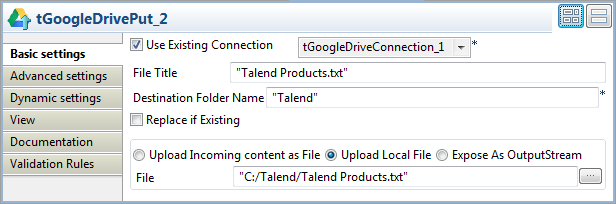
-
Repeat Step 2 through Step 5 to upload another
local file to the folder Talend in Google
Drive. In this example, it is Talend
Products.txt.
Creating a new folder in Google Drive
-
Double-click tGoogleDriveCreate to open its Basic settings view in the Component tab.
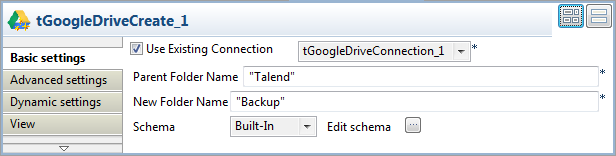
-
Select the Use Existing Connection check
box and from the list that appears select the component you have configured
to open your Google Drive connection. -
In the Parent Folder Name field, enter
the name of the folder in which a new folder will be created. In this
example, it is Talend. -
In the New Folder Name field, enter the
name of the folder to be created. In this example, it is Backup. -
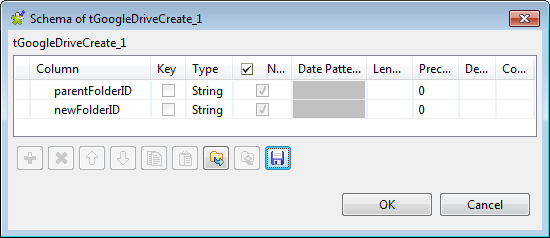
Click the […] button next to Edit schema to view the predefined schema of tGoogleDriveCreate.
-
Double-click the first tLogRow to open its Basic settings view in the Component tab.
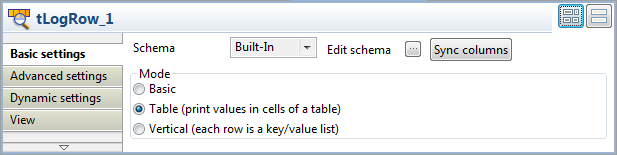
-
In the Mode area, select Table (print values in cells of a table) for a
better display of the results.
Copying a file to the newly created folder
-
Double-click tGoogleDriveCopy to open its Basic settings view in the Component tab.
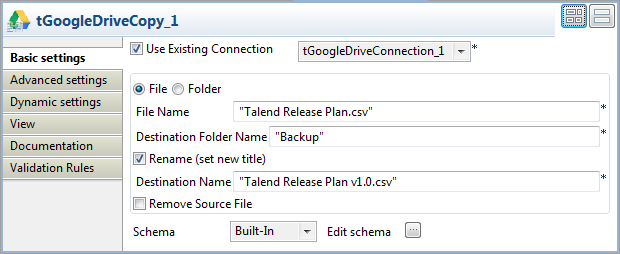
-
Select the Use Existing Connection check
box and from the list that appears select the component you have configured
to open your Google Drive connection. -
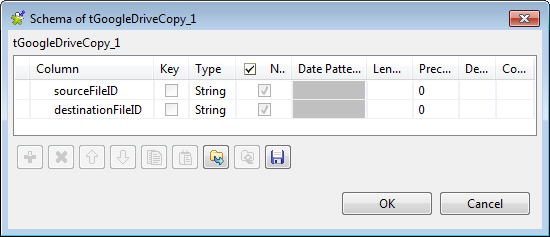
In the File Name field, enter the name of
the file to be copied. In this example, it is Talend
Release Plan.csv. -
In the Destination Folder Name field, enter the name of
the folder to which the file will be copied. In this example, it is
Backup. -
Select the Rename (set new title) check box, and in the
Destination Name field that appears
enter a new name for the file after being copied to the destination folder.
In this example, it is Talend Release Plan
v1.0.csv. -
Click the […] button next to Edit schema to view the predefined schema of tGoogleDriveCopy.
-
Double-click the second tLogRow to open its Basic settings view in the Component tab.

-
In the Mode area, select Table (print values in cells of a table) for a
better display of the results.
Listing files and folders in Google Drive
-
Double-click tGoogleDriveList to open its
Basic settings view in the Component tab.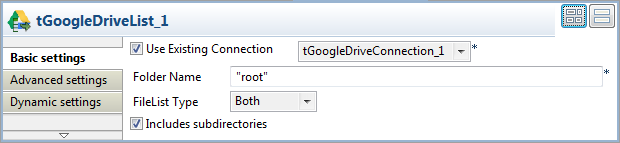
-
Select the Use Existing Connection check
box and from the list that appears select the component you have configured
to open your Google Drive connection. -
In the Folder Name field, enter the name of the folder
to be iterated on. In this example, it is the root directory of Google Drive
and you can use the alias root to refer
to it. -
Select Both from the FileList
Type drop-down list to list both files and folders in the
root directory.Select the Includes subdirectories check box to iterate
also on the subdirectories of the root directory. -
Double-click tIterateToFlow to open its
Basic settings view in the Component tab.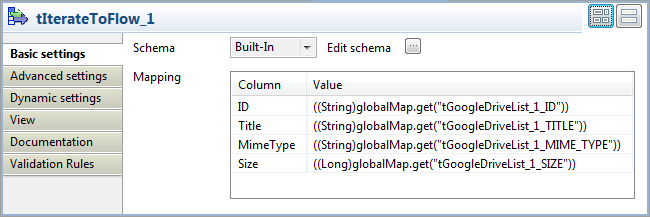
-
Click the […] button next to Edit schema to open the schema editor.
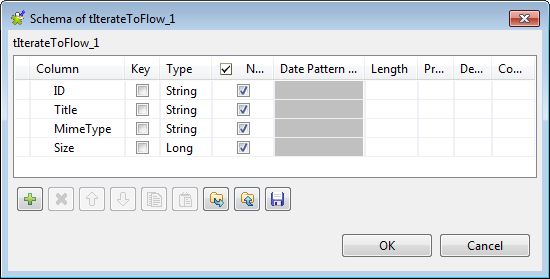
Click the [+] button to add four columns:
ID, Title, and MimeType of
the type string, and Size of the type
long.Click OK to validate the changes and accept the
propagation prompted by the pop-up dialog box. -
In the Mapping table, fill in the value for each column
by selecting the corresponding cell in the Value column and then press Ctrl+Space and from the list of variables that appears
select the corresponding global variable of the tGoogleDriveList component. In this example, select:-
((String)globalMap.get(“tGoogleDriveList_1_ID”))
for the ID column, -
((String)globalMap.get(“tGoogleDriveList_1_TITLE”))
for the Title column, -
((String)globalMap.get(“tGoogleDriveList_1_MIME_TYPE”))
for the MimeType column,
and -
((Long)globalMap.get(“tGoogleDriveList_1_SIZE”))
for the Size column.
-
-
Double-click the third tLogRow to open
its Basic settings view in the Component tab.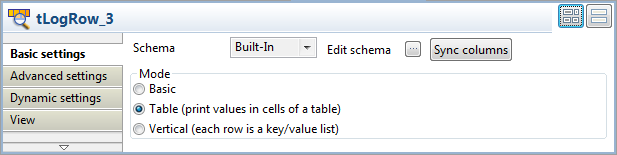
-
In the Mode area, select Table (print values in cells of a table) for a
better display of the results.
-
Press Ctrl + S to save the Job.
-
Execute the Job by pressing F6 or
clicking Run on the Run tab.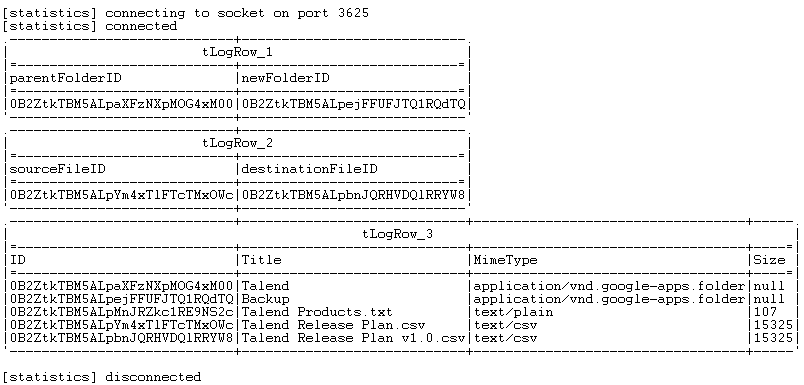
As shown above, two files Talend Products.txt and
Talend Release Plan.csv were uploaded
to the folder Talend, then a new folder
Backup was created in the folder
Talend and the file Talend Release Plan.csv was copied to the new
folder and renamed to Talend Release Plan
v1.0.csv, and finally all files and folders are listed and
displayed on the console.