The tOracleOutputBulk and tOracleBulkExec components are used together in a two step process. In
the first step, an output file is generated. In the second step, this file is used in
the INSERT operation used to feed a database. These two steps are fused together in the
tOracleOutputBulkExec component, detailed in a
separate section. The advantage of using two separate steps is that the data can be
transformed before it is loaded in the database.
|
Component family |
Databases/Oracle |
|
|
Function |
tOracleBulkExec inserts, appends, |
|
|
Purpose |
As a dedicated component, it allows gains in performance during |
|
|
Basic settings |
Property type |
Either Built-in or Repository. Since version 5.6, both the Built-In mode and the Repository mode are |
|
|
|
Built-in: No property data stored |
|
|
|
Repository: Select the repository |
|
|
Use an existing connection |
Select this check box and in the Component List click the NoteWhen a Job contains the parent Job and the child Job, if you need to share an existing
For an example about how to share a database connection across Job levels, see |
|
|
Connection type |
Drop-down list of available drivers:
Oracle OCI: Select this connection
Oracle Service Name: Select this
Oracle SID: Select this connection
Oracle Custom: Select this |
|
|
DB Version |
Select the Oracle version in use. |
|
|
Host |
IP address of the database server. |
|
|
Port |
Port number listening the database server. |
|
|
Database |
Database name. |
|
|
Schema |
Schema name. |
|
|
Username and |
DB user authentication data. To enter the password, click the […] button next to the |
|
|
Table |
Name of the table to be written. Note that only one table can be |
|
|
Action on table |
On the table defined, you can perform one of the following
None: No operation is carried
Drop and create table: The table is
Create table: The table does not
Create table if not exists: The
Drop table if exists and create:
Clear table: The table content is
Truncate table: The table content |
|
|
Data file name |
Name of the file to be loaded. WarningThis file should be located on the same machine as the |
|
|
Action on data |
On the data of the table defined, you can perform:
Insert: Inserts rows to an empty
Update: Update the existing data of
Append: Adds rows to the existing
Replace: Overwrites some rows of
Truncate: Drops table entries and |
|
|
Schema and Edit |
A schema is a row description, it defines the number of fields to Since version 5.6, both the Built-In mode and the Repository mode are Click Edit schema to make changes to the schema. If the
|
|
|
|
Built-In: You create and store the schema locally for this |
|
|
|
Repository: You have already created the schema and When the schema to be reused has default values that are integers or functions, ensure that For more details, see https://help.talend.com/display/KB/Verifying+default+values+in+a+retrieved+schema. |
|
Advanced settings |
Advanced separator (for number) |
Select this check box to change the separator used for the |
|
|
Use existing control file |
Select this check box if you use a control file (.ctl) and specify |
|
|
Record format |
Define the record format:
Default: format parameters are set Stream: set Record terminator. Fixed: set the Record length. Variable: set the Field size of the record length. |
|
|
Specify .ctl file’s INTO TABLE clause manually |
Select this check box to manually fill in the INTO TABLE clause of the control file. |
|
|
Fields terminated by |
Character, string or regular expression to separate fields: None: no separator is used.
Whitespace: the separator used is a
EOF (used for loading LOBs from
Other terminator: Set another |
|
|
Use fields enclosure |
Select this check box if you want to use enclosing characters for
Fields enclosure (left part):
Field enclosure (right part): |
|
|
Use schema’s Date Pattern to load Date field |
Select this check box to use the date pattern of the schema in the |
|
|
Specify field condition |
Select this check box to define data loading condition. |
|
|
Preserve blanks |
Select this check box to preserve the blanks. |
|
|
Trailing null columns |
Select this check box to load null columns. |
|
|
Load options |
Click + to add data loading
Parameter: select a loading
Value: enter a value for the |
|
|
NLS Language |
In the list, select the language used for the data that are not |
|
|
Set Parameter NLS_TERRITORY |
Select this check box to modify the territory conventions used for |
|
|
Encoding |
Select the encoding from the list, or enter the encoding between double quotes if it does |
|
|
Output |
Select the type of output for the standard output of the Oracle to console, to global variable. |
|
|
Convert columns and table names to uppercase |
Select this check box to uppercase the names of the columns and |
|
|
tStatCatcher Statistics |
Select this check box to collect log data at the component |
|
Dynamic settings |
Click the [+] button to add a row in the table and fill The Dynamic settings table is available only when the For more information on Dynamic settings and context |
|
|
Global Variables |
NB_LINE_DATA: the number of rows read. This is an After NB_LINE_BAD: the number of rows rejected. This is an
NB_LINE_INSERTED: the number of rows inserted. This is an RETURN_CODE: the return code indicating the result of ERROR_MESSAGE: the error message generated by the A Flow variable functions during the execution of a component while an After variable To fill up a field or expression with a variable, press Ctrl + For further information about variables, see Talend Studio |
|
|
Usage |
This dedicated component offers performance and flexibility of |
|
|
Log4j |
The activity of this component can be logged using the log4j feature. For more information on this feature, see Talend Studio User For more information on the log4j logging levels, see the Apache documentation at http://logging.apache.org/log4j/1.2/apidocs/org/apache/log4j/Level.html. |
|
|
Limitation |
The database server/client must be installed on the same machine |
|
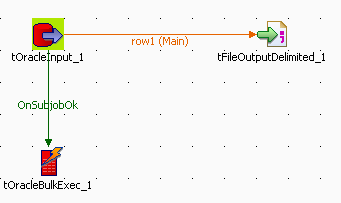
This scenario describes how to truncate the content of an Oracle database and load the
content of an input file. The related Job is composed of three components that
respectively creates the content, output this content into a file to be loaded into the
Oracle database after the database table has been truncated.
-
Drop the following components: tOracleInput, tFileOutputDelimited and tOracleBulkExec from the Palette to the design workspace.
-
Connect the tOracleInput to the tFileOutputDelimited using a Row > Main link.
-
Connect the tOracleInput to the tOracleBulkExec using a OnSubjobOk trigger link.

-
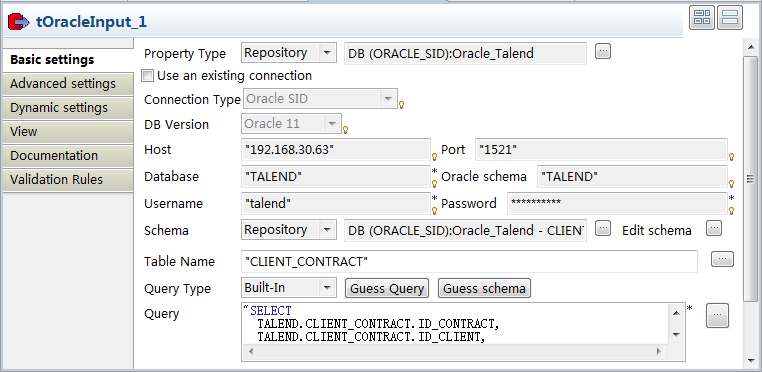
Double-click the tOracleInput to open its
Basic settings view. -
Define the Oracle connection details. It is recommended to store the
database connection details in the Metadata
folder of the Repository tree view in order
to retrieve them easily at any time in any Job.
-
Define the schema, if it is not stored in the Repository. In this example, the schema contains four
columns as follows: ID_Contract,
ID_Client, Contract_type and
Contract_Value. -
Define the tFileOutputDelimited component
parameters, including output File Name,
Row separator and Fields delimiter. -
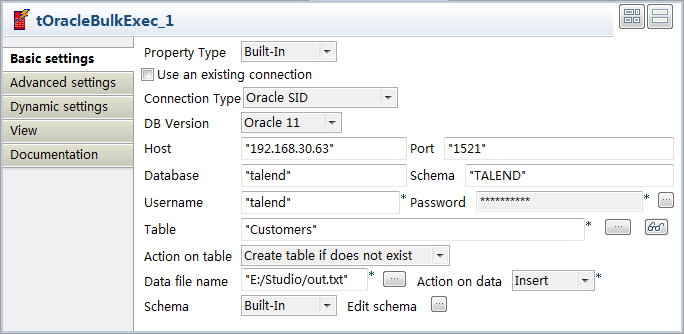
Double-click on the tOracleBulkExec to
define the database populating properties.
-
In the Property Type list, select
Repository if you stored the database
connection details under the Metadata node
of the Repository or select Built-in to define them manually. In this
scenario, use the Built-in mode. -
Set the connection parameters in the following fields: Host, Port,
Database, Schema, Username, and
Password. -
Fill in the name of the Table to be
populated and the Action on data to be
carried out. In this use case, select insert. -
In the Schema list, select Built-in, and click the […] button next to the Edit
schema field to define the structure of the data to be passed
to the next component. -
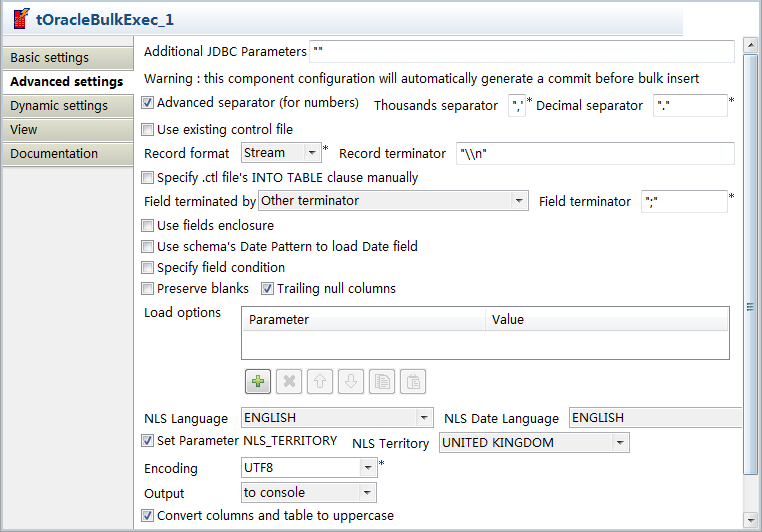
Click the Advanced settings view to
configure the advanced settings of the component.
-
Select the Use an existing control file
check box if you want to use a control file (.ctl) storing the status of the
physical structure of the database. Or, fill in the following fields
manually: Record format, Specify .ctl file’s INTO TABLE clause manually,
Field terminated by, Use field enclosure, Use
schema’s Date Pattern to load Date field, Specify field condition, Preserve blanks, Trailing null
columns, Load options,
NLS Language and Set Parameter NLS_TERRITORY according to your
database. -
In the Encoding list, select the
encoding, or enter the encoding between double quotes if it does not exist
in the list. -
In the Output list, select to console to output the standard output of the
database in the console.
-
Press Ctrl+S to save your Job.
-
Press F6 to run the Job. The log is shown
in the console of the Run view and the
table is populated with the parameter file data.
Related topic: see Scenario: Inserting data in MySQL database.