|
Component family |
ESB/REST |
|
|
Function |
The tRESTClient component sends |
|
|
Purpose |
The tRESTClient component is used |
|
|
Basic settings |
URL |
Type in the URL address of the REST server to be invoked. When the |
| Relative Path |
Enter the relative path of the REST server to be invoked. For example, if you want to access If Use Service Locator is If Use Service Locator is |
|
|
|
HTTP Method |
From this list, select an HTTP method that describes the desired
– GET: retrieves data from the
– POST: uploads data to the server
– PUT: updates data based on the
– DELETE: removes data based on the |
| Content Type |
Select XML, JSON, or FORM This list appears only when you select the POST or PUT HTTP |
|
| Accept Type |
Select the media type the client end is prepared to accept for the Available options are XML, |
|
| Query parameters |
Specify the URI query parameters in the form of name-value pairs. This option is mostly used with the GET method. |
|
|
Schema and Edit |
A schema is a row description, it defines the number of fields This component uses three built-in, read-only schemas. Click Edit Schema to view the Warning
Changing the schema type may result in loss of the |
|
| Input Schema |
Schema for the input data. This schema contains two – body: stores the content of – string: stores the input |
|
| Response Schema |
Schema for server response. This schema is passed onto the next – statusCode: stores the HTTP – body: stores the content of a – string: stores the response |
|
| Error Schema |
Schema for error information. This schema is passed onto the next – errorCode: stores the HTTP – errorMessage: stores the error |
|
| Use Service Locator | Select this check box to enable the Service Locator. It maintains the availability of the service to help meet demands and service level agreements (SLAs). Specify the Service namespace and the Service name in the corresponding fields. |
|
| Use Service Activity Monitor | Select this check box to enable the Service Activity Monitor. It captures events and stores this information to facilitate in-depth analysis of service activity and track-and-trace of messages throughout a business transaction. This can be used to analyze service response times, identify traffic patterns, perform root cause analysis and more. |
|
| Use Authentication |
Select this check box if authentication is required on the REST If you use Basic HTTP or To enter the password, click the […] button next to the If you use OAuth2 Bearer, you |
|
|
Use Authorization |
Select this check box to enable authorized call. Specify the For more information about the management of user roles and |
|
|
Use Business Correlation |
Select this check box to create a correlation ID in this You can specify a correlation ID in the Correlation Value field. In this case the When this option is enabled, tRESTClient will also extract the correlation ID |
|
| Die on error | This check box is selected to kill the Job when an error occurs. Clear the check box to skip the row on error and complete the process for error-free rows. |
|
|
Advanced settings |
Log messages |
Select this check box to log the message exchange between the |
|
Convert Response To DOM Document |
Select this check box to convert the response from the server to Clear this check box if you want the response to be handled as a |
|
| Drop JSON Request Root |
This option appears when HTTP |
|
|
Wrap JSON Response |
This option appears and is enabled by default when JSON is selected from the Accept Type list in the Basic settings view. With this check box selected, the response is wrapped with a |
|
| HTTP Headers |
Type in the name-value pair(s) for HTTP headers to define the For the specific definitions of HTTP headers, consult your REST |
|
|
Disable chunked encoding |
This option appears when HTTP |
|
| Service Locator Customer Properties | This option appears when Use Service Locator is enabled in the Basic settings tab. Click [+] to add as many properties as needed to the table. Enter the name and the value of each property in the Property Name field and the Property Value field respectively to identify the service. |
|
| Service Activity Customer Properties | This option appears when Use Service Activity Monitor is enabled in the Basic settings tab. Click [+] to add as many properties as needed to the table. Enter the name and the value of each property in the Property Name field and the Property Value field respectively to identify the service. |
|
|
Connection timeout |
Set the amount of time, in seconds, that the client will attempt |
|
| Receive timeout | Set the amount of time, in seconds, that the client will wait for a response before it times out. If set to 0, the client will wait indefinitely. (default: 60) |
|
| Use HTTP proxy | Select this check box if you are using a proxy server. Once selected, you need to provide the connection details: host, port, username and password. |
|
| tStatCatcher Statistics | Select this check box to gather the Job processing metadata at the Job level as well as at each component level. |
|
|
Dynamic settings |
Click the [+] button to add a row in the table and fill the Once a dynamic parameter is defined, the corresponding option becomes highlighted and For more information on Dynamic settings and context |
|
|
Usage |
This component is used as a RESTful Web service client to |
|
| Connections |
Outgoing links: Row: Response; Error. Trigger: On Subjob Ok; On Subjob Incoming links: Row: Main; Reject. Trigger: Run if; On Subjob Ok; On For further information regarding connections, see Talend Studio User |
|
|
Global Variables |
NB_LINE: the number of rows processed. This is an After HEADERS: the HTTP response headers. This is a Flow CORRELATION_ID: the correlation ID by which chained ERROR_MESSAGE: the error message generated by the A Flow variable functions during the execution of a component while an After variable To fill up a field or expression with a variable, press Ctrl + For further information about variables, see Talend Studio |
|
|
Limitation |
n/a |
|
This scenario describes a three-component Job that retrieves user information based on
the user ID from a REST service via HTTP GET and displays the retreived user
information, as well as the message exchange between the client and the server, on the
Run console.
Prerequisites:
If you are a Talend ESB user, create a Job
as described in Scenario 2: Using URI Query parameters to explore the data of a database, run
the Job to expose a REST service, and enter the REST service URL in your Web browser,
http://localhost:8088/users in this example. You should see information
like the following:

If you are not a Talend ESB user, then you need
to get from your REST service provider the URL, the data structure, and the required
parameters of the REST service you are going to call and make necessary modifications in
the scenario configurations accordingly.
-
Drop the following components from the Palette onto the design workspace:
-
tRESTClient, used to call the
REST service and retrieve user information from the server
end, -
tXMLMap, used to adapt the tree
structure of the REST service, and -
tLogRow, to display the retrieved
user information on the Run
console.
-
-
Connect the tRESTClient to the tXMLMap using a Row > Response
connection. -
Connect the tXMLMap to the tLogRow using a Row > Main connection, and
give it a name, out in this
example. -
Label the components to best describe the actions to perform.

Configuring the service call
-
Double-click the tRESTClient component to
open its Basic settings view.
-
Fill the URL field with the URL of the
REST service you are going to invoke, “http://localhost:8088/users” in this example. Note that the
URL provided in this use case is for demonstration purposes only and not a
live address. -
From the HTTP Method list, select
GET to send an HTTP request for
retrieving the existing records.From the Accept Type list, select the
type the client end is prepared to accept for the response from the server
end, XML. Leave the rest of the settings as
they are. -
Click the [+] button beneath the
Query parameters table to add two
parameters, from and to, and set both parameters to 2, to get the information of the user with the
ID of 2.Alternatively, you can query the information of the user with the ID of 2
by adding ?from=2&to=2 to the service
URL. -
In the Advanced settings view of the
tRESTClient component, select the
Log messages and the Convert Response To DOM Document check boxes to
log the message exchange to the server and convert the response from the
server to document type.
Mapping the service structure and displaying the retrieved user
information
-
Double-click the tXMLMap component to
open the Map Editor. -
If you selected XML in the Accept Type list of the tRESTClient component, define the input XML tree structure
according to the service structure.-
In the input table, right-click the default root node of the body column, select Rename from the contextual menu, and
rename it to users. -
Right-click the users node,
select Create Sub-Element from the
contextual menu, and create sub-element named user. Set user as the loop element because the XML structure
of the Web service to be invoked is looped on this element. -
Right-click the user node,
select Create Attribute from the
contextual menu, and enter id in
the [Create New Attribute] dialog
box to create an attribute named id for the user
node. -
Right-click the user node
again, select Create Sub-Element
from the contextual menu, and enter first_name in the [Create New
Element] dialog box to create an sub-element named
first_name for the user node.Repeat this operation to create another sub-element under the
user node, last_name. -
Drop the id, first_name and last_name columns from the input table to the output
table, and then click OK to
validate the mapping and close the Map Editor.
If you selected JSON in the Accept Type list of the tRESTClient component, the response from the server end will
be sent back in JSON format and converted to document type. In this example,
the converted response structure looks like the following:123456789<root><users><user><id>2</id><first_name>Theodore</first_name><last_name>Harding</last_name></user></users></root>Note that the
<root>element is removed if the Wrap JSON Response check box is cleared in the
Advanced settings of the tRESTClient component.Define the input XML tree structure accordingly and map it with the output
data flow in a similar manner as described above.
-
-
Double-click the tLogRow component to
open its Basic settings view.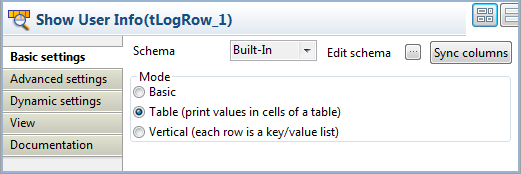
-
Click the Sync columns button to make
sure the component schema is synchronized with the output schema of the
tXMLMap component. -
In the Mode field, select the Table option to display the GET result in table
cells.
-
Press Ctrl+S to save your Job.
-
Press F6 or click Run on the Run console to
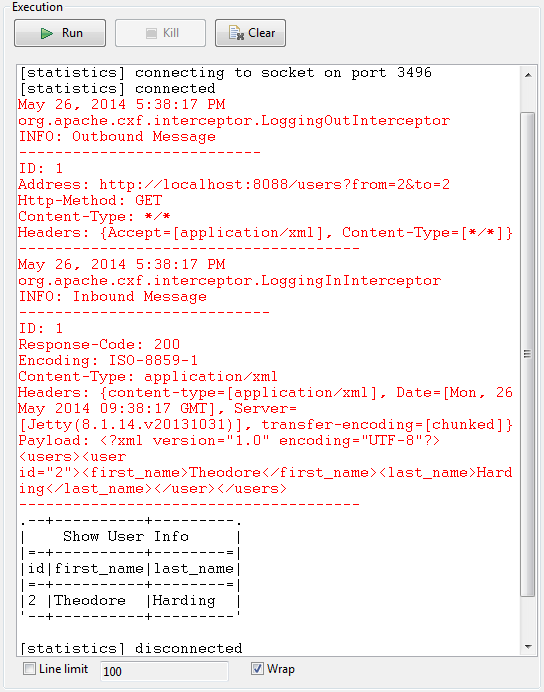
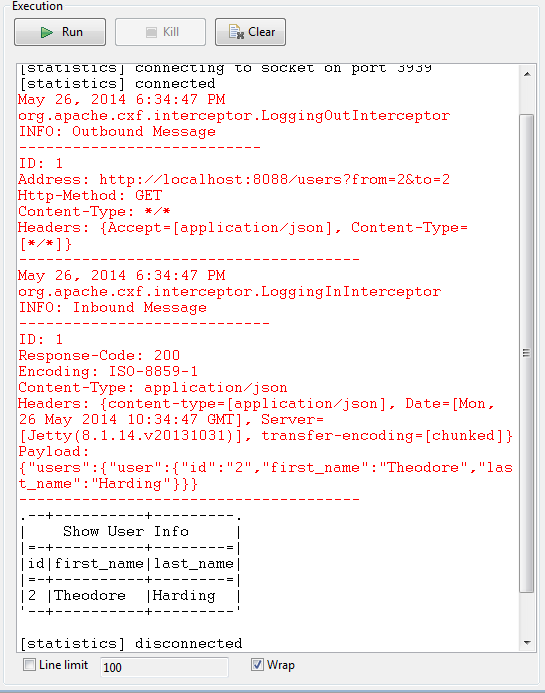
launch the Job.The console shows that the tRESTClient
component successfully reads the user information from the server end
corresponding to the specified user ID.If you selected XML in the Accept Type list of the tRESTClient component, the execution result will be:
If you selected JSON in the Accept Type list of the tRESTClient component, the execution result will be:
This scenario describes a three-component Job that updates the information of a list
of users to a remote database through a REST service using the HTTP POST method. When
executed, the Job displays the client-server message exchange information on the
Run console.
The user information to be updated to the server is stored in a CSV file, which looks
like the following:
|
1 2 3 4 5 6 |
id;first_name;last_name 1;John;Smith 2;Martin;Reagan 3;James;White 4;Jenny;Jackson 5;Robert;Thomson |
Prerequisites:
If you are a Talend ESB user, create a Job
as described in Scenario 3: REST service accepting HTTP POST requests and run the Job
as a REST server to expose a REST service that accepts HTTP POST requests. Upon
execution of the Job, the console displays the service implementation information,
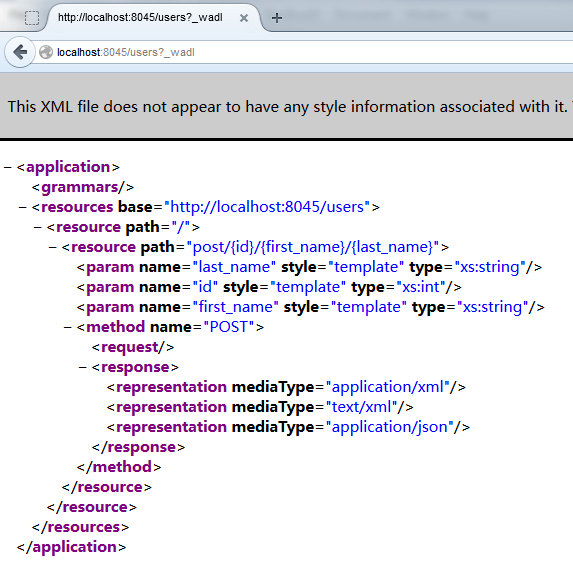
including the service endpoint URL, which is http://localhost:8045/users in
this example. If you enter http://localhost:8045/users?_wadl in your Web
browser, you should see the service definition information like the following:
If you are not a Talend ESB user, then you need
to get the service-related information from your REST service provider including the
URL, the resource path, and the data structure, and make necessary modifications in the
scenario configurations accordingly.
-
Create a Job and add the following components by typing their names in the
design workspace or drop them from the Palette:-
tFileInputDelimited, to read user
information of a local file, -
tXMLMap, to adapt the input
structure to the REST service structure, and -
tRESTClient, used to call the
REST service to send data to the remote database.
-
-
Connect the tFileInputDelimited to the
tXMLMap using a Row > Main
connection. -
Connect the tXMLMap to the tRESTClient using a Row > Main connection, and
give the output flow a name, request in
this example. -
Label the components to best describe the actions to perform.

Configuring the input data and the structure mappings
-
Double-click the tFileInputDelimited
component to open its Basic settings
view.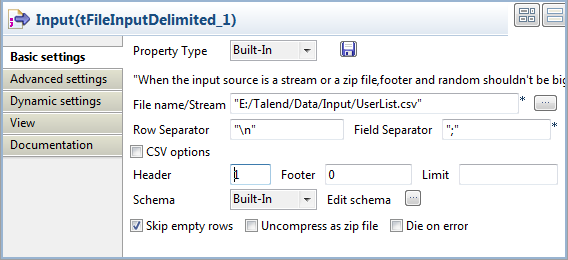
-
Specify the input file in the File name
field, fill the Header field with 1 to skip
the header row, and keep the rest parameters as they are. -
Click the […] button next to Edit schema to open the [Schema] dialog box, and edit the input schema as
follows:-
id, type Integer, 2 characters
long, set as the key column -
first_name, type String
-
last_name, type String

-
-
Double-click the tXMLMap component to
open the Map Editor. -
Rename the root node in the output
table: right-click the node, select Rename
from the contextual menu, and specify a new name in the pop-up dialog box,
user in this example. -
Select all the three columns in the input table and drop them onto the
user node, and select the Create as sub-element of target node option from
the pop-up dialog box to set these columns as sub-elements of the user node. When done, click OK to validate the mappings and close the Map
Editor.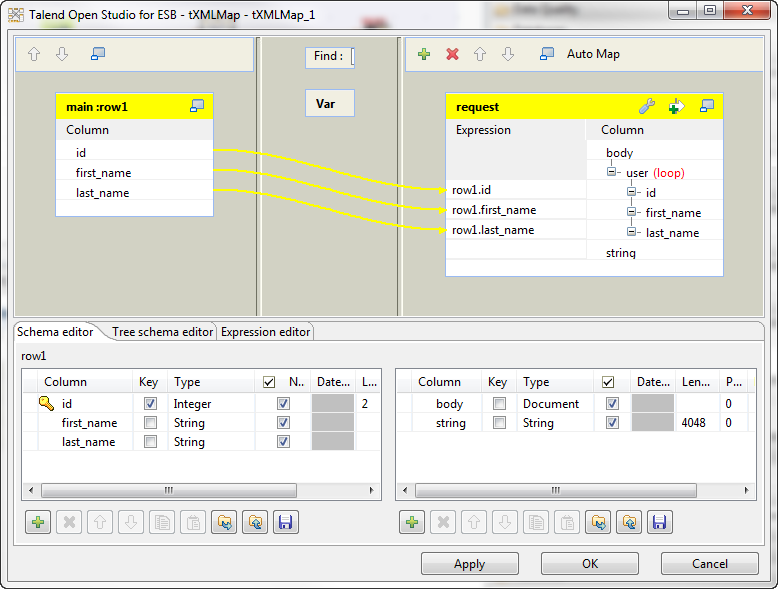
Configuring the service call
-
Double-click the tRESTClient component to
open its Basic settings view.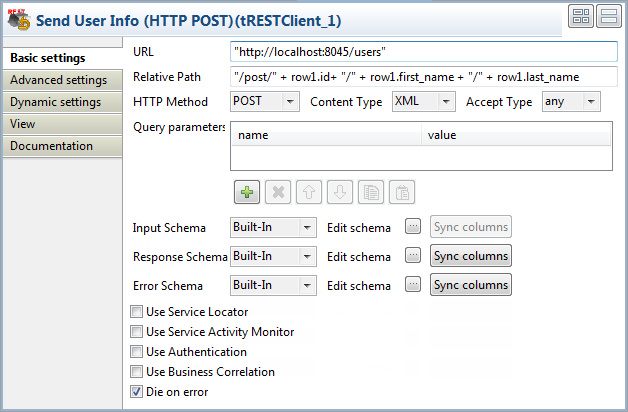
-
Fill the URL field with the URI location
where the REST service is accessible,
"http://localhost:8088/users"in this example. -
In the Relative Path field, enter the
resource path,"/post/" + row1.id+ "/" + row1.first_name + "/" +in this example. This will send the data from the
row1.last_name
input row to the server end via the resource path. -
From the HTTP Method list, select
GET to send an HTTP request for
retrieving the existing records.From the Accept Type list, select the
type the client end is prepared to accept for the response from the server
end, XML. -
In the Advanced settings view of the
tRESTClient component, select the
Log messages check box to log the
message exchange information with the server.Leave the rest of the settings as they are.
