tSalesforceOutputBulk and tSalesforceBulkExec components are used together to output the needed
file and then execute intended actions on the file for your Salesforce.com. These two
steps compose the tSalesforceOutputBulkExec component,
detailed in a separate section. The interest in having two separate elements lies in the
fact that it allows transformations to be carried out before the data loading.
|
Component family |
Business/Cloud |
|
|
Function |
tSalesforceOutputBulkExec |
|
|
Purpose |
As a dedicated component, tSalesforceOutputBulkExec gains performance while |
|
|
Basic settings |
Use an existing connection |
Select this check box and in the Component List click the NoteWhen a Job contains the parent Job and the child Job, Component |
|
|
Login Type |
Two options are available: Basic: select this option to log OAuth2: select this option to
|
|
Salesforce Webservice URL |
Enter the Webservice URL required to connect to the Salesforce |
|
|
Salesforce Version |
Enter the Salesforce version you are using. |
|
|
|
Username and |
Enter your Web service authentication details. To enter the password, click the […] button next to the |
|
|
Consumer Key and Consumer |
Enter your OAuth authentication details. Such information is To enter the consumer secret, click the […] button next For what a Connected App is, see Connected Apps. For how to create a Connected App, see |
|
|
Callback Host and Callback |
Enter your OAuth authentication callback url. This url (both host |
|
|
Token File |
Enter the token file name. It stores the refresh token that is |
|
|
Bulk file path |
Directory where are stored the bulk data you need to |
|
|
Action |
You can do any of the following operations on the data of the Insert: insert data. Update: update data.
Upsert: update and insert Delete: delete data. |
|
|
Upsert Key Column |
Specify the key column for the upsert operation. Available when Upsert is selected |
|
|
Module |
Select the relevant module in the list. NoteIf you select the Use Custom |
|
|
Schema and Edit |
A schema is a row description. It defines the number of fields to be processed and passed on Since version 5.6, both the Built-In mode and the Repository mode are Click Edit schema to make changes to the schema. If the
Click Sync columns to retrieve the schema from the |
|
Advanced settings |
Rows to commit |
Specify the number of lines per data batch to be processed. |
|
|
Bytes to commit |
Specify the number of bytes per data batch to be processed. |
|
|
Concurrency mode |
The concurrency mode for the job. Parallel: process batches in Serial: process batches in serial |
|
|
Wait time for checking batch |
Specify the wait time for checking whether the batches in a Job |
|
|
Use Socks Proxy |
Select this check box if you want to use a proxy server. In this |
|
|
Ignore NULL fields values |
Select this check box to ignore NULL values in Update or Upsert mode. |
|
Relationship mapping for upsert |
Click the [+] button to add lines Additionally, the Polymorphic
Column name of Talend schema:
Lookup field name: lookup
External id name: external ID field Polymorphic: select this check
Module name: name of the lookup Note
|
|
|
|
tStatCatcher Statistics |
Select this check box to gather the Job processing metadata at a |
|
Global Variables |
ERROR_MESSAGE: the error message generated by the A Flow variable functions during the execution of a component while an After variable To fill up a field or expression with a variable, press Ctrl + For further information about variables, see Talend Studio |
|
|
Usage |
This component is mainly used when no particular transformation is |
|
|
Limitation |
The bulk data to be processed in Salesforce.com should be |
|
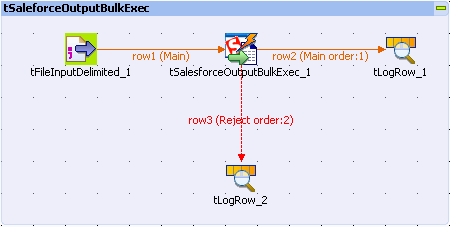
This scenario describes a four-component Job that submits bulk data into
Salesforce.com, executs your intended actions on the data, and ends up with displaying
the Job execution results for your reference.

Before starting this scenario, you need to prepare the input file which offers the
data to be processed by the Job. In this use case, this file is
sforcebulk.txt, containing some customer information.
Then to create and execute this Job, operate as follows:
-
Drop tFileInputDelimited, tSalesforceOutputBulkExec, and tLogRow from the Palette onto the workspace of your studio.
-
Use Row > Main connection to connect tFileInputDelimited to tSalesforceOutputBulkExec.
-
Use Row > Main and Row > Reject to connect tSalesforceOutputBulkExec respectively to the two tLogRow components.
-
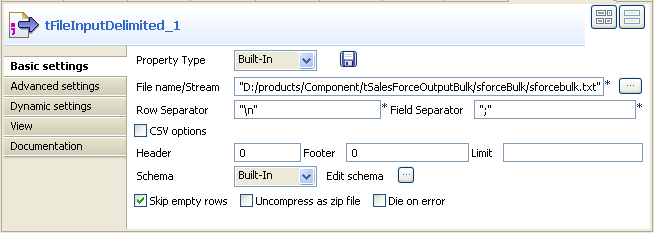
Double-click tFileInputDelimited to
display its Basic settings view and define
the component properties.
-
From the Property Type list, select
Repository if you have already stored
the connection to the salesforce server in the Metadata node of the Repository tree view. The property fields that follow are
automatically filled in. If you have not defined the server connection
locally in the Repository, fill in the details manually after selecting
Built-in from the Property Type list.For more information about how to create the delimited file metadata, see
Talend Studio
User Guide. -
Next to the File name/Stream field, click
the […] button to browse to the input
file you prepared for the scenario, for example,
sforcebulk.txt. -
From the Schema list, select Repository and then click the three-dot button to
open a dialog box where you can select the repository schema you want to use
for this component. If you have not defined your schema locally in the
metadata, select Built-in from the
Schema list and then click the
three-dot button next to the Edit schema
field to open the dialog box where you can set the schema manually. In this
scenario, the schema is made of four columns: Name,
ParentId, Phone and
Fax.
-
According to your input file to be used by the Job, set the other fields
like Row Separator, Field Separator…
-
Double-click tSalesforceOutputBulkExec to
display its Basic settings view and define
the component properties.
-
In Salesforce WebService URL field, use
the by-default URL of the Salesforce Web service or enter the URL you want
to access. -
In the Username and Password fields, enter your username and password for the
Web service. -
In the Bulk file path field, browse to
the directory where you store the bulk .csv data to be
processed.Note
The bulk file here to be processed must be in
.csv format. -
From the Action list, select the action
you want to carry out on the prepared bulk data. In this use case, insert. -
From the Module list, select the object
you want to access, Account in this
example. -
From the Schema list, select Repository and then click the three-dot button to
open a dialog box where you can select the repository schema you want to use
for this component. If you have not defined your schema locally in the
metadata, select Built-in from the
Schema list and then click the
three-dot button next to the Edit schema
field to open the dialog box where you can set the schema manually. In this
example, edit it conforming to the schema defined previously.
-
Double-click tLogRow_1 to display its
Basic settings view and define the
component properties.
-
Click Sync columns to retrieve the schema
from the preceding component. -
Select Table mode to display the
execution result. -
Do the same with tLogRow_2.
-
Press CTRL+S to save your Job and press
F6 to execute it.On the console of the Run view, you can
check the execution result.
In the tLogRow_1 table, you can read the
data inserted into your Salesforce.com.In the tLogRow_2 table, you can read the
rejected data due to the incompatibility with the Account objects you have accessed.If you want to transform the input data before submitting them, you need
to use tSalesforceOutputBulk and tSalesforceBulkExec in cooperation to achieve
this purpose. For further information on the use of the two components, see
Scenario: Inserting transformed bulk data into your Salesforce.com.