cHttp
resources.
cHttp Standard properties
These properties are used to configure cHttp running in the Standard Job framework.
The Standard
cHttp component belongs to the Connectivity/Internet family.
Basic settings
|
Uri |
The URI of the Http resource to call. |
| Client | Select this option to use cHttp as a client to call external servers. |
| Server | Select this option to use cHttp as a server to produce Web services. |
|
Client Configuration / Method |
Select an Http request method from GET, POST, |
|
GET: Retrieve the information
Parameters: click the [+] button to add lines as needed and
Encoder Charset: enter the |
|
|
POST: Request that the origin
Plain Text: select the Content-Type from text/plain, text/html, text/xml, application/x-www-form-urlencoded, application/xml, application/JSON, or other… (specify the Content-Type in
Form Style: click the [+] button to add lines as needed and
Use Message Body: use the incoming message body as the |
|
|
PUT: Request that the
Plain Text: select the Content-Type from text/plain, text/html, text/xml, application/x-www-form-urlencoded, application/xml, application/JSON, or other… (specify the Content-Type in
Form Style: click the [+] button to add lines as needed and
Use Message Body: use the incoming message body as the |
|
|
DELETE: Request that the origin
Parameters: click the [+] button to add lines as needed and
Encoder Charset: enter the |
|
|
HEAD: Identical to GET except
Parameters: click the [+] button to add lines as needed and
Encoder Charset: enter the |
|
|
OPTIONS: Represent a request for |
|
|
TRACE: Invoke a remote, |
|
|
Server Configuration / Disable Stream Cache |
DefaultHttpBinding will copy the request input stream into a stream cache and put it into message body. When this check box is selected, DefaultHttpBinding will set the request input stream directly into the message body. |
|
Server Configuration / Session Support |
Select this check box to enable the session manager on the server side of Jetty. |
|
Server Configuration / Use Transfer-Encoding |
This option is enabled by default. If this check box is cleared, Jetty servlet will disable the HTTP streaming and set the content-length header on the response. |
|
Server Configuration / Enable JMX |
Select this option to enable Jetty JMX support for this endpoint. For more information about this option, see the sitehttp://camel.apache.org/jetty.html#Jetty-JettyJMXsupport. |
|
Server Configuration / Match on URI Prefix |
Select this check box to use the CamelServlet to find a target consumer by matching the URI prefix if no exact match is found. For more information about this option, see the site http://camel.apache.org/how-do-i-let-jetty-match-wildcards.html. |
|
Server Configuration / Use Jetty Continuation |
Select this check box to use Jetty continuations for the Jetty Server. For more information about this option, see the site http://wiki.eclipse.org/Jetty/Feature/Continuations. |
|
Server Configuration / Enable HTTP TRACE |
Select this option to enable the HTTP TRACE method. |
Advanced settings
|
Headers |
Click the [+] button to add lines |
Usage
|
Usage rule |
cHttp provides Http based endpoints for consuming |
|
Limitation |
Due to license incompatibility, one or more JARs required to use this component are not |
Scenario 1: Retrieving the content of a remote file
This scenario applies only to a Talend solution with ESB.
In this scenario, cHttp is used to request the body
of a weather condition definition file that is available at
http://wsf.cdyne.com/WeatherWS/Weather.asmx
.
Dropping and linking the components
-
Drop the following components from the Palette onto the workspace: cMessagingEndpoint, cSetBody, cHttp and
cProcessor, labelled as STARTER, HTTP_REQUEST_BODY, GET_WEATHER_DESCRIPTION and PRINT_RESPONSE respectively. -
Link the components using a Row >
Route connection.
Configuring the components
-
Double-click cMessagingEndpoint to open
its Basic settings view in the Component tab.
-
In the URI field, enter
timer:go?repeatCount=1to define a timer for starting
message exchanges. In this example, only one message exchange will be
carried out due to the setting ofrepeatCount=1. -
Double-click cSetBody to open its
Basic settings view in the Component tab.
- In the Language field, select Constant.
-
In the Expression field, enter the
following as the body of the request message:12<soapenv:Envelope xmlns:soapenv="http://schemas.xmlsoap.org/soap/envelope/" xmlns:weat="http://ws.cdyne.com/WeatherWS/"><soapenv:Header/><soapenv:Body><weat:GetWeatherDefinitionInformation/></soapenv:Body></soapenv:Envelope> -
Double-click cHttp to open
its Basic settings view in the Component tab.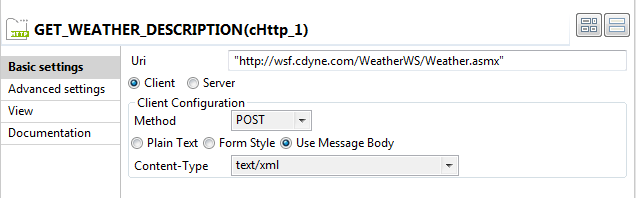
-
In the Uri field, enter the location of
the file to fetch, http://wsf.cdyne.com/WeatherWS/Weather.asmx in this
example. -
Click the Client radio button to use this
cHttp component as a client. - Select POST in the Method list and then the Use Message Body radio button. Select text/xml in the Content-Type list.
-
Click Advanced settings for further setup.
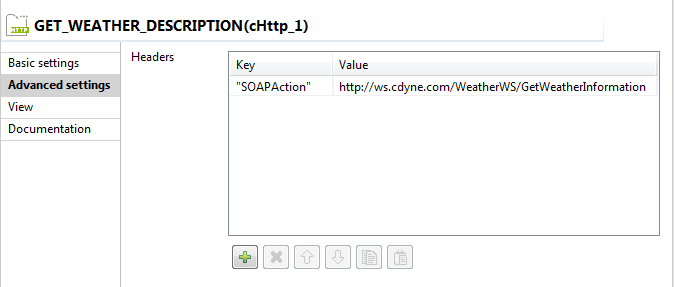
-
Click the [+] button to add a line in the
Headers table.Type inSOAPActionand
http://ws.cdyne.com/WeatherWS/GetWeatherInformationfor the
Key and Value fields. -
Double-click cProcessor to open its
Basic settings view in the Component tab.
-
In the Code area, enter the following to print the
response from the remote website, the body of the desired file:123System.out.println("--------------------RESPONSE--------------------");System.out.println(exchange.getIn().getBody(String.class));System.out.println("--------------------END--------------------"); - Press Ctrl+S to save your Route.
Viewing code and executing the Route
-
Click the Code tab at the bottom of the
design workspace to check the generated code.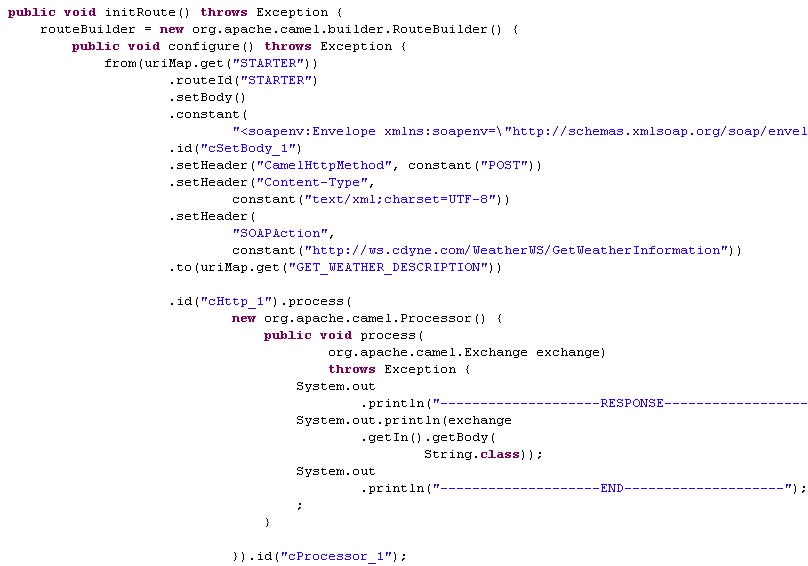 As shown above, the message exchange starts
fromthe endpoint
STARTER, gets its body set to<soapenv:Envelope
xmlns:soapenv="http://schemas.xmlsoap.org/soap/envelope/"xmlns:weat="http://ws.cdyne.com/WeatherWS/"><soapenv:Header/><soapenv:Body><weat:GetWeatherDefinitionInformation/></soapenv:Body></soapenv:Envelope>
atcSetBody_1, and then is sent out to the specified website by
cHttp_1. Finally, the response is printed out via
cProcessor_1. -
Press F6 to execute the Route.
 As shown above, the retrieved file defines up to 37 weather conditions
with detailed description.
Scenario 2: Using cHttp to produce a Web service
This scenario applies only to a Talend solution with ESB.
In this scenario, cHttp is used to as a server to
start a Web service. A cProcessor component is used to
request the service.
Dropping and linking the components
-
Drag and drop a cHttp and a cProcessor from the Palette onto the design workspace.
-
Link the components using a Row >
Route connection. - Label the components for better identification of their roles.
Configuring the components
-
Double-click cHttp to open its Basic settings view in the Component tab.
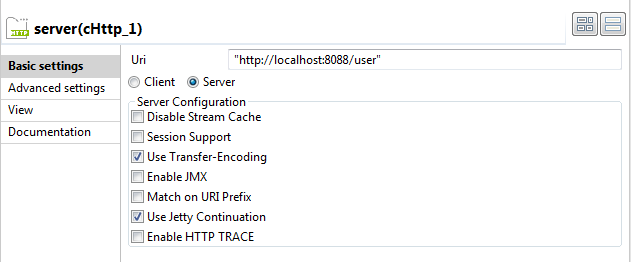
-
In the URI field, enter
"http://localhost:8088/user"where the service will be
accessible for requests. -
Click the Server radio button to use this
cHttp component as a server. Keep the
default settings of the other options. -
Double-click cProcessor to
open its Basic settings view in the
Component tab.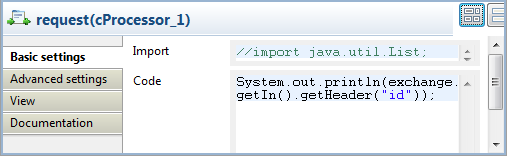
-
In the Code area, enter the following
code to get the headeridof the exchange message:1System.out.println(exchange.getIn().getHeader("id")); - Press Ctrl+S to save your Route.
Viewing code and executing the Route
-
Click the Code tab at the bottom of the
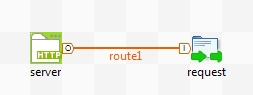
design workspace to check the generated code.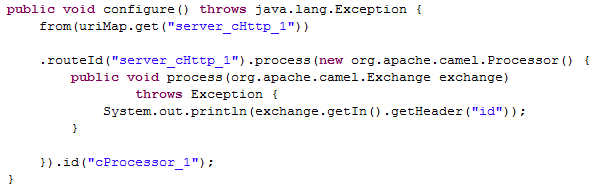 As shown above, the route is built
fromthe endpoint
server_cHttp_1and the message headeridis
printed out bycProcessor_1. -
Press F6 to execute the Route.

-
Start a Web browser. In the address bar, type in
http://localhost:8088/user?id=1and click Enter. A blank page opens up.
-
Switch back to the studio. The id
1is printed in the
console.