cPipesAndFilters
Splits message routing into a series of independent processing stages.
cPipesAndFilters divides message
processing into a sequence of independent endpoint instances, which can then be chained
together.
cPipesAndFilters Standard properties
These properties are used to configure cPipesAndFilters running in the Standard Job framework.
The Standard
cPipesAndFilters component belongs to the Routing family.
Basic settings
|
URI list |
Click the plus button to add new lines for URIs that identify |
Usage
|
Usage rule |
cPipesAndFilters is usually used |
|
Limitation |
n/a |
Scenario: Using cPipesAndFilters to process the task in sequence
This scenario applies only to a Talend solution with ESB.
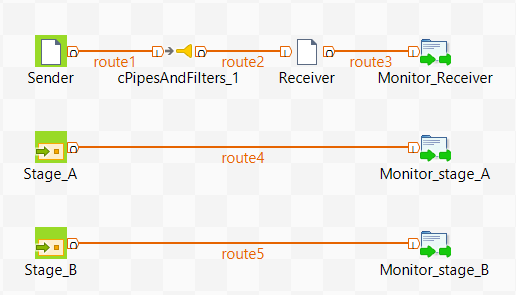
In this scenario, a cPipesAndFilters component is
used so that messages sent from the sender endpoint undergo stage A and stage B. Upon
completion of both stages, the messages are routed to a file system, which is the
receiver endpoint for the messages.

Dropping and linking the components
-
From the Connectivity folder of the Palette, drop two cFile components onto the design workspace, one as the
message sender and the other as the message receiver, and label them
Sender and Receiver respectively to better identify their roles in the
Route. -
From the Routing folder, drop one cPipesAndFilters component onto the design workspace,
between the two cFile components. -
From the Core folder, drop two cMessagingEndpoint components onto the design workspace, one
as the endpoint of stage A and the other as the endpoint of stage B, and
label them Stage_A and Stage_B respectively to better identify their
roles in the Route. -
From the Custom folder, drop three cProcessor components onto the design workspace to monitor
messages received on the receiver, stage A and stage B endpoints
respectively, and label them Monitor_Receiver, Monitor_stage_A, and Monitor_stage_B respectively to better identify their roles
in the Route. -
Right-click the cFile component labeled
Sender, select Row > Route from the
contextual menu, and click the cPipesAndFilters component.Repeat this step to set up the rest Row >
Route connections, as shown
above.
Configuring the components
-
Double-click the cFile component labeled
Sender to open its Basic settings view in the Component tab.
-
In the Path field, fill in or browse to
the path to the folder that holds the source files. -
From the Encoding list, select the
encoding type of your source files. Leave the other parameters as they
are. -
Repeat these steps to define the path to the output files and the output encoding type in
the Basic settings view of the cFile component labeled Receiver. -
Double-click the cPipesAndFilters
component to open its Basic settings view
in the Component tab.
-
Click the plus button to add two lines to the URI list
table, and fill the first line with"direct:a"and the second
line with"direct:b"to define the URIs of stage A and stage B
that the messages will undergo. -
Double-click the cMessagingEndpoint component labeled
Stage_A to configure the component in
its Basic settings view and define the URI
of stage A. Repeat this step to define the URI of stage B in the Basic
settings view of the cMessagingEndpoint component labeled Stage_B. -
Double-click the cProcessor component
labeled Monitor_Receiver to open its
Basic settings view, and customize the
code in the Code area to display the file
names of the messages received on Receiver, as follows:12System.out.println("Message sent to Receiver: "+exchange.getIn().getHeader("CamelFileName"));Repeat this step to customize the code in the other two cProcessor components to display the file names
of the messages received on stage A and stage B respectively:12System.out.println("Message sent to stage A: "+exchange.getIn().getHeader("CamelFileName"));12System.out.println("Message sent to stage B: "+exchange.getIn().getHeader("CamelFileName")); - Press Ctrl+S to save your Route.
Viewing code and executing the Route
-
Click the Code tab at the bottom of the
design workspace to have a look at the generated code. As shown in the code, messages sent
from
Senderare redirected to endpoints identified by
direct:aanddirect:bby
cPipesAndFilters_1before being routed to
Receiver. -
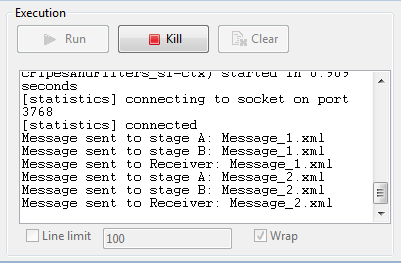
Press F6 to run your Route.
RESULT: The message delivery goes through stage A and
then stage B before reaching Receiver.