Scenario: Writing dynamic columns from a source file to a database
This scenario applies only to a subscription-based Talend solution.
In this scenario, MySQL is used for demonstration purposes. You will read dynamic columns from a source file, map them and then
write them to a table in a MySQL database. By defining
a dynamic column alongside known column names, we can retrieve all of the columns from
the source file, including the unknown columns.
-
Drop a tFileInputDelimited, a tMap and a tMysqlOutput component onto the workspace.

-
Link tFileInputDelimited to tMap using a Row >
Main connection. -
Link tMap to tMysqlOutput using a Row > *New Output*
(Main) connection. -
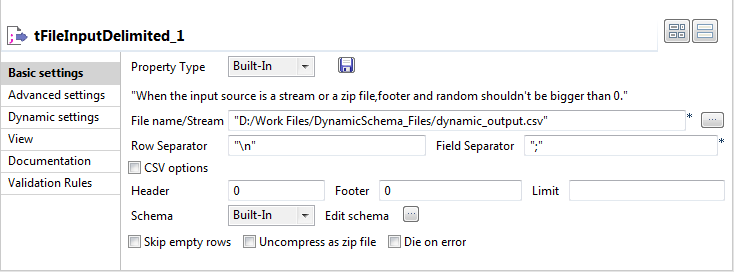
Double-click tFileInputDelimited to open its
Basic Settings view in the Component tab.
The dynamic schema feature is only supported in Built-In mode.
-
Select Built-In from the Property Type list.
-
Click the […] button next to the File name/Stream field and browse to the input
file. -
Enter the characters you want to use as separators next to the Row Separator and Field
Separator fields. -
Click Edit Schema to define the source file
schema.The [Edit Schema] dialog box opens.

-
Add as many rows as required or delete rows using the

and

buttons.
-
Modify the order of the columns using the

and

buttons.
-
Under Column, enter the names of each known
column on separate rows. -
In the last row, under Column, enter a name
for the dynamic column. -
Under Type, click the field to define the
type of data in the corresponding column.Click the arrow to select the correct data type.
Under Type, the dynamic
column type must be set as Dynamic.
The dynamic column must be defined in the last row of the schema.
-
Click OK to close the dialog box when you
have finished defining the source schema. -
Click tMap to open its Basic Settings view in the Component tab.

-
Click […] next to Map Editor to map the columns from the source file.

-
On the toolbar on top of the Output Panel on
the top right of the window, click thebutton.
The [Add an Output] schema dialog box
appears.

-
Next to New output, enter a name for the
output schema. -
Click OK to close the dialog box.
-
Using the Ctrl + click technique, highlight
all off the column names in the input schema on the left and drop them onto the
output schema.The columns dropped on the output columns retain their original values and
they are automatically mapped on a one to one basis.
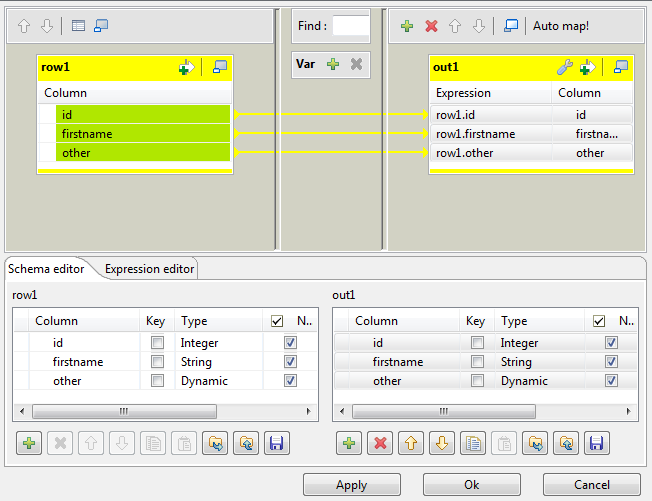
-
In the output schema, click the relevant row under Expression if you want to use the Expression Builder to set advanced parameters for the
corresponding column in the output. -
Click the […] button which appears to open
the Expression Builder and set the parameters
as required.
For further information about using the Expression
Builder, see
Talend Studio
User Guide.
The dynamic column must be mapped on a one to one basis and cannot undergo
any transformations. It cannot be used in a filter expression or in a variables
section. It cannot be renamed in the output table and cannot be used as a join
condition.
-
Click OK to close the Map Editor.
-
Double click tMysqlOutput to set its
Basic Settings in the Component tab.

-
Select Built-in as the Property Type.
-
Select the DB Version from the corresponding
list. -
Next to Host, enter the database server IP
address. -
Next to Port, enter the listening port
number of the database server. -
Enter your authentication data in the Username and Password
fields. -
Next to Action on table, select the required
action. -
Next to Action on data, select the required
action. -
Set the Schema type as
Built-in and click Edit schema
to modify the schema if required. -
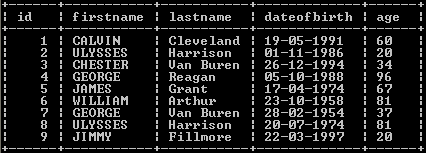
Press F6 to run the Job.
The table is written to the MySQL database along with the data and the column
names of the previously unknown columns:
The Job can also be run in the Traces Debug mode,
which allows you to view the rows as they are written to the output file, in the
workspace.
For further information about defining and mapping dynamic schemas, see
Talend Studio
User Guide.
For an example of how to write dynamic columns to an output file, see Scenario 5: Writing dynamic columns from a database to an output file.