tEXABulkExec
Imports data into an EXASolution database table using the IMPORT command provided
by the EXASolution database in a fast way.
The import will be cancelled after a configurable number
of records fail to import. Erroneous records can be sent to a log table in the same database
or to a local log file.
tEXABulkExec Standard properties
These properties are used to configure tEXABulkExec running in the Standard Job framework.
The Standard
tEXABulkExec component belongs to the Databases family.
The component in this framework is generally available.
Basic settings
|
Use an existing connection |
Select this check box and from the list displayed select the relevant connection Note:
When a Job contains the parent Job and the child Job, if you need to share an
existing connection between the two levels, for example, to share the connection created by the parent Job with the child Job, you have to:
For an example about how to share a database connection across Job levels, see |
|
Property Type |
Either Built-In or Repository.
|
|
Host |
Enter the host or host list of the EXASol database servers. EXASol can run in a cluster |
|
Port |
Enter the listening port number of the EXASolution database cluster. |
|
Schema |
Enter the name of the schema you want to use. |
|
User and Password |
Enter the user authentication data to access the EXASolution database. To enter the password, click the […] button next to the |
|
Table |
Enter the name of the table to be written. Note:
Typically the table names are stored in upper case. If you need |
|
Action on table |
On the table defined, you can perform one of the following operations
|
|
Schema and Edit |
A schema is a row description. It defines the number of fields (columns) to
Note:
The columns in the schema must be in the same order as they are in |
|
|
Click Edit schema to make changes to the schema.
|
Advanced settings
|
Additional JDBC Parameters |
Specify additional connection properties for the database connection you are This field is not available if the Use an existing |
|
Column Formats |
Specify the format for Date and numeric columns if the default can not
|
|
Source table columns |
If the source is a database, configure the mapping between the source Specifically configuring the mapping is optional. If you set nothing
|
|
Column Separator |
Enter the separator for the columns of a row in the local file. |
|
Column Delimiter |
Enter the delimiter that encapsulates the field content in the local |
|
Row Separator |
Enter the char used to separate the rows in the local file. |
|
Null representation |
Enter the string that represents a NULL value in the local file. If |
|
Skip rows |
Enter the number of rows (for example, header or any other prefix |
|
Encoding |
Enter the character set used in the local file. By default, it is |
|
Trim column values |
Specify whether spaces are deleted at the border of CSV
|
|
Default Date Format |
Specify the format for datetime values. By default, it is YYYY-MM-DD. |
|
Default Timestamp Format |
Specify the timestamp format used. By default, it is YYYY-MM-DD HH24:MI:SS.FF3. |
|
Thousands Separator |
Specify the character used to separate thousand groups in a numeric Note that this setting affects the connection property NLS_NUMERIC_CHARACTERS that defines the |
|
Decimal Separator |
Specify the character used to separate the integer part of a number Note that this setting affects the connection property NLS_NUMERIC_CHARACTERS that defines the |
|
Minimal number errors to reject the |
Specify the maximum number of invalid rows allowed during the data |
|
Log Error Destination |
Specify the location where error messages will be stored.
|
|
Transfer files secure |
Select this check box to transfer the file over HTTPS instead of |
|
tStatCatcher Statistics |
Select this check box to gather the Job processing metadata at the Job level |
Global Variables
|
Global Variables |
NB_LINE_INSERTED: the number of rows inserted. This is an
NB_LINE_DELETED: the number of rows deleted. This is an
FILENAME: the name of the file processed. This is an
ERROR_LOG_FILE: the path to the local log file. This is
ERROR_MESSAGE: the error message generated by the A Flow variable functions during the execution of a component while an After variable To fill up a field or expression with a variable, press Ctrl + For further information about variables, see |
Usage
|
Usage rule |
This component is usually used as a standalone component. |
|
Dynamic settings |
Click the [+] button to add a The Dynamic settings table is For examples on using dynamic parameters, see Scenario: Reading data from databases through context-based dynamic connections and Scenario: Reading data from different MySQL databases using dynamically loaded connection parameters. For more information on Dynamic |
Settings for different sources of import data
The settings for this component change depending on the source of your import
data.
The component handles data coming from any of the following sources:
-
Local file
-
Remote file
-
EXASol database
-
Oracle database
-
JDBC-compliant database
Local file
The local file is not transferred by uploading the file. Instead, the driver
establishes a (secure) web service that sends the URL to the database, and the
database retrieves the file from this local web service. Because the port of this
service cannot be explicitly defined, this method requires a transparent network
between the local Talend Job and the EXASolution database.
|
File name |
Specify the path to the local file to be imported. |
Remote file
This method works with a file that is accessible on a server through the following
protocols: SCP, SFTP, FTP, HTTP, or HTTPS.
|
Use predefined |
It is possible, via the SQL interface, to set up a named To know what connections are available, look at the table The connection must contain a URL with one of the following The URL must not contain the file name. The file name is |
|
Remote file server URL |
Specify the URL to the file server, without the file name |
|
File name |
Specify the name of the file you want to fetch from the |
|
Query parameters |
If the web service depends on query parameters, specify them For example, if you want to get a file from an HDFS file |
|
Use user |
Select this check box if you want to use Basic Authentication |
|
Remote user and Remote users password |
Enter the user name and password need to access the web |
EXASol database
An EXASolution database can also serve as a remote source for the data. The source
can be a table or a specific query.
|
Use predefined connection |
It is possible, via the SQL interface, to set up a named To know what connections are available, look at the table The username and password must by provided by the component |
|
EXASol database host |
Specify the host of the remote EXASolution database. This field can also be used to access a cluster. |
|
Use self defined |
Select this check box if you want to use a specific query to This method is preferred if, for example, your data needs to |
|
Source query |
If you want to use a specific query, enter the query in this |
|
Database or schema |
If you are not using a specific query, enter the schema name |
|
Source table |
If you are not using a specific query, enter the table name in The mapping between the source table columns and the target |
|
Use user |
Select this check box if you want to use Basic Authentication |
|
Remote user and Remote users password |
Enter the user name and password needed to access the source |
Oracle database
An Oracle database can also serve as remote source for the data. Access to an
Oracle database requires an Enterprise license for the EXASolution database and does
not work with the free edition. The source can be a table or a specific
query.
|
Use predefined connection |
It is possible, via the SQL interface, to set up a named To know what connections are available, look at the table The username and password must by provided by the component |
|
Oracle database URL |
Specify the JDBC URL to the Oracle database. |
|
Use self defined |
Select this check box if you want to use a specific query to This method is preferred if, for example, your data needs to |
|
Source query |
If you want to use a specific query, enter the query in this |
|
Database or schema |
If you are not using a specific query, enter the schema name |
|
Source table |
If you are not using a specific query, enter the table name in The mapping between the source table columns and the target |
|
Use user |
Select this check box if you want to use Basic Authentication |
|
Remote user and Remote users password |
Enter the user name and password needed to access the source |
JDBC-compliant database
The free edition
of the EXASolution database supports MySQL and PostgreSQL databases, and others are
available in the Enterprise edition. The source can be table or a self defined
query.
Nearly all enterprise-grade databases provide a JDBC interface.
|
Use predefined connection |
It is possible, via the SQL interface, to set up a named To know what connections are available, look at the table The username and password must by provided by the component |
|
JDBC database URL |
Specify the JDBC URL to the source database. |
|
Use self defined query |
Select this check box if you want to use a specific query to This method is preferred if, for example, your data needs to |
|
Source query |
If you want to use a specific query, enter the query in this |
|
Database or schema |
If you are not using a specific query, enter the schema name |
|
Source table |
If you are not using a specific query, enter the table name in The mapping between the source table columns and the target |
|
Use user authentication |
Select this check box if you want to use Basic Authentication |
|
Remote user and Remote users password |
Enter the user name and password needed to access the source |
Scenario: Importing data into an EXASolution database table from a local CSV file
This scenario describes a Job that writes
employee information into a CSV file, then loads the data from this local file into a newly
created EXASolution database table using the tEXABulkExec
component, and finally retrieves the data from the table and displays it on the
console.

Dropping and linking the components
-
Create a new Job and add the following components by typing their names in the
design workspace or dropping them from the Palette: a tFixedFlowInput
component, a tFileOutputDelimited component, a
tEXABulkExec component, a tEXAInput component, and a tLogRow component. -
Connect the tFixedFlowInput component to the
tFileOutputDelimited component using a
Row > Main connection. -
Do the same to connect the tEXAInput
component to the tLogRow component. -
Connect the tFixedFlowInput component to the
tEXABulkExec component using a Trigger > On Subjob
Ok connection. -
Do the same to connect the tEXABulkExec
component to the tEXAInput component.
Configuring the components
Preparing the source data
-
Double-click the tFixedFlowInput component to
open its Basic settings view.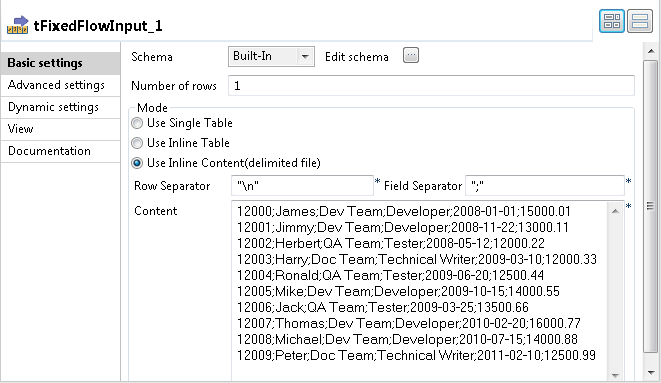
-
Click the […] button next to Edit schema to open the [Schema] dialog box.
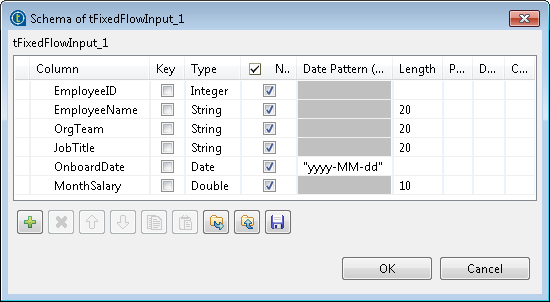
-
Click the [+] button to add six columns:
EmployeeID of the Integer type, EmployeeName,
OrgTeam and JobTitle of the String type,
OnboardDate of the Data type with the yyyy-MM-dd
date pattern, and MonthSalary of the
Double type. -
Click OK to close the dialog box and accept
schema propagation to the next component. -
In the Mode area, select Use Inline Content (delimited file) and enter the
following employee data in the Content
field.1234567891012000;James;Dev Team;Developer;2008-01-01;15000.0112001;Jimmy;Dev Team;Developer;2008-11-22;13000.1112002;Herbert;QA Team;Tester;2008-05-12;12000.2212003;Harry;Doc Team;Technical Writer;2009-03-10;12000.3312004;Ronald;QA Team;Tester;2009-06-20;12500.4412005;Mike;Dev Team;Developer;2009-10-15;14000.5512006;Jack;QA Team;Tester;2009-03-25;13500.6612007;Thomas;Dev Team;Developer;2010-02-20;16000.7712008;Michael;Dev Team;Developer;2010-07-15;14000.8812009;Peter;Doc Team;Technical Writer;2011-02-10;12500.99 -
Double-click the tFileOutputDelimited
component to open its Basic settings
view.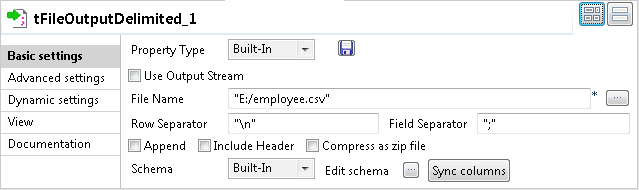
-
In the File Name field, specify the file into
which the input data will be written. In this example, it is “E:/employee.csv”. -
Click Advanced settings to open the Advanced settings view of the tFileOutputDelimited component.
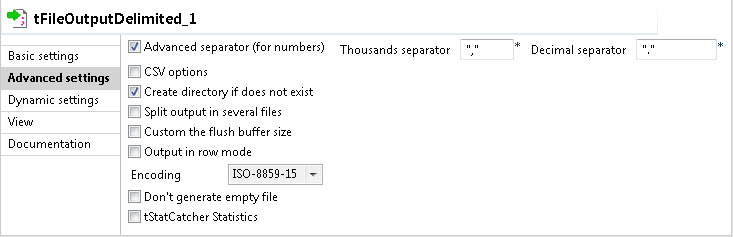
-
Select the Advanced separator (for numbers)
check box and in the Thousands separator and
Decimal separator fields displayed, specify
the separators for thousands and decimal. In this example, the default values
“,” and “.” are used.
Loading the source data into a newly created EXASolution database table
-
Double-click the tEXABulkExec component to
open its Basic settings view.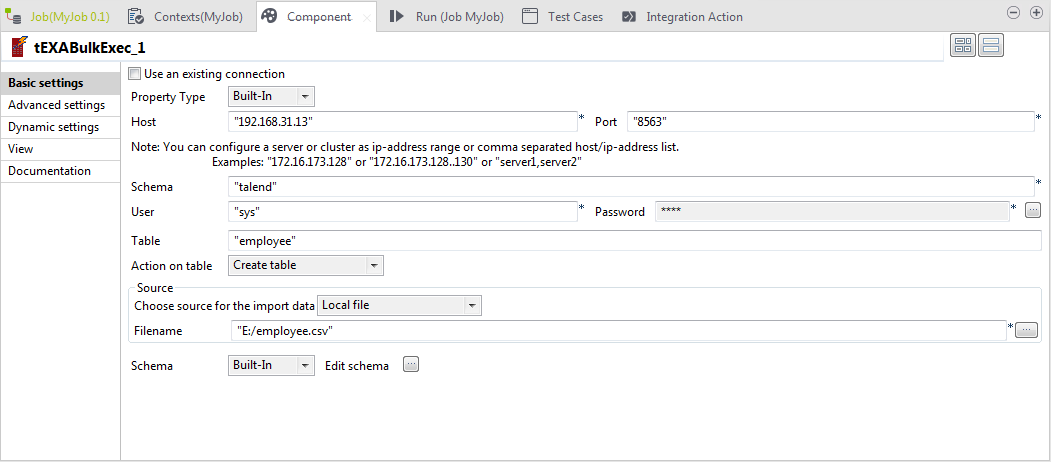
-
Fill in the Host, Port, Schema, User and Password
fields with your EXASolution database connection details. -
In the Table field, enter the name of the
table into which the source data will be written. In this example, the target
database table is named “employee” and it
does not exist. -
Select Create table from the Action on table list to create the specified
table. -
In the Source area, select Local file as the source for the input data, and then
specify the file that contains the source data. In this example, it is “E:/employee.csv”. -
Click the […] button next to Edit schema to open the [Schema] dialog box and define the schema, which should be the
same as that of the tFixedFlowInput
component.Then click OK to validate these changes and
close the dialog box. -
Click Advanced settings to open the Advanced settings view of the tEXABulkExec component.
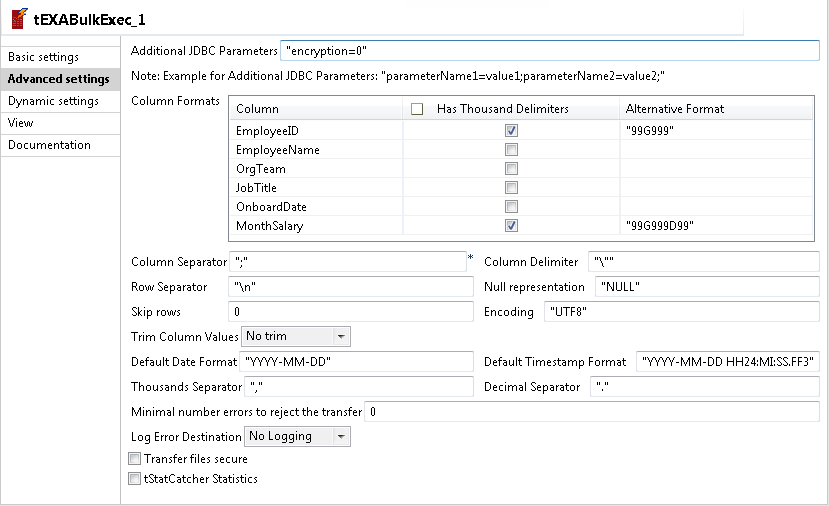
-
In the Column Formats table, for the two
numeric fields EmployeeID and MonthSalary, select the corresponding check boxes
in the Has Thousand Delimiters column, and then
define their format model strings in the corresponding fields of the Alternative Format column. In this example, “99G999” for EmployeeID and “99G999D99”
for MonthSalary. -
Make sure that the Thousands Separator and
Decimal Separator fields have values
identical to those of the tFileOutputDelimited
component and keep the default settings for the other options.
Retrieving data from the EXASolution database table
-
Double-click the tEXAInput component to open
its Basic settings view.
-
Fill in the Host name, Port, Schema name, Username and Password fields with your EXASolution database connection
details. -
In the Table Name field, enter the name of
the table from which the data will be retrieved. In this example, it is
“employee”. -
Click the […] button next to Edit schema to open the [Schema] dialog box and define the schema, which should be the
same as that of the tFixedFlowInput
component.Then click OK to close the dialog box and
accept schema propagation to the next component. -
Click the Guess Query button to fill the
Query field with the following
auto-generated SQL statement that will be executed on the specified
table.1234567SELECT employee.EmployeeID,employee.EmployeeName,employee.OrgTeam,employee.JobTitle,employee.OnboardDate,employee.MonthSalaryFROM employee -
Double-click the tLogRow component to open
its Basic settings view.
-
In the Mode area, select the Table (print values in cells of a table) option for
better readability of the output.
Saving and executing the Job
- Press Ctrl + S to save the Job.
-
Press F6 to execute the Job.
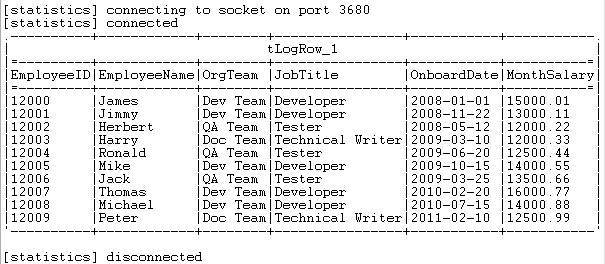 As shown above, the employee data is written into the specified EXASolution
database table and is then retrieved and displayed on the console.