tHDFSList
files or folders based on a filemask pattern and iterates on each
unity.
tHDFSList Standard properties
These properties are used to configure tHDFSList running in the Standard Job framework.
The Standard
tHDFSList component belongs to the Big Data and the File families.
The component in this framework is available when you are using one of the Talend solutions with Big Data.
Basic settings
|
Property type |
Either Built-in or Repository
Built-in: No property data stored
Repository: Select the repository |
||
|
Use an existing connection |
Select this check box and in the Component List Note that when a Job contains the parent Job and the child Job, Component List presents only the connection components in the same |
||
|
Distribution |
Select the cluster you are using from the drop-down list. The options in the
list vary depending on the component you are using. Among these options, the following ones requires specific configuration:
|
||
|
Hadoop version |
Select the version of the Hadoop distribution you are using. The available
options vary depending on the component you are using. Along with the evolution of Hadoop, please note the following changes:
|
||
|
Use kerberos authentication |
If you are accessing the Hadoop cluster running
with Kerberos security, select this check box, then, enter the Kerberos principal name for the NameNode in the field displayed. This enables you to use your user name to authenticate against the credentials stored in Kerberos.
This check box is available depending on the Hadoop distribution you are |
||
| Use a keytab to authenticate |
Select the Use a keytab to authenticate Note that the user that executes a keytab-enabled Job is not necessarily |
||
|
NameNode URI |
Type in the URI of the Hadoop NameNode, the master node of a Hadoop system. For |
||
|
User name |
The User name field is available when you are not using |
||
|
Group |
Enter the membership including the authentication user under which the HDFS instances were |
||
|
HDFS Directory |
Browse to, or enter the path pointing to the data to be used in the file system. |
||
|
FileList Type |
Select the type of input you want to iterate on from the
Files if the input is a set of
Directories if the input is a set
Both if the input is a set of the |
||
|
Include subdirectories |
Select this check box if the selected input source type includes |
||
|
Case Sensitive |
Set the case mode from the list to either create or not create |
||
|
Use Glob Expressions as Filemask |
This check box is selected by default. It filters the results |
||
|
Files |
Click the plus button to add as many filter lines as needed:
Filemask: in the added filter |
||
|
Order by |
The folders are listed first of all, then the files. You can
By default: alphabetical order, by
By file name: alphabetical order or
By file size: smallest to largest
By modified date: most recent to Note:
If ordering by file name, in |
||
| Order action |
Select a sort order by clicking one of the following radio ASC: ascending order; DESC: descending order; |
Advanced settings
|
Use Exclude Filemask |
Select this check box to enable Exclude
Exclude Filemask: Fill in the Note:
File types in this field should be quoted with double |
|
Hadoop properties |
Talend Studio uses a default configuration for its engine to perform operations in a Hadoop distribution. If you need to use a custom configuration in a specific situation, complete this table with the property or properties to be customized. Then at runtime, the customized property or properties will override those default ones.
For further information about the properties required by Hadoop and its related systems such
as HDFS and Hive, see the documentation of the Hadoop distribution you are using or see Apache’s Hadoop documentation on http://hadoop.apache.org/docs and then select the version of the documentation you want. For demonstration purposes, the links to some properties are listed below:
|
|
tStatCatcher Statistics |
Select this check box to gather the Job processing metadata at a Job level as well as at each component level. |
Global Variables
|
Global Variables |
CURRENT_FILE: the current file name. This is a Flow
CURRENT_FILEDIRECTORY: the current file directory. This
CURRENT_FILEEXTENSION: the extension of the current file.
CURRENT_FILEPATH: the current file path. This is a Flow
NB_FILE: the number of files iterated upon so far. This is
ERROR_MESSAGE: the error message generated by the A Flow variable functions during the execution of a component while an After variable To fill up a field or expression with a variable, press Ctrl + For further information about variables, see |
Usage
|
Usage rule |
tHDFSList provides a list of |
|
Dynamic settings |
Click the [+] button to add a row in the The Dynamic settings table is For examples on using dynamic parameters, see Scenario: Reading data from databases through context-based dynamic connections and Scenario: Reading data from different MySQL databases using dynamically loaded connection parameters. For more information on Dynamic |
|
Connections |
Outgoing links (from this component to another): Row: Iterate
Trigger: On Subjob Ok; On Subjob Incoming links (from one component to this one): Row: Iterate.
Trigger: Run if; On Subjob Ok; On For further information regarding connections, see |
|
Prerequisites |
The Hadoop distribution must be properly installed, so as to guarantee the interaction
For further information about how to install a Hadoop distribution, see the manuals |
|
Limitation |
JRE 1.6+ is required. |
Scenario: Iterating on a HDFS directory
This scenario applies only to a Talend solution with Big Data.
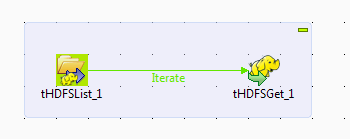
This scenario uses a two-component Job to iterate on a specified directory in HDFS so
as to select the files from there towards a local directory.
Preparing the data to be used
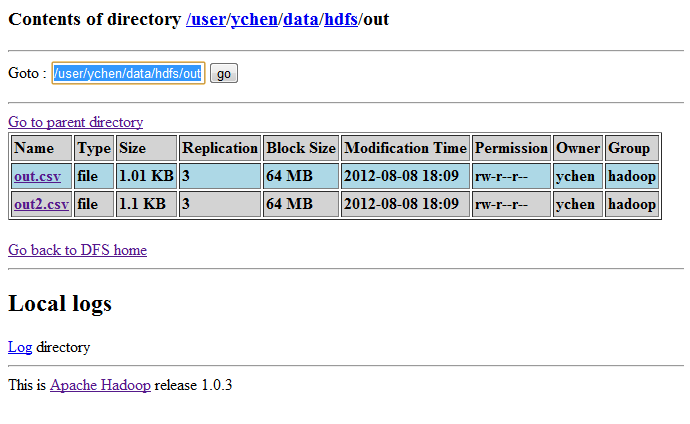
scenario, two files are created in the directory: /user/ychen/data/hdfs/out.
information, see tHDFSPut or tHDFSOutput.
Linking the components
-
In the
Integration
perspective
of
Talend Studio
, create an empty Job, named HDFSList for example, from the Job
Designs node in the Repository tree view.For further information about how to create a Job, see the
Talend Studio
User
Guide. - Drop tHDFSList and tHDFSGet onto the workspace.
-
Connect them using the Row > Iterate
link.
Configuring the iteration
-
Double-click tHDFSList to open its
Component view.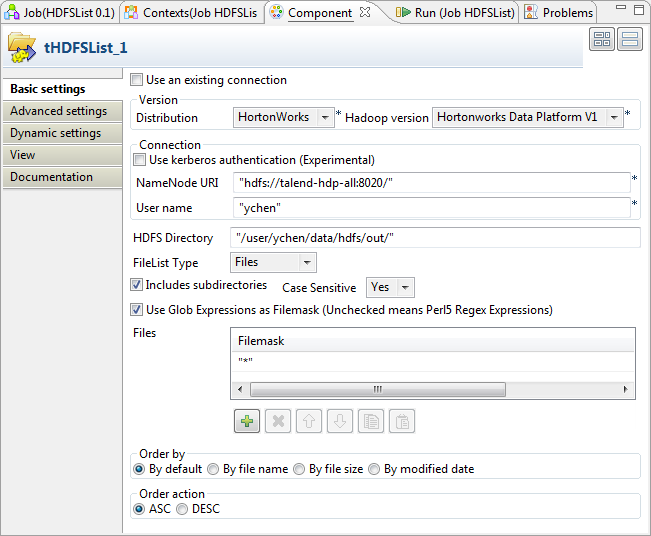
-
In the Version area, select the Hadoop
distribution you are connecting to and its version. -
In the Connection area, enter the values
of the parameters required to connect to the HDFS.In the real-world practice, you may use tHDFSConnection to create a connection and reuse it from the
current component. For further information, see tHDFSConnection. -
In the HDFS Directory field, enter the
path to the folder where the files to be iterated on are. In this example,
as presented earlier, the directory is /user/ychen/data/hdfs/out/. -
In the FileList Type field, select
File. -
In the Files table, click

to add one row and enter * between the quotation marks to iterate on any files
existing.
Selecting the files
-
Double-click tHDFSGet to open its
Component view.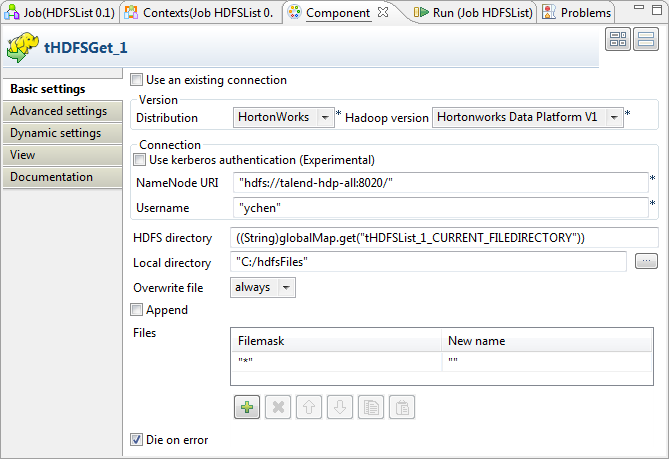
-
In the Version area, select the Hadoop
distribution you are connecting to and its version. -
In the Connection area, enter the values
of the parameters required to connect to the HDFS.In the real-world practice, you may have used tHDFSConnection to create a connection; then you can reuse
it from the current component. For further information, see tHDFSConnection. -
In the HDFS directory field, enter the
path to the folder holding the files to be retrieved.To do this with the auto-completion list, place the mouse pointer in this
field, then, press Ctrl+Space to display
the list and select the
tHDFSList_1_CURRENT_FILEDIRECTORY variable to reuse the
directory you have defined in tHDFSList. In
this variable, tHDFSList_1 is the label
of the component. If you label it differently, select the variable
accordingly.Once selecting this variable, the directory reads, for example, ((String)globalMap.get(“tHDFSList_1_CURRENT_FILEDIRECTORY”))
in this field.For further information about how to label a component, see the
Talend Studio
User
Guide. -
In the Local directory field, enter the
path, or browse to the folder you want to place the selected files in. This
folder will be created if it does not exist. In this example, it is
C:/hdfsFiles. -
In the Overwrite file field, select
always. -
In the Files table, click
to add one row and enter * between the quotation marks in the Filemask column in order to get any files existing.
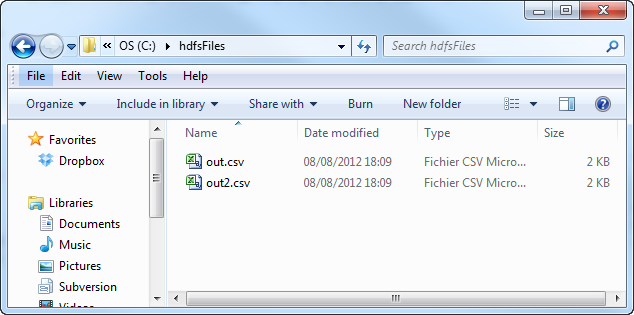
Executing the Job
Once done, you can check the files created in the local directory.