tKMeansModel
Analyzes incoming datasets based on applying the K-Means algorithm.
This component analyzes feature vectors usually pre-processed by tModelEncoder to generate a clustering model that is used by
tPredict to cluster given elements.
It generates a clustering model out of this analysis and
writes this model either in memory or in a given file system.
tKMeansModel properties for Apache Spark Batch
These properties are used to configure tKMeansModel running in the Spark Batch Job framework.
The Spark Batch
tKMeansModel component belongs to the Machine Learning family.
This component is available in the Palette of the Studio only if you have subscribed to any Talend Platform product with Big Data or Talend Data Fabric.
Basic settings
|
Vector to process |
Select the input column used to provide feature vectors. Very often, |
|
Save the model on file |
Select this check box to store the model in a given file system. Otherwise, the model is |
|
Number of clusters (K) |
Enter the number of clusters into which you want tKMeansModel to group data. In general, a large number of clusters can decreases errors in |
|
Set distance threshold of the convergence |
Select this check box and in the Epsilon field that is displayed, enter the convergence If you leave this check box clear, the default convergence distance |
|
Set the maximum number of |
Select this check box and in the Maximum number If you leave this check box clear, the default value 20 is used. |
|
Set the number of parallelized |
Select this check box and in the Number of If you leave this check box clear, the default value 1 is used. This actually means that the Note that this parameter helps you optimize the use of your resources |
|
Initialization function |
Select the mode to be used to select the points as initial cluster
|
|
Set the number of steps for the |
Select this check box and in the Steps field that is displayed, enter the number of If you leave this check box clear, the default value 5 is used. 5 |
|
Define the random seed |
Select this check box and in the Seed |
Advanced settings
|
Display the centers after the |
Select this check box to output the vectors of the cluster centers This feature is often useful when you need to understand how the |
Usage
|
Usage rule |
This component is used as an end component and requires an input link. You can accelerate the training process by adjusting the stopping conditions such as the |
|
Model evaluation |
The parameters you need to set are free parameters and so their values may be provided by Therefore, you need to train the relationship model you are generating with different sets |
Modeling the accident-prone areas in a city
This scenario applies only to a subscription-based Talend solution with Big data.
In this scenario, the tKMeansModel component is used to
analyze a set of sample geographical data about the destination of ambulances in a city in
order to model the accident-prone areas.
A model like this can be employed to help determine the optimal locations for building hospitals.

You can download this sample data from here. It consists of pairs of latitudes and longitudes.
The sample data was randomly and automatically generated for demonstration purposes only
and in any case it does not reflect the situation of these areas in the real world.
-
The Spark version to be used is 1.4 onwards.
-
The sample data is stored in your Hadoop file system and you have proper rights
and permissions to at least read it. -
Your Hadoop cluster is properly installed and is running.
If you are not sure about these requirements, ask the administrator of your
Hadoop system.
-
tHDFSConfiguration: it defines the HDFS connection to
be used by Spark and by the other components. -
tFileInputDelimited: it loads the sample data into the
data flow of the Job. -
tReplicate: it replicates the sample data and caches the
replication. -
tKMeansModel: it analyzes the data to train the model
and writes the model to HDFS. -
tModelEncoder: it pre-process the data to prepare proper
feature vectors to be used by tKMeansModel. -
tPredict: it applies the KMeans model on the
replication of the sample data. In the real-world practice, this data should be a
set of reference data to test the model accuracy. -
tFileOutputDelimited: it writes the result of the
prediction to HDFS.
Arranging data flow for the KMeans Job
-
In the
Integration
perspective of the Studio, create an empty Job from the Job Designs node in the Repository tree view.For further information about how to create a Job, see
Talend Open Studio for Big Data Getting Started
Guide
. - In the workspace, enter the name of the component to be used and select this component from the list that appears.
-
Connect tFileInputDelimited to tReplicate using the Row >
Main link. - Do the same to connect tReplicate to tModelEncoder and then tModelEncoder to tKMeansModel.
- Repeat the operations to connect tReplicate to tPredict and then tPredict to tFileOutputDelimited.
- Leave tHDFSConfiguration as it is.
Configuring the connection to the file system to be used by Spark
-
Double-click tHDFSConfiguration to open its
Component view. Note that tHDFSConfiguration is used because the Spark Yarn client mode is used to run Spark Jobs in this scenario.Spark uses this component to connect to the HDFS system to which the jar
files dependent on the Job are transferred. -
In the Version area, select the Hadoop distribution
you need to connect to and its version. -
In the NameNode URI field, enter the location of the
machine hosting the NameNode service of the cluster. If you are using WebHDFS, the location should be
webhdfs://masternode:portnumber; if this WebHDFS is secured
with SSL, the scheme should be swebhdfs and you need to use
a tLibraryLoad in the Job to load the library required by
the secured WebHDFS. -
In the Username field, enter the
authentication information used to connect to the HDFS system to be used. Note
that the user name must be the same as you have put in the Spark configuration tab.
Reading and caching the sample data
-
Double-click the first tFileInputInput component to
open its Component view. -
Click the […] button next to Edit schema and in the pop-up schema dialog box, define the
schema by adding two columns latitude and
longitude of Double type.
-
Click OK to validate these changes and accept the
propagation prompted by the pop-up dialog box. -
Select the Define a storage configuration
component check box and select the tHDFSConfiguration component to be used.tFileInputDelimited uses this configuration
to access the sample data to be used as training set. -
In the Folder/File field, enter the directory
where the training set is stored. -
Double-click the tReplicate component to open its
Component view. -
Select the Cache replicated RDD check box and from
the Storage level drop-down list, select
Memory only. This way, this sample data is
replicated and stored in memory for use as test set.
Preparing features for KMeans
-
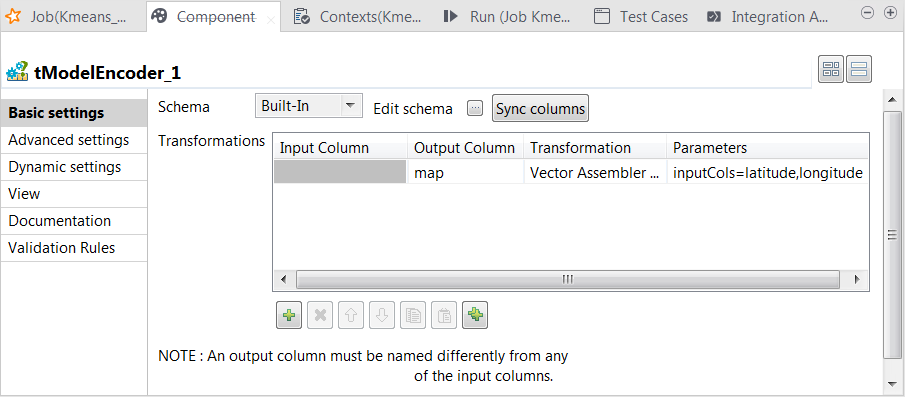
Double-click the tModelEncoder component to open its Component view.
-
Click the […] button
next to Edit schema and on the tModelEncoder side of the pop-up schema dialog box,
define the schema by adding one column named map of
Vector type. -
Click OK to validate these changes and accept
the propagation prompted by the pop-up dialog box. -
In the Transformations
table, add one row by clicking the [+]
button and then proceed as follows:-
In the Output column column, select the column
that carry the features. In this scenario, it is
map. -
In the Transformation column, select the
algorithm to be used for the transformation. In this scenario, it is
Vector assembler. -
In the Parameters column, enter the parameters
you want to customize for use in the Vector assembler algorithm. In this
scenario, enter
inputCols=latitude,longitude.
In this transformation, tModelEncoder combines all feature vectors into one single
feature column. -
In the Output column column, select the column
-
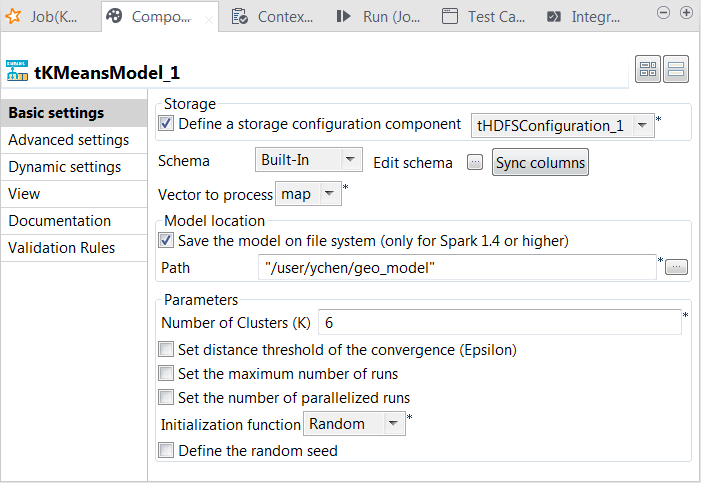
Double-click tKMeansModel to open its Component view.
-
Select the Define a storage configuration
component check box and select the tHDFSConfiguration component to be used. -
From the Vector to
process list, select the column that provides the feature vectors to
be analyzed. In this scenario, it is map, which combines
all features. -
Select the Save the model on file system
check box and in the HDFS folder field that
is displayed, enter the directory you want to use to store the generated
model. -
In the Number of cluster
field, enter the number of decision trees you want tKMeans to build. You need to try different numbers to run the
current Job to create the clustering model several times; after comparing the
evaluation results of every model created on each run, you can decide the number
you need to use. For example, put 6.You need to write the evaluation code yourself. - From the Initialization function, select Random. In general, this mode is used for simple datasets.
- Leave the other parameters as they are.
Testing the KMeans model
-
Double-click tPredict to open its
Component view.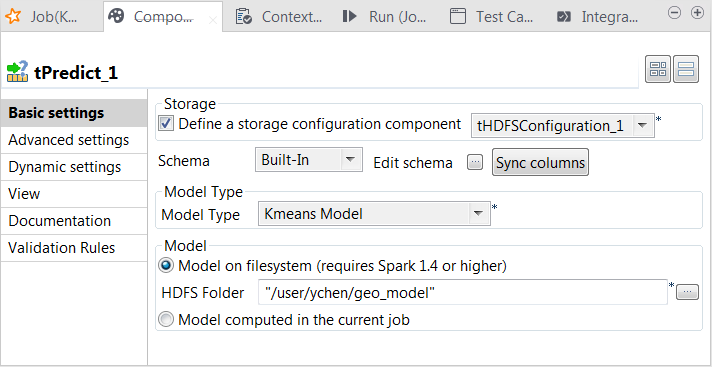
-
Select the Define a storage configuration
component check box and select the tHDFSConfiguration component to be used. -
From the Model type drop-down list, select
Kmeans model. -
Select the Model on filesystem radio button and enter the
directory in which the KMeans model is stored.In this case, the tPredict component contains a
read-only column called label in which the
model provides the labels of the clusters. -
Double-click tFileOutputDelimited to open its
Component view.
-
Select the Define a storage configuration
component check box and select the tHDFSConfiguration component to be used. -
In the Folder field, browse to the location
in HDFS in which you want to store the prediction result. - From the Action drop-down list, select Overwrite. But if target folder does not exist, select Create.
-
Select the Merge result to single file check
box and then the Remove source dir check
box. -
In the Merge file path field, browse to the
location in HDFS in which you want to store the merged prediction result.
Selecting the Spark mode
-
Click Run to open its view and then click the
Spark Configuration tab to display its view
for configuring the Spark connection. -
Select the Use local mode check box to test your Job locally.
In the local mode, the Studio builds the Spark environment in itself on the fly in order to
run the Job in. Each processor of the local machine is used as a Spark
worker to perform the computations.In this mode, your local file system is used; therefore, deactivate the
configuration components such as tS3Configuration or
tHDFSConfiguration that provides connection
information to a remote file system, if you have placed these components
in your Job.You can launch
your Job without any further configuration. -
Clear the Use local mode check box to display the
list of the available Hadoop distributions and from this list, select
the distribution corresponding to your Spark cluster to be used.This distribution could be:If you cannot find the distribution corresponding to yours from this
drop-down list, this means the distribution you want to connect to is not officially
supported by
Talend
. In this situation, you can select Custom, then select the Spark
version of the cluster to be connected and click the
[+] button to display the dialog box in which you can
alternatively:-
Select Import from existing
version to import an officially supported distribution as base
and then add other required jar files which the base distribution does not
provide. -
Select Import from zip to
import the configuration zip for the custom distribution to be used. This zip
file should contain the libraries of the different Hadoop/Spark elements and the
index file of these libraries.In
Talend
Exchange, members of
Talend
community have shared some ready-for-use configuration zip files
which you can download from this Hadoop configuration
list and directly use them in your connection accordingly. However, because of
the ongoing evolution of the different Hadoop-related projects, you might not be
able to find the configuration zip corresponding to your distribution from this
list; then it is recommended to use the Import from
existing version option to take an existing distribution as base
to add the jars required by your distribution.Note that custom versions are not officially supported by
Talend
.
Talend
and its community provide you with the opportunity to connect to
custom versions from the Studio but cannot guarantee that the configuration of
whichever version you choose will be easy. As such, you should only attempt to
set up such a connection if you have sufficient Hadoop and Spark experience to
handle any issues on your own.
For a step-by-step example about how to connect to a custom
distribution and share this connection, see Connecting to a custom Hadoop distribution. -
Executing the Job
- Press Ctrl + S to save the Job.
-
Press F6 to run the Job.
The merged prediction result is stored in HDFS and you can evaluate this
result using your evaluation process. Then run this Job more times with
different KMeans parameters in order to obtain the optimal model.
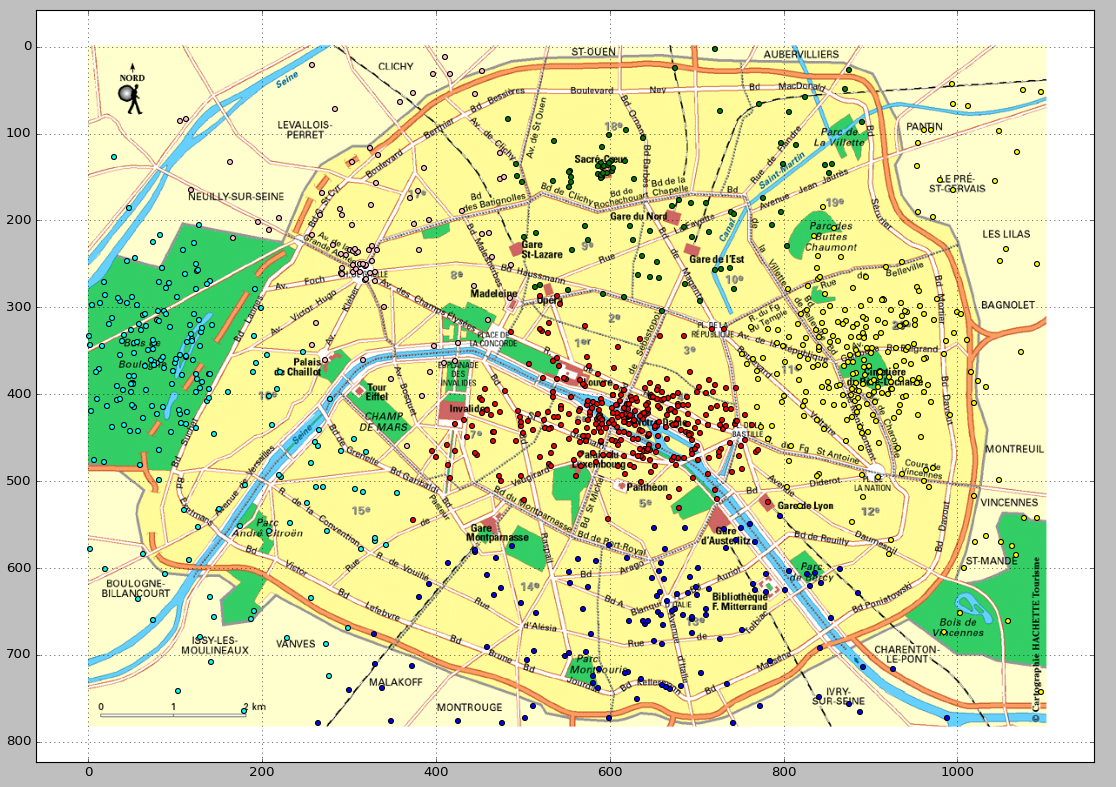
The following image shows an example of the predicted clusters. This visualization is
produced via a Python script. You can download this script from here and bear in mind to adapt the path in the script to access the
prediction result in your own machine.