tMatchPairing
Enables you to compute pairs of suspect duplicates from any source data including
large volumes in the context of machine learning on Spark.
This component reads a data set row by row, excludes unique rows and exact
duplicates in separate files, computes pairs of suspect records based on a blocking key
definition and creates a sample of suspect records representative of the data set.
You can label suspect pairs manually or load them into a Grouping
campaign which is already defined on the Talend Data Stewardship
server.
For further information about Grouping campaigns, see
documentation on Talend Help Center (https://help.talend.com).
Spark 1.6+ and Spark 2.0:
-
Spark 1.6: CDH5.7, CDH5.8, HDP2.4.0, HDP2.5.0, MapR5.2.0, EMR4.5.0,
EMR4.6.0. -
Spark 2.0: EMR5.0.0.
tMatchPairing properties for Apache Spark Batch
These properties are used to configure tMatchPairing running in the Spark Batch Job framework.
The Spark Batch
tMatchPairing component belongs to the Data Quality family.
The component in this framework is available when you have subscribed to any Talend Platform product with Big Data or Talend Data
Fabric.
Basic settings
|
Define a storage configuration |
Select the configuration component to be used to provide the configuration If you leave this check box clear, the target file system is the local The configuration component to be used must be present in the same Job. For |
|
Schema and Edit Schema |
A schema is a row description. It defines the number of fields (columns) to Click Sync columns to retrieve the schema from Click Edit schema to make changes to the schema.
The output schema of this component has read-only columns
PAIR_ID and
LABEL: used only with the Pairs sample output link. You must fill in this
COUNT: used only with the Exact duplicates output link. This column gives |
|
|
Built-In: You create and store the |
|
|
Repository: You have already created |
|
Blocking key |
Select the columns with which you want to construct the This blocking key is used to generate suffixes which are |
|
Suffix array blocking parameters |
Min suffix length: Set the
Max block size: Set the maximum |
|
Pairing model location |
Folder: Set the path to the local If you want to store the model in a specific file system, The button for browsing does not work with the Spark Local mode; if you are using the Spark Yarn or the Spark Standalone mode, |
|
Integration with Data Stewardship |
Select this check box to set the connection parameters to the Talend Data Stewardship If you select this check box, tMatchPairing loads the |
|
Data Stewardship Configuration |
|
Advanced settings
|
Filtering threshold |
Enter a value between 0.2 and 0.85 to filter the pairs of 0.3 is the default value. The higher the value is, the |
|
Pairs sample |
Number of pairs: Enter a size for
Set a random seed: Select this |
|
Data Stewardship Configuration |
Max tasks per commit: Set the number of lines you Do not change the default value unless you are facing performance issues. |
Usage
|
Usage rule |
This component is used as an intermediate step. This component, along with the Spark Batch component Palette it belongs to, appears only |
|
Spark Batch Connection |
You need to use the Spark Configuration tab in
the Run view to define the connection to a given Spark cluster for the whole Job. In addition, since the Job expects its dependent jar files for execution, you must specify the directory in the file system to which these jar files are transferred so that Spark can access these files:
This connection is effective on a per-Job basis. |
Matching on Spark
Matching on spark applies only to a subscription-based Talend Platform solution with Big
data or Talend Data Fabric.
Using
Talend Studio
, you can match very high volume of data using machine learning on Spark. This
feature helps you to match very big number of records with a minimal human
intervention.
Machine learning with Spark is usually two phases: the first phase
computes a model (i.e. teaches the machine) based on historical data and mathematical
heuristics, and the second phase applies the model on new data. In the Studio, the first
phase is implemented by two Jobs, one with the tMatchPairing component and the second with the tMatchModel component. While the second phase is
implemented by a third Job with the tMatchPredict
component.
Two workflows are possible when matching on Spark with the Studio.
-
compute pairs of suspect records based on a blocking key
definition, -
creates a sample of suspect records representative of the data
set, -
can optionally write this sample of suspect records into a Grouping campaign
defined on the Talend Data Stewardship server, -
separates unique records from exact match records,
-
generates a pairing model to be used with tMatchPredict.
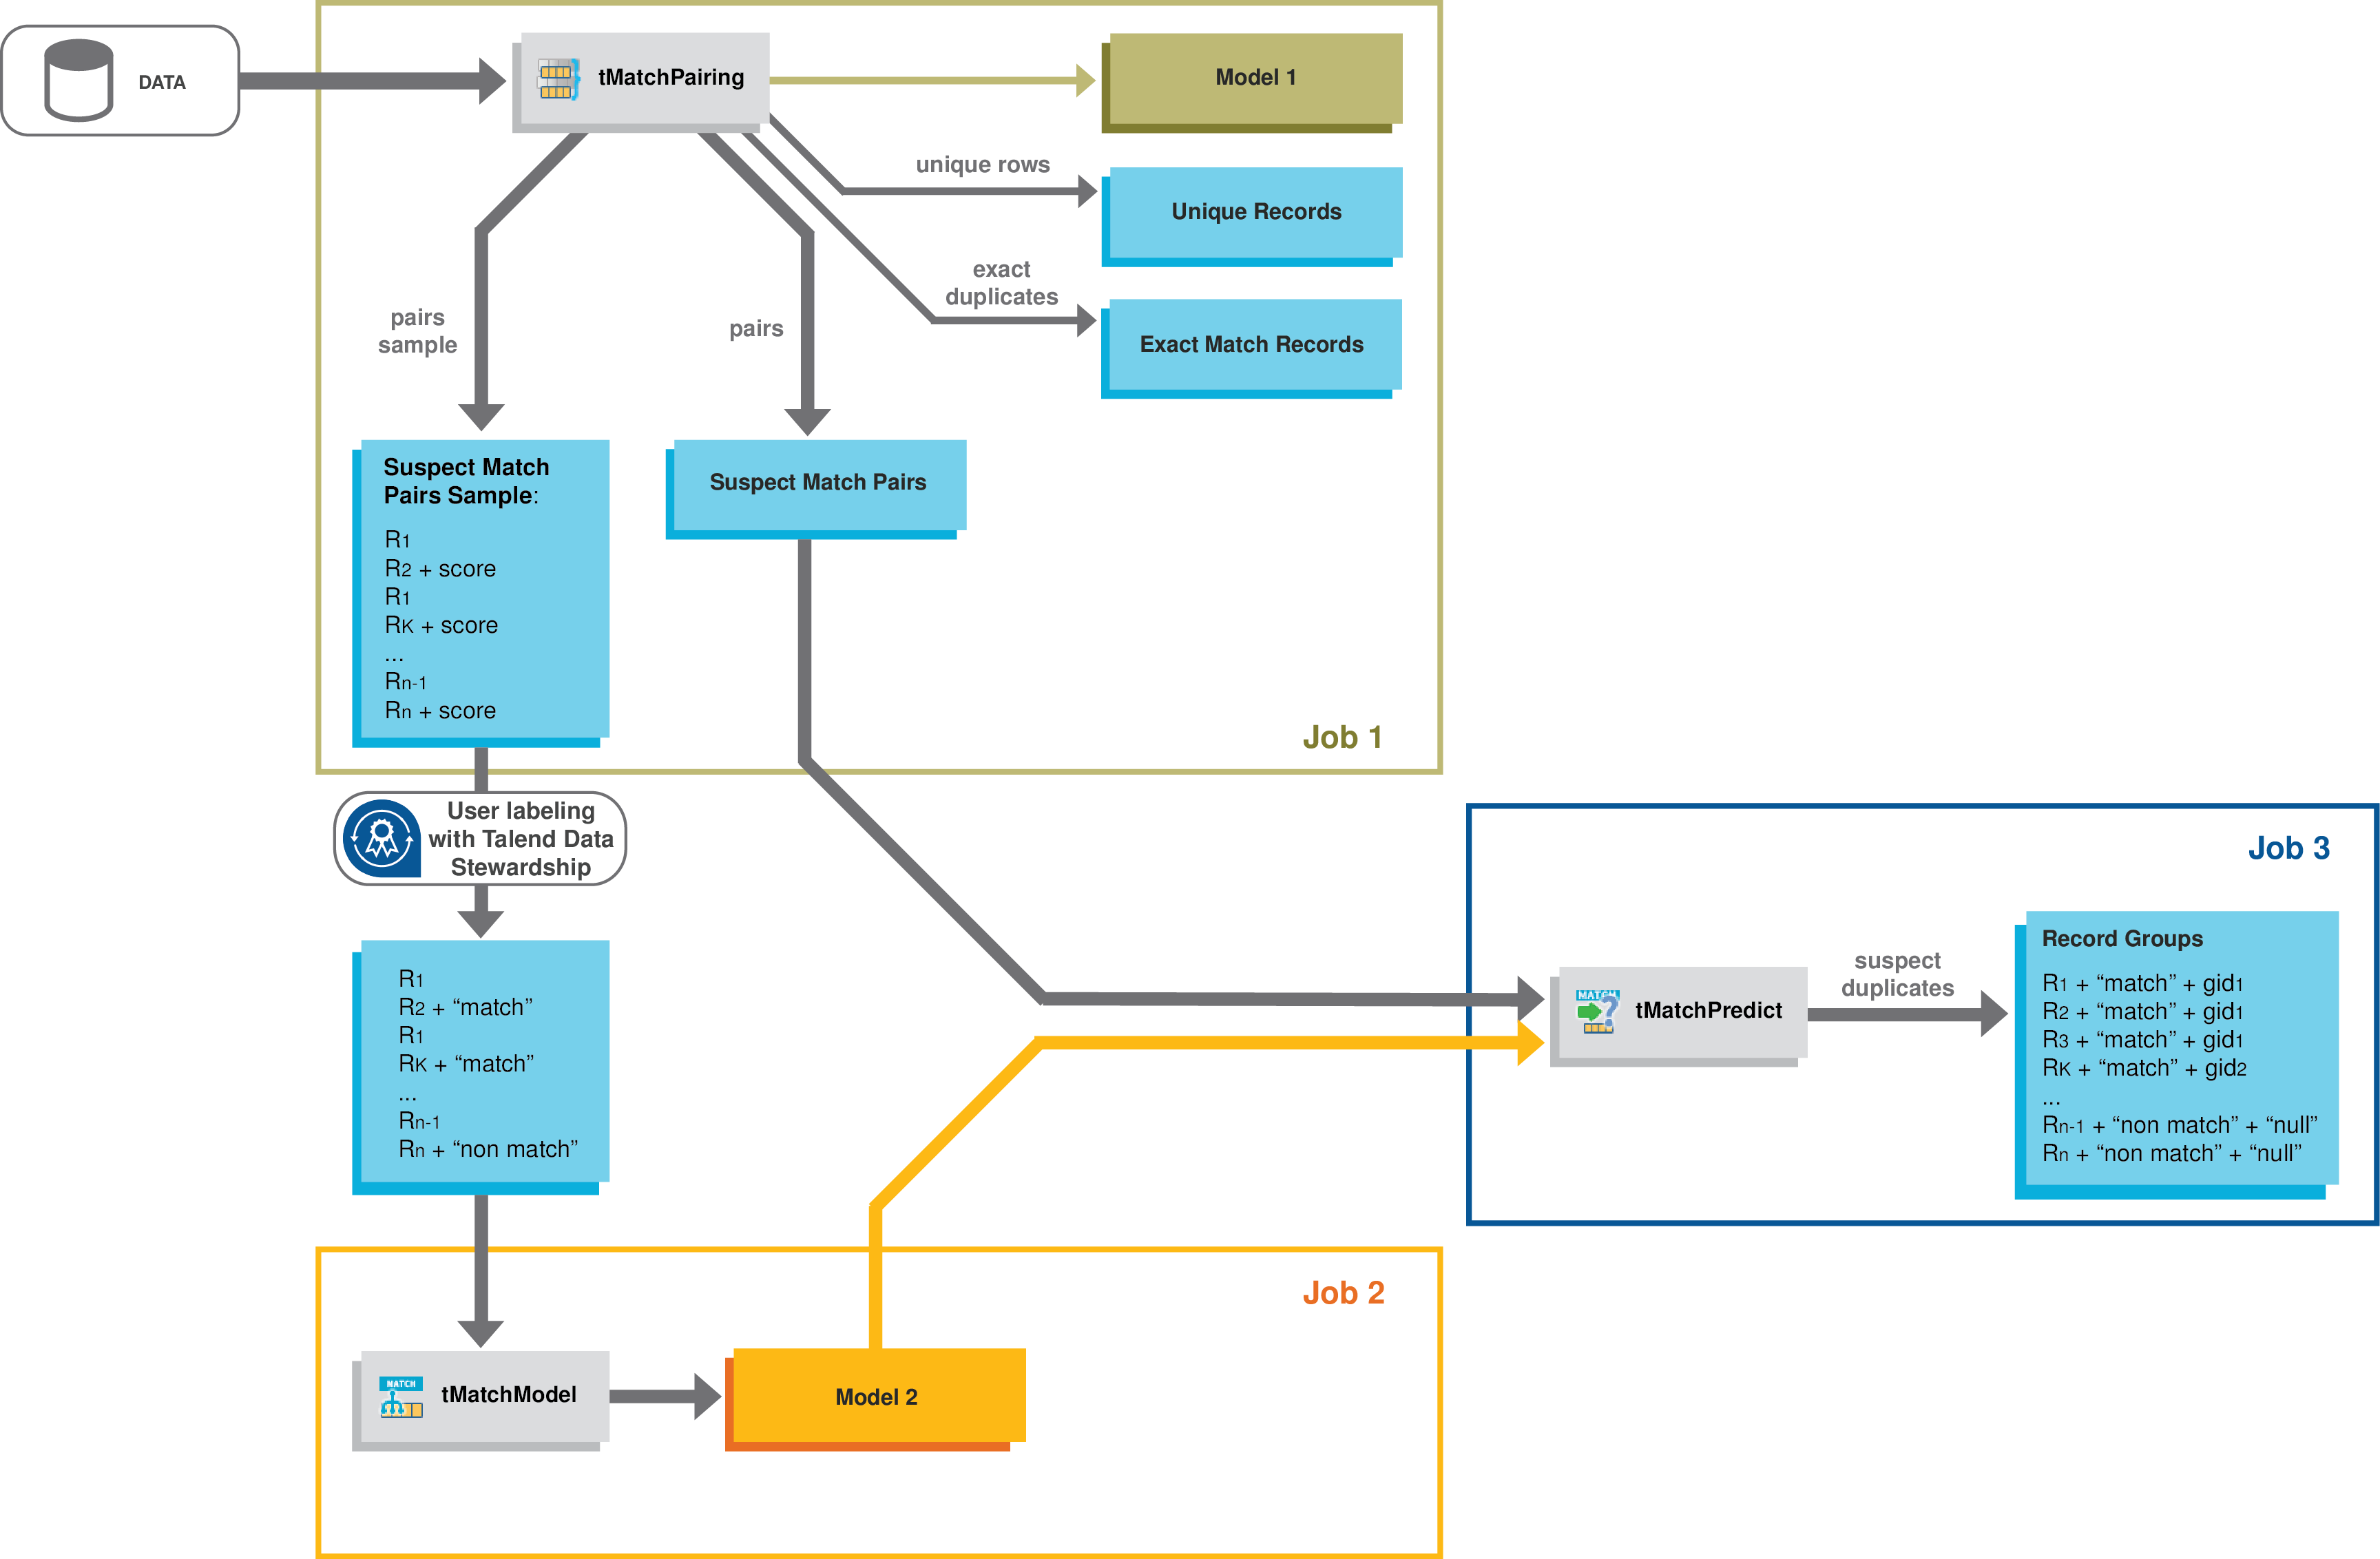
You can then manually label the sample suspect records by resolving tasks
in a Grouping campaign defined on the Talend Data Stewardship server, which is the
recommended method, or by editing the files manually.
-
computes similarities between the records in each suspect
pair, -
trains a classification model based on the Random Forest
algorithm.
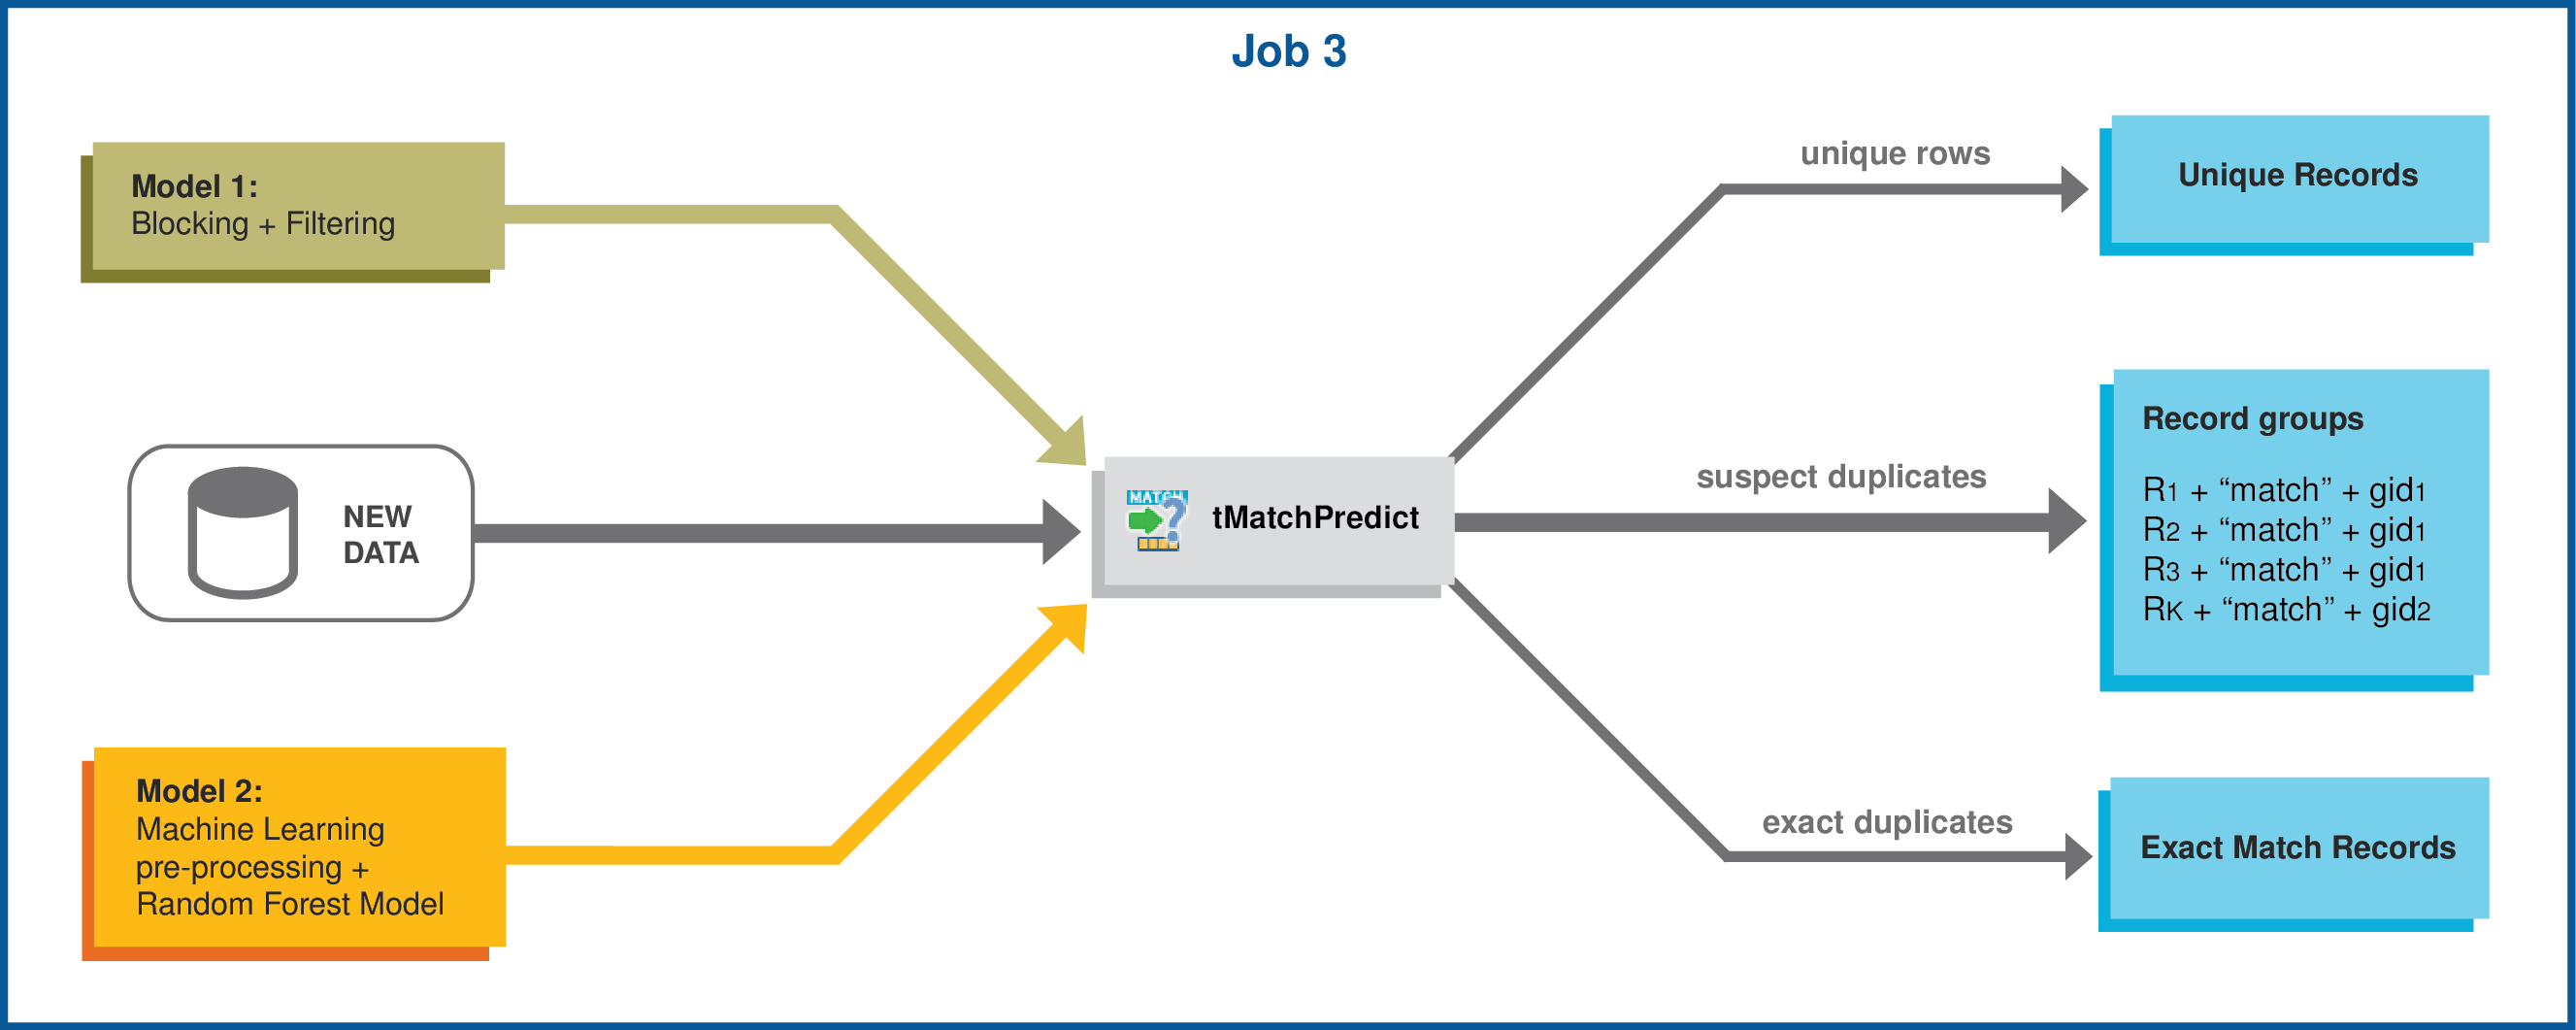
tMatchPredict labels suspect records automatically
and groups suspect records which match the label(s) set in the component properties.
generated by tMatchPairing and the matching model
generated by tMatchModel, and:
-
labels suspect records automatically,
-
groups suspect records which match the label(s) set in the
component properties, -
separates the exact duplicates from unique records.
Scenario 1: Computing suspect pairs and writing a sample in Talend Data Stewardship
This scenario applies only to a subscription-based Talend Platform solution with Big data or Talend Data Fabric.
Finding duplicate records is hard and time consuming especially when you are dealing with
huge volume of data. In this example, tMatchPairing uses a
blocking key to compute the pairs of suspect duplicates in a long list of early
childhood education centers in Chicago coming from ten different sources.
It also computes a sample of the suspect duplicates and writes it in the form of tasks
into a Grouping campaign on the Talend Data Stewardship server.
Authorized data stewards can then intervene on the data sample and decide if suspect
pairs are duplicates.
You can then use the labeled sample to compute a matching model and apply it on all
suspect duplicates in the context of machine learning on Spark.
-
You have been assigned in Talend Administration Center the Campaign Owner role which grants you
access to the campaigns on the server. - You have created the Grouping campaign in Talend Data Stewardship and defined
the schema which corresponds to the structure of the education centers file.For further information, see the online publication about
Grouping campaigns on Talend Help Center (https://help.talend.com).
Creating the Job
-
Drop the following components from the Palette onto the
design workspace: tFileInputDelimited,
tMatchPairing, tLogRow and
tFileOutputDelimited (x2).
-
Connect tFileInputDelimited to
tMatchPairing using the Main link.tFileInputDelimited reads the source file and sends
data to the next component. -
Connect tMatchPairing to the output file components
using the Pairs and Unique rows
links, and to tLogRow using the Exact
duplicates link.tMatchPairing pre-analyzes the data, computes pairs
of suspect duplicates, unique rows and exact duplicates and generates a pairing
model to be used with tMatchPredict
Selecting the Spark mode
-
Click Run to open its view and then click the
Spark Configuration tab to display its view
for configuring the Spark connection. -
Select the Use local mode check box to test your Job locally.
In the local mode, the Studio builds the Spark environment in itself on the fly in order to
run the Job in. Each processor of the local machine is used as a Spark
worker to perform the computations.In this mode, your local file system is used; therefore, deactivate the
configuration components such as tS3Configuration or
tHDFSConfiguration that provides connection
information to a remote file system, if you have placed these components
in your Job.You can launch
your Job without any further configuration. -
Clear the Use local mode check box to display the
list of the available Hadoop distributions and from this list, select
the distribution corresponding to your Spark cluster to be used.This distribution could be:If you cannot find the distribution corresponding to yours from this
drop-down list, this means the distribution you want to connect to is not officially
supported by
Talend
. In this situation, you can select Custom, then select the Spark
version of the cluster to be connected and click the
[+] button to display the dialog box in which you can
alternatively:-
Select Import from existing
version to import an officially supported distribution as base
and then add other required jar files which the base distribution does not
provide. -
Select Import from zip to
import the configuration zip for the custom distribution to be used. This zip
file should contain the libraries of the different Hadoop/Spark elements and the
index file of these libraries.In
Talend
Exchange, members of
Talend
community have shared some ready-for-use configuration zip files
which you can download from this Hadoop configuration
list and directly use them in your connection accordingly. However, because of
the ongoing evolution of the different Hadoop-related projects, you might not be
able to find the configuration zip corresponding to your distribution from this
list; then it is recommended to use the Import from
existing version option to take an existing distribution as base
to add the jars required by your distribution.Note that custom versions are not officially supported by
Talend
.
Talend
and its community provide you with the opportunity to connect to
custom versions from the Studio but cannot guarantee that the configuration of
whichever version you choose will be easy. As such, you should only attempt to
set up such a connection if you have sufficient Hadoop and Spark experience to
handle any issues on your own.
For a step-by-step example about how to connect to a custom
distribution and share this connection, see Connecting to a custom Hadoop distribution. -
Reading data and sending the fields to the next component
-
Double-click tFileInputDelimited to open its
Basic settings view.The input data must have duplicate records, otherwise the model generated
will not give authentic results when used on the whole suspect
pairs. -
Click the […] button next to Edit
schema and use the [+] button in the
dialog box to add String type columns: Original_Id,
Source, Site_name and
Address. -
Click OK in the dialog box and accept to propagate
the changes when prompted. -
In the Folder/File field, set the path to the input
file. -
Set the row and field separators in the corresponding fields and the header
and footer, if any.
Computing suspect pairs and writing a sample in a Grouping campaign
-
Double-click tMatchPairing to
display the Basic settings view and define the
component properties.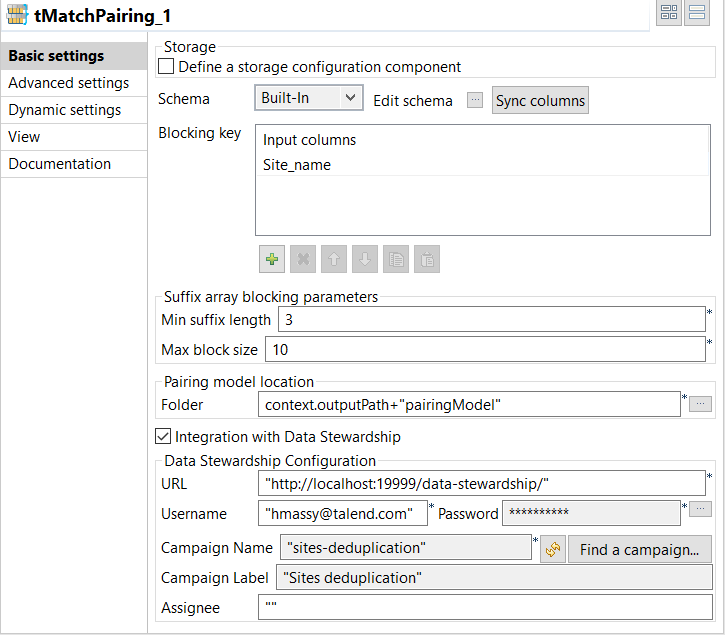
-
Click Sync columns to retrieve the schema defined in
the input component. -
In the Blocking Key table, click the
[+] button to add a row. Select the column you want
to use as a blocking key, Site_name in this
example.The blocking key is constructed from the agency name and is used to
generate the suffixes used to group pairs of records. -
In the Suffix array blocking parameters section:
-
In the Min suffix length field, set the
minimum suffix length you want to reach or stop at in each
group. -
In the Max block size field, set the maximum
number of the records you want to have in each block. This helps
filtering data in large blocks where the suffix is too common.
-
In the Min suffix length field, set the
-
In the Folder field, set the path to the local
folder where you want to generate the pairing model file.If you want to store the model in a specific file system, for example S3
or HDFS, you must use the corresponding component in the Job and select
the Define a storage configuration component
check box in the component basic settings. -
Select the Integration with Data Stewardship check box
and set the connection parameters to the Talend Data Stewardship
server.-
In the URL field, enter the address of
the server suffixed with /data-stewardship/, for example http://localhost:19999/data-stewardship/.
-
Enter your login information to the server in the
Username and Password
fields.To enter your password, click the […] button next to the Password field, enter your password between double
quotes in the dialog box that opens and click OK. -
Click Find a campaign to open a dialog
box which lists the campaigns defined on the server and for which you are the owner or
you have the access rights.
-
Select the Sites deduplication campaign in which
to write the grouping tasks and click OK.
-
-
Click Advanced settings and set the below
parameters:-
In the Filtering threshold field, enter a
value between 0.2 and 0.85 to filter the pairs of suspect records
based on the calculated scores.This value helps to exclude the pairs which are not very similar.
The higher the value is, the more similar the records are. -
Leave the Set a random seed check box clear
as you want to generate a different sample by each execution of the
Job. -
In the Number of pairs field, enter the size
of the suspect pairs sample you want to generate. -
When configured with Talend Data Stewardship, enter the maximum number of the tasks to load per a
commit in the Max tasks per commit
field.
-
In the Filtering threshold field, enter a
Configuring the output components to write suspect pairs, unique rows and
exact duplicates
-
Double-click the first tFileOutputDelimited
component to display the Basic settings view and
define the component properties.You have already accepted to propagate the schema to the output
components when you defined the input component. -
Clear the Define a storage configuration component
check box to use the local system as your target file system. -
In the Folder field, set the path to the folder
which will hold the output data. -
From the Action list, select the operation for
writing data:-
Select Create when you run the Job for the
first time. -
Select Overwrite to replace the file every
time you run the Job.
-
- Set the row and field separators in the corresponding fields.
-
Select the Merge results to single file check box,
and in the Merge file path field set the path where
to output the file of the suspect record pairs. -
Double-click the second tFileOutputDelimited
component and define the component properties in the Basic
settings view, as you do with the first component.This component creates the file which holds the unique rows generated
from the input data. -
Double-click tLogRow component and define the
component properties in the Basic settings
view.This component writes the exact duplicates generated from the input
data on the Studio console.
Executing the Job to write tasks into the Grouping campaign
Press F6 to save and execute the
Job.
A sample of suspect pairs is computed and written in the form of tasks into
the Sites deduplication campaign and the record names
are automatically set to Record 1 and
Record 2.
The component also computes suspect pairs and unique rows and writes them in
the output files. It writes exact duplicates on the studio console.
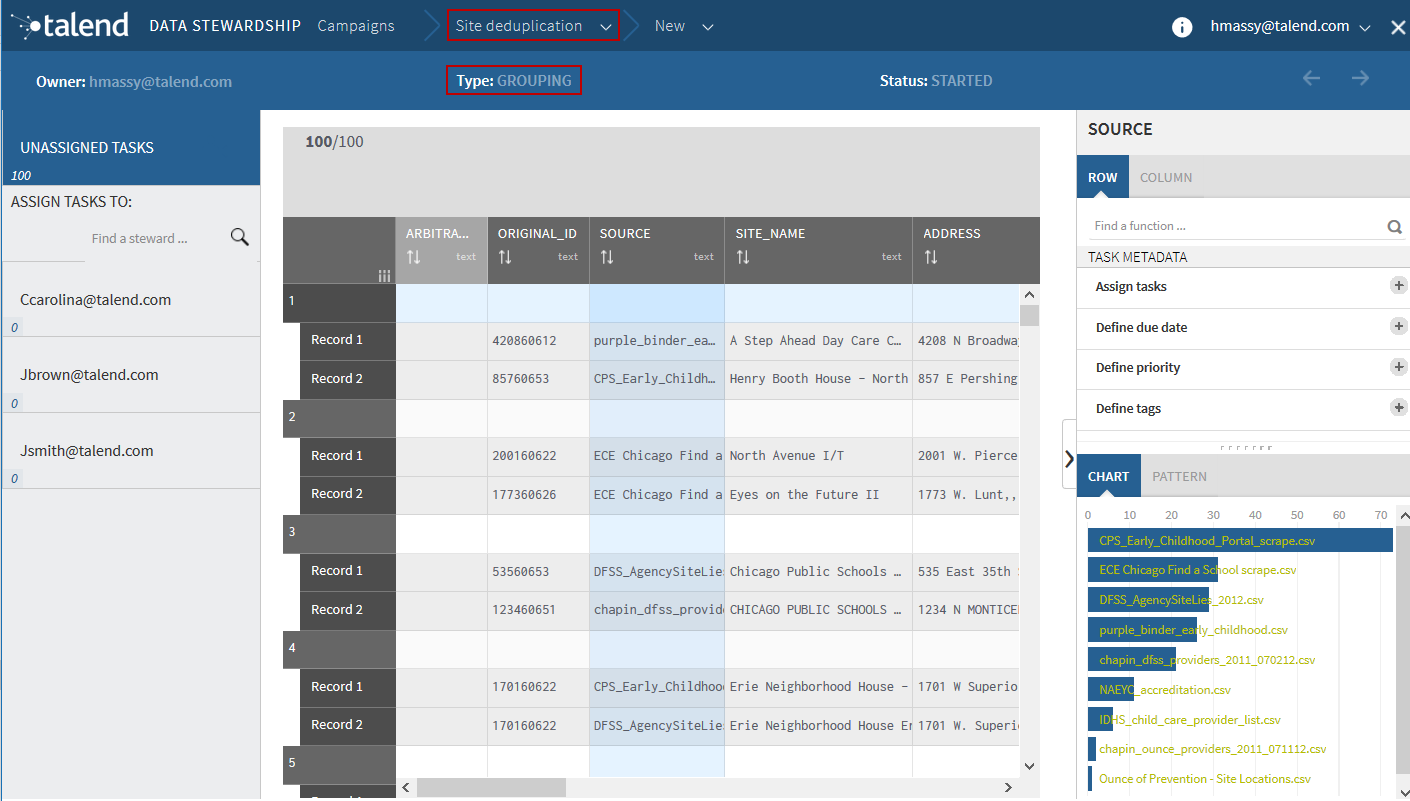
You can now assign the tasks to authorized data stewards who need to decide
if the records in each group are duplicates.
For further information about handling grouping
tasks, see the documentation on Talend Help Center (https://help.talend.com).
Scenario 2: Computing suspect pairs and suspect sample from source
data
This scenario applies only to a subscription-based Talend Platform solution with Big data or Talend Data Fabric.
In this example, tMatchPairing uses a blocking key to compute the
pairs of suspect duplicates in a list of early childhood education centers in
Chicago.
The use case described here uses:
-
a tFileInputDelimited component to read the source file,
which contains a list of early childhood education centers in Chicago coming
from ten different sources; -
a tMatchPairing component to pre-analyze the data, compute
pairs of suspect duplicates and generate a pairing model which is used by the
tMatchPredict component; -
three tFileOutputDelimited
components to output the suspect duplicates, a sample of suspect pairs and the
unique records; and -
a tLogRow component to
output the exact duplicates.
Setting up the Job
-
Drop the following components from the Palette onto the design workspace:
tFileInputDelimited, tMatchPairing, three tFileOutputDelimited and tLogRow. -
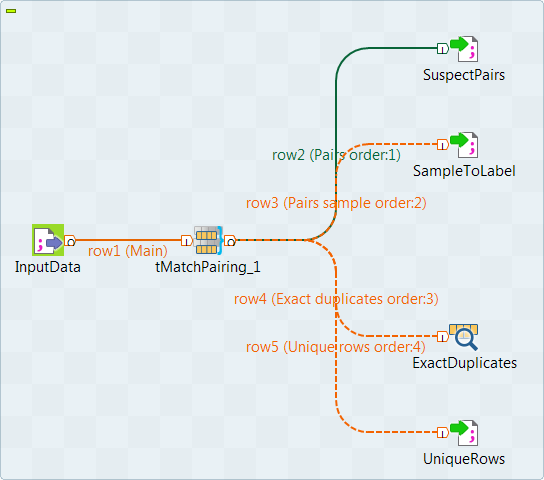
Connect tFileInputDelimited to
tMatchPairing using the Main link. -
Connect tMatchPairing to
the tFileOutputDelimited components using the Pairs, Pairs
sample and Unique rows links, and to the
tLogRow component using the
Exact duplicates link.
Selecting the Spark mode
-
Click Run to open its view and then click the
Spark Configuration tab to display its view
for configuring the Spark connection. -
Select the Use local mode check box to test your Job locally.
In the local mode, the Studio builds the Spark environment in itself on the fly in order to
run the Job in. Each processor of the local machine is used as a Spark
worker to perform the computations.In this mode, your local file system is used; therefore, deactivate the
configuration components such as tS3Configuration or
tHDFSConfiguration that provides connection
information to a remote file system, if you have placed these components
in your Job.You can launch
your Job without any further configuration. -
Clear the Use local mode check box to display the
list of the available Hadoop distributions and from this list, select
the distribution corresponding to your Spark cluster to be used.This distribution could be:If you cannot find the distribution corresponding to yours from this
drop-down list, this means the distribution you want to connect to is not officially
supported by
Talend
. In this situation, you can select Custom, then select the Spark
version of the cluster to be connected and click the
[+] button to display the dialog box in which you can
alternatively:-
Select Import from existing
version to import an officially supported distribution as base
and then add other required jar files which the base distribution does not
provide. -
Select Import from zip to
import the configuration zip for the custom distribution to be used. This zip
file should contain the libraries of the different Hadoop/Spark elements and the
index file of these libraries.In
Talend
Exchange, members of
Talend
community have shared some ready-for-use configuration zip files
which you can download from this Hadoop configuration
list and directly use them in your connection accordingly. However, because of
the ongoing evolution of the different Hadoop-related projects, you might not be
able to find the configuration zip corresponding to your distribution from this
list; then it is recommended to use the Import from
existing version option to take an existing distribution as base
to add the jars required by your distribution.Note that custom versions are not officially supported by
Talend
.
Talend
and its community provide you with the opportunity to connect to
custom versions from the Studio but cannot guarantee that the configuration of
whichever version you choose will be easy. As such, you should only attempt to
set up such a connection if you have sufficient Hadoop and Spark experience to
handle any issues on your own.
For a step-by-step example about how to connect to a custom
distribution and share this connection, see Connecting to a custom Hadoop distribution. -
Configuring the input component
-
Double-click tFileInputDelimited to open its
Basic settings view.The input data must have duplicate records, otherwise the model generated
will not give authentic results when used on the whole suspect
pairs. -
Click the […] button next to Edit
schema and use the [+] button in the
dialog box to add String type columns: Original_Id,
Source, Site_name and
Address. -
Click OK in the dialog box and accept to propagate
the changes when prompted. -
In the Folder/File field, set the path to the input
file. -
Set the row and field separators in the corresponding fields and the header
and footer, if any.
Computing suspect duplicates, exact duplicates and unique rows
-
Double-click tMatchPairing to
display the Basic settings view and define the
component properties.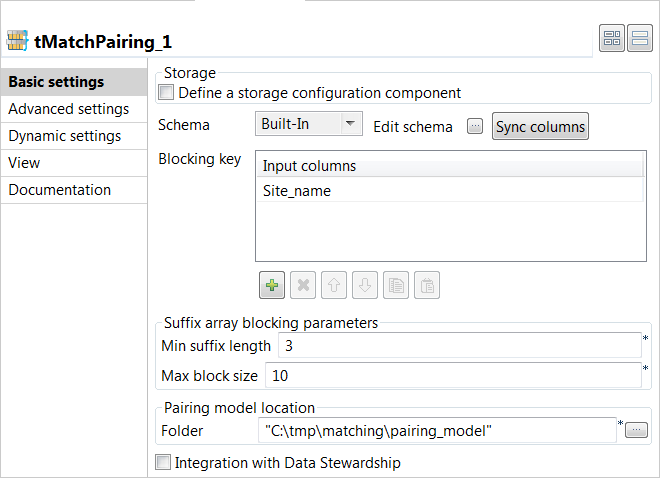
-
Click Sync columns to retrieve the schema defined in
the input component. -
In the Blocking Key table, click the
[+] button to add a row. Select the column you want
to use as a blocking key, Site_name in this
example.The blocking key is constructed from the agency name and is used to
generate the suffixes used to group pairs of records. -
In the Suffix array blocking parameters section:
-
In the Min suffix length field, set the
minimum suffix length you want to reach or stop at in each
group. -
In the Max block size field, set the maximum
number of the records you want to have in each block. This helps
filtering data in large blocks where the suffix is too common.
-
In the Min suffix length field, set the
-
In the Folder field, set the path to the local
folder where you want to generate the pairing model file.If you want to store the model in a specific file system, for example S3
or HDFS, you must use the corresponding component in the Job and select
the Define a storage configuration component
check box in the component basic settings. -
Click Advanced settings and set the below
parameters:-
In the Filtering threshold field, enter a
value between 0.2 and 0.85 to filter the pairs of suspect records
based on the calculated scores.This value helps to exclude the pairs which are not very similar.
The higher the value is, the more similar the records are. -
Leave the Set a random seed check box clear
as you want to generate a different sample by each execution of the
Job. -
In the Number of pairs field, enter the size
of the suspect pairs sample you want to generate. -
When configured with Talend Data Stewardship, enter the maximum number of the tasks to load per a
commit in the Max tasks per commit
field.
-
In the Filtering threshold field, enter a
Configuring the output components to write suspect pairs, suspect sample
and unique rows
-
Double-click the first tFileOutputDelimited
component to display the Basic settings view and
define the component properties.You have already accepted to propagate the schema to the output
components when you defined the input component. -
Clear the Define a storage configuration component
check box to use the local system as your target file system. -
In the Folder field, set the path to the folder
which will hold the output data. -
From the Action list, select the operation for
writing data:-
Select Create when you run the Job for the
first time. -
Select Overwrite to replace the file every
time you run the Job.
-
- Set the row and field separators in the corresponding fields.
-
Select the Merge results to single file check box,
and in the Merge file path field set the path where
to output the file of the suspect record pairs. -
Double-click the other tFileOutputDelimited components to display the Basic
settings view and define the component properties.For example, set the path where to output the sample data to
C:/tmp/tmp/pairsSample and set the path where to
output the file of the suspect sample to
C:/tmp/pairing/SampleToLabel.csv.For example, set the path where to output the unique row to
C:/tmp/tmp/uniqueRows and set the path where to
output the file of the suspect pairs sample to
C:/tmp/pairing/uniqueRows.csv.
Configuring the log component to write exact duplicates
-
Double-click tLogRow component and define the
component properties in the Basic settings
view.This component writes the exact duplicates generated from the input
data on the Studio console. -
Click Sync columns to retrieve the schema from the
preceding component. -
In the Mode area, select Table (print values
in cells of a table) for better readability of the result.
Executing the Job to compute suspect pairs and suspect sample
Job.
tMatchPairing computes the pairs of suspect records and the
pairs sample, based on the blocking key definition, and writes the results to the
output files.
tMatchPairing excludes unique rows and writes them in the
output file:

tMatchPairing excludes exact duplicates and writes them in the
Run view:

The component has added an extra read-only column, LABEL, for
the Pairs sample link.

You can use the LABEL column to label suspect records manually
before using them with the tMatchModel component.
You can find an example of how to generate a matching model
using tMatchModel on Talend Help Center (https://help.talend.com).