tMomInput
Fetches a message from a queue on a Message-Oriented Middleware (MOM) system and
passes it on to the next component.
tMomInput makes it possible to set up asynchronous
communications via a MOM server.
tMomInput Standard properties
These properties are used to configure tMomInput running in the Standard Job framework.
The Standard
tMomInput component belongs to the Internet family.
The component in this framework is generally available.
Basic settings
|
Use existing connection |
Select this check box and in the Component Note that when a Job contains the parent Job and the child Job, Component List presents only the connection components in the same |
|
Keep Listening |
Select this check box to keep the MOM server listening for and This check box is not visible when ActiveMQ is selected from the MQ server list and the receive |
|
Sleeping time (in sec) |
Specify the timeout interval (in seconds) within which the next This field is available in any one of the following situations:
|
|
receive number of messages |
Select this check box to set the maximum number of messages that This check box is available only when ActiveMQ is selected from the MQ server list and the Keep |
|
maximum messages |
Enter the maximum number of messages you can receive. This field is available only when the receive number of messages check box is |
|
Timeout for receiver |
Select this check box and specify the timeout interval for the This check box is available only when the receive number of messages check box is |
|
Failover |
Select this check box to use the ActiveMQ failover transport. For This check box is available only when ActiveMQ is selected from the MQ server list and the Static |
|
Static Discovery |
Select this check box to use the ActiveMQ static transport This check box is available only when ActiveMQ is selected from the MQ server list and the Failover check box is cleared. |
|
URI parameters |
Enter the URI parameters. This field is available only when the Failover or Static |
|
MQ server |
Select the type of the MQ server(s) to be connected from the list: |
|
Use SSL Transport |
Select this check box to use the ActiveMQ SSL transport. For more This check box is available only when ActiveMQ is selected from the MQ server list. |
|
Host |
Enter the host name or IP address of the MQ server. |
|
Port |
Enter the listening port of the MQ server. |
|
Username and Password |
Enter the user authentication credentials. To enter the password, click the […] button next to the |
|
Channel |
Specify the name of the channel through which the connection is This field is available only when WebSphere |
|
Message From |
Type in the message source, exactly as expected by the server; Note that the field is case-sensitive. This field is available only when ActiveMQ or JBoss |
|
Message Type |
Select the message type, either Topic or Queue. This field is available only when ActiveMQ or JBoss |
|
Message Body Type |
Select the message body type: Text |
|
Schema and Edit |
A schema is a row description, it defines the number of fields In the context of tMomInput |
|
QueueManager |
Specify the name of the queue manager to which the connection is This field is available only when WebSphere |
|
MessageQueue |
Enter the name of the message queue into which message queueing This field is available only when WebSphere |
|
Is using message id to fetch |
Select this check box to fetch messages according to their This check box is available only when Text |
|
Commit (delete message after read from the |
Select this check box to force a commit after reading each message This check box is available only when WebSphere MQ is selected from the MQ server list and the Browse message check box in the Advanced settings view is cleared. |
|
Backout messages to input queue |
Select this check box to put the message back into the queue after This check box and the Browse This check box is available only when WebSphere MQ is selected from the MQ server list and the Keep Listening, Commit (delete message after read from the queue) |
|
Backout messages to backout queue (when backoutCount of |
Select this check box to backout the messages to the backout queue This check box is available only when WebSphere MQ is selected from the MQ server list and the Keep Listening, Commit (delete message after read from the queue) |
|
Set Transacted |
Select this check box to transact the session. For further Note:
Selecting this check box will ignore the settings in the This check box is available only when ActiveMQ is selected from the MQ server list. |
|
start server |
Select this check box to force a start of the ActiveMQ This check box is available only when ActiveMQ is selected from the MQ server list. |
Advanced settings
|
Additional options |
Define the additional transport options in the table. This table
For example, enter maxReconnectAttempts in the Option name field and then 0 in the Option For more information about the failover transport options, see For more information about the static discovery transport options, |
|
Acknowledgement Mode |
Select an acknowledgement mode from the list to indicate that the
Auto Acknowledge: With this
Client Acknowledge: With this
Dups OK Acknowledge: This For further information about the usage of Jms headers, see https://publib.boulder.ibm.com/iseries/v5r2/ic2924/books/csqzaw07.pdf.
Note:
If the Set Transacted |
|
Get Jms Header |
Select this check box to receive the Jms headers through the
mapping from Jms fields onto MQ Series fields. When this check box is checked, you can specify the Jms header and the corresponding reference column name in the line(s) you added by clicking the plus button in the Parameters table. For further information about the usage of Jms headers, see https://publib.boulder.ibm.com/iseries/v5r2/ic2924/books/csqzaw07.pdf. Note:
This check box is enabled when the MQ server is ActiveMQ |
|
Get Jms Properties |
Select this check box to receive the Jms properties mapped to MQMD (Available when ActiveMQ or |
|
Browse message |
Select this check box to disable Commit Note:
This check box and the Backout messages |
|
Get MQMD Fields |
Select this check box to set one or more message descriptors by
Field Name: Select one or more
Reference Column Name: The header For further information, see http://publib.boulder.ibm.com/infocenter/wmqv7/v7r0m0/index.jsp?topic=%2Fcom.ibm.mq.csqzak.doc%2Ffr13040_.htm/. (Available when WebSphere MQ is |
|
Include Header |
Select this check box to specify the header of the message:
MQRFH2 fixed Portion: Select this
MCD folder: Select this check box
JMS folder: Select this check box
USR folder: Select this check box For further information about MQRFH2 header, see http://publib.boulder.ibm.com/infocenter/wmbhelp/v6r1m0/index.jsp?topic=%2Fcom.ibm.etools.mft.doc%2Faq06920_.htm. (Available when WebSphere MQ is |
|
Set CipherSpec |
Select this check box to enable the CipherSpec list from which you For further information about CipherSpec, see http://publib.boulder.ibm.com/infocenter/wmqv6/v6r0/index.jsp?topic=%2Fcom.ibm.mq.csqzas.doc%2Fsy12870_.htm. (Available when WebSphere MQ is |
|
tStatCatcher Statistics |
Select this check box to gather the Job processing metadata at a |
Global Variables
|
Global Variables |
ERROR_MESSAGE: the error message generated by the
NB_LINE: the number of rows read by an input component or A Flow variable functions during the execution of a component while an After variable To fill up a field or expression with a variable, press Ctrl + For further information about variables, see |
Usage
|
Usage rule |
This component is generally used as a start component. It must be |
|
Dynamic settings |
Click the [+] button to add a The Dynamic settings table is For examples on using dynamic parameters, see Scenario: Reading data from databases through context-based dynamic connections and Scenario: Reading data from different MySQL databases using dynamically loaded connection parameters. For more information on Dynamic |
|
Limitation |
Make sure the relevant ActiveMQ, JBoss Messaging or Websphere MQ This component requires installation of its related jar files. |
Scenario 1: Asynchronous communication via a MOM server
This scenario is made of two Jobs. The first Job posts messages on a JBoss server
queue and the second Job fetches the message from the server.
Configuring and executing the first Job
In the first Job, a string message is created using a tRowGenerator and put on a JBoss server using a tMomOutput. An intermediary tLogRow component displays the flow being passed.
-
Drop the three components required for the first Job from the Palette onto the design workspace and right-click
to connect them using a Main row
link.
-
Double-click on tRowGenerator to set the
schema to be randomly generated.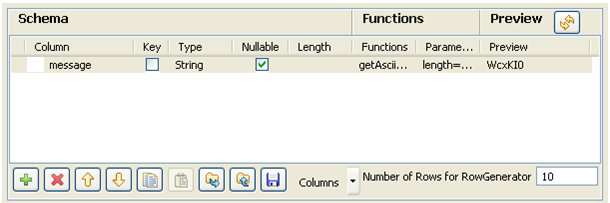
-
Set just one column called message. This is the
message to be put on the MOM queue. -
This column is of String type and is
nullable. To produce the data, use a preset function which concatenates
randomly chosen ascii characters to form a 6-char string. This function is
getAsciiRandomString. (Java version). Click the Preview
button to view a random sample of data generated. -
Set the Number of rows to be generated to
10.Click OK to validate. -
The tLogRow is only used to display a
intermediary state of the data to be handled. In this example, it doesn’t
require any specific configuration. -
Then select the tMomOutput
component.
-
In this case, the MQ server to be used is
JBoss.In the Host and Port fields, fill in the relevant connection
information. -
Select the Message type from the list.
The message can be of Queue or Topic type. In this example, select the Queue type from the list. -
In the To field, type in the message
source information strictly respecting the syntax expected by the server.
This should match the Message Type you selected, such as:
queue/A.Note:The message name is case-sensitive, therefore
queue/Aand
Queue/Aare different. -
Then click Sync Columns to pass on the
schema from the preceding component. The schema being read-only, it cannot
be changed. The data posted onto the MQ comes from the first schema column
encountered. -
Press F6 to execute the Job and view the
data flow being passed on in the console, thanks to the tLogRow component.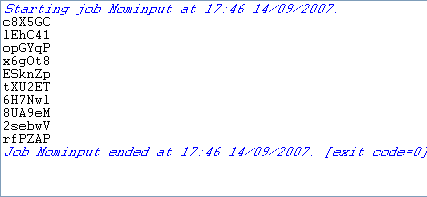
Configuring and executing the second Job
Then set the second Job in order to fetch the queuing messages from the MOM
server.
-
Drop the tMomInput component and a
tLogRow from the Palette to the design workspace.
-
Select the tMomInput to set the
parameters.
-
Select the MQ server from the list. In
this example, a JBoss messaging server is used. - Set the server Host and Port information.
-
Set the Message From and the Message Type to match the source and type
expected by the messaging server. -
The Schema is read-only and is made of
two columns: From and Message. -
Select the Keep listening check box and
set the verification frequency to 5 seconds.Note:When using the Keep Listening option,
you’ll need to kill the Job to end it. - No need to change any default setting from the tLogRow.
-
Save the Job and run it (when launching for the first time or if you
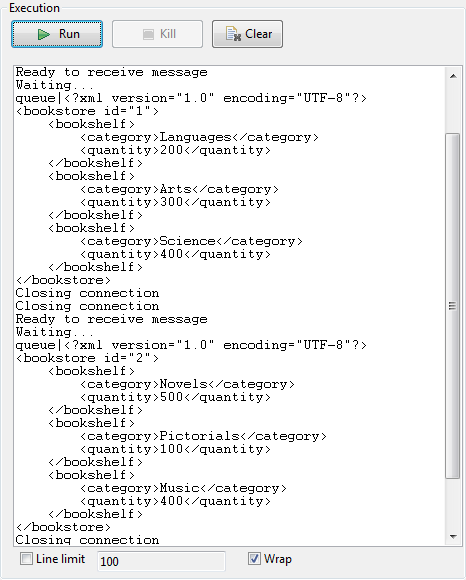
killed it on a previous run).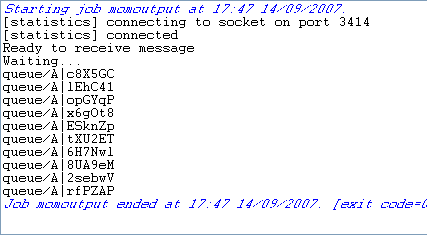 The messages fetched on the server are displayed on the console.
Scenario 2: Transmitting XML files via a MOM server
This scenario describes a five-component Job composed of two subjobs that sends XML
files from a local folder to a MOM queue, and then fetches the files from the MOM queue
and displays the contents of the files on the console.

Dropping and links the components
-
From the Palette, drop the following
components one after another onto the design workspace: tFileList, tFileInputXML, tMomOutput,
tMomInput, and tLogRow. -
Connect tFileList to tFileInputXML using a Row > Iterate link, and
connect tFileInputXML to tMomOutput using a Row > Main link to form the
first subjob. This subjob will read each XML file in a given folder and send
it to a MOM queue. -
Connect tMomInput to tLogRow using a Row > Main link to form the
second subjob. This subjob will fetch the XML files from MOM queue and
display the file contents on the console. -
Connect tFileInputXML to tMomInput using a Trigger > On Component Ok
connection to link the two subjobs.
Configuring the first subjob
Configuring the input components
-
Double-click the tFileList component
to open its Basic settings view.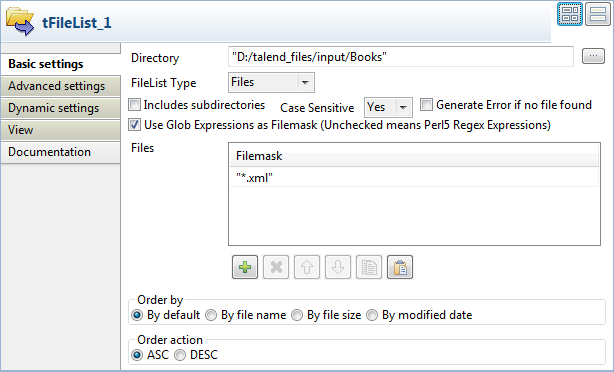
-
In the Directory field, enter the
path to the directory to read XML files from, or browse to the path by
clicking the […] button next to the
field. -
Select Use Glob Expressions as
Filemask check box, add a new line in the Files field by clicking the [+] button, and enter"*.xml"as
the file mask so that all XML files in the directory will be used. Keep
all the other settings as they are. -
Double-click the tFileInputXML
component to open its Basic settings
view.
-
Click the […] button next to
Edit schema to open the [Schema] dialog box.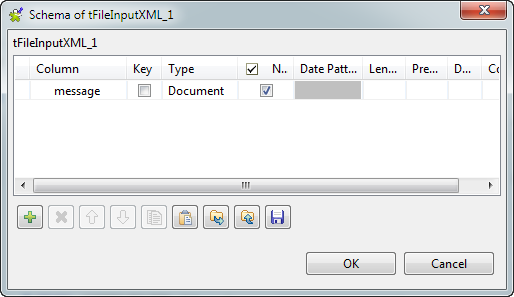
-
Click the [+] button to add a column,
give it a name, message in this
example, and select Document from the
Type list to handle XML format
files. Then, click OK to close the
dialog box. -
In the File name/Stream field, press
Ctrl+Space to access the global
variable list, and selecttFileList_1.CURRENT_FILEPATHto
loop on the context files’ directory. -
In in the Loop XPath query fields,
enter"/"to define the root as the loop node of the input
files’ structure; in the Mapping table,
fill the XPath query column with
"."to extract all data from context node of the source
files, and select the Get Nodes check
box to build a Document type data flow.
Configuring the tMomOutput component
-
Double-click the tMomOutput component
to open its Basic settings view.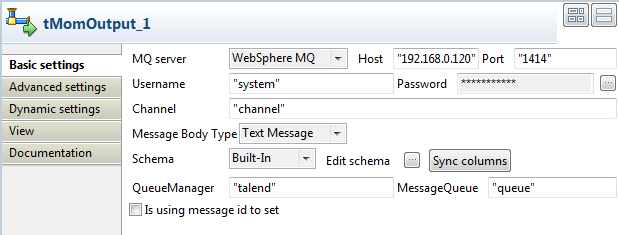
-
Select WebSphere MQ from the
MQ server list, and enter the host
name or IP address of the MQ server and the port number. -
Enter the login authentication information in the Username and Password fields, and enter the channel name of the
transmission queue in the Channel
field. -
As we are handling file messages, select Text
Message from the Message Body
Type list. -
Click Sync columns to retrieve the
schema structure from the preceding component. -
Fill in the queue manager and message queue details in the
corresponding fields, and leave the other settings as they are.
Configuring the second subjob
-
Double-click the tMomInput component to
open its Basic settings view.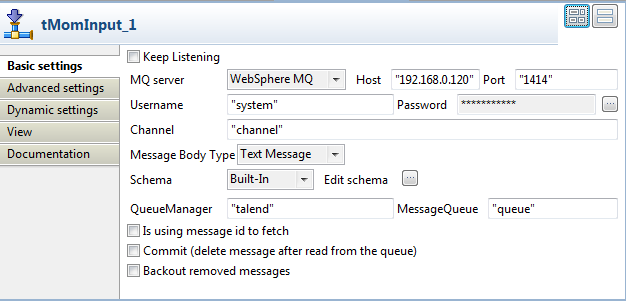
-
Set the basic parameters of the component using the same settings you have
done in the tMomOutput component, including
the MQ server details, login authentication details, channel, message body
type, queue manager and message queue. -
Click the […] button next to Edit schema to open the [Schema] dialog box.
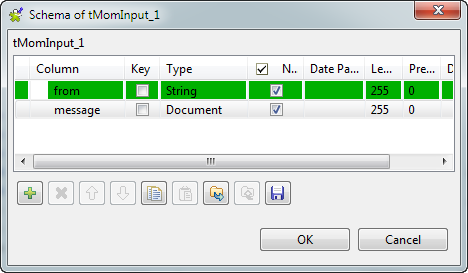
-
From the Type list for the message column, select Document to handle XML format files, and then click
OK to close the dialog box.
Saving and executing the Job
- Press Ctrl+S to save your Job.
-
Press F6 or click Run on the Run tab to
execute the Job.The XML files in the specified folder are written to the message queue and
then retrieved from the queue. The contents of the files are displayed on
the console.