tMongoDBLookupInput
Executes a database query with a strictly defined order which must correspond to
the schema definition.
tMongoDBLookupInput
reads a database and extracts fields based on a query.
tMongoDBLookupInput properties for Apache Spark Streaming
These properties are used to configure tMongoDBLookupInput running in the Spark Streaming Job framework.
The Spark Streaming
tMongoDBLookupInput component belongs to the Databases family.
The component in this framework is available only if you have
subscribed to Talend Real-Time Big Data Platform or Talend Data Fabric .
Basic settings
|
Property type |
Either Built-In or Repository. Built-In: No property data stored centrally.
Repository: Select the repository file where the |
||||
|
MongoDB configuration |
Select this check box and in the Component |
||||
|
Schema and Edit |
A schema is a row description. It defines the number of fields (columns) to Click Edit schema to make changes to the schema.
If a column in the database is a JSON document and you need to read |
||||
|
Collection |
Enter the name of the collection to be used. A MongoDB collection is the equivalent of an RDBMS table and contains |
||||
|
Set read preference |
Select this check box and from the Read preference If you leave this check box clear, the Job uses the default Read preference, that is to For further information, see MongoDB’s documentation about Replication and its Read |
||||
|
Query |
Specify the query statement to select documents from the collection specified in the For
example
In this code, row1 is not the label of the link to The result of the query must contain only records that match join key you need to use in This approach ensures that no redundant records are loaded into memory and outputted to |
||||
|
Mapping |
Each column of the schema defined for this component represents a field of the documents For example, in the document reading as
follows
The first and the last fields have person as their parent node but the _id field does not have any parent node. So once completed, this Mapping table should read as follows:
|
||||
|
Limit |
Enter the maximum number of records to be retrieved. |
Advanced settings
|
No query timeout |
Select this check box to prevent MongoDB servers from stopping idle A cursor for MongoDB is a pointer to the result set of a query. By |
Usage
|
Usage rule |
This component is used as a start component and requires an output link. This component should use a tMongoDBConfiguration component present in the same Job to connect This component, along with the Spark Streaming component Palette it belongs to, appears Note that in this documentation, unless otherwise explicitly stated, a scenario presents |
|
Spark Connection |
You need to use the Spark Configuration tab in
the Run view to define the connection to a given Spark cluster for the whole Job. In addition, since the Job expects its dependent jar files for execution, you must specify the directory in the file system to which these jar files are transferred so that Spark can access these files:
This connection is effective on a per-Job basis. |
Reading and writing data in MongoDB using a Spark Streaming Job
This scenario applies only to Talend Real-time Big Data Platform or Talend Data Fabric.
In this scenario, you create a Spark Streaming Job to extract data about given movie
directors from MongoDB, use this data to filter and complete movie information and then
write the result into a MongoDB collection.
follows:
|
1 2 3 4 5 |
1;Gregg Araki 2;P.J. Hogan 3;Alan Rudolph 4;Alex Proyas 5;Alex Sichel |
This data contains the names of these directors and the ID numbers distributed to
them.
follows:
|
1 2 3 4 5 |
{ "_id" : ObjectId("575546da3b1c7e22bc7b2189"), "person" : { "id" : 3, "name" : "Alan Rudolph" } } { "_id" : ObjectId("575546da3b1c7e22bc7b218b"), "person" : { "id" : 4, "name" : "Alex Proyas" } } { "_id" : ObjectId("575546da3b1c7e22bc7b218c"), "person" : { "id" : 5, "name" : "Alex Sichel" } } { "_id" : ObjectId("575546da3b1c7e22bc7b2188"), "person" : { "id" : 1, "name" : "Gregg Arakit" } } { "_id" : ObjectId("575546da3b1c7e22bc7b218a"), "person" : { "id" : 2, "name" : "P.J. Hogan" } } |
Note that the sample data is created for demonstration purposes only.
-
The Spark cluster and the MongoDB database to be used have been properly
installed and are running. -
The above-mentioned data has been loaded in the MongoDB collection to be
used.
To replicate this scenario, proceed as follows:
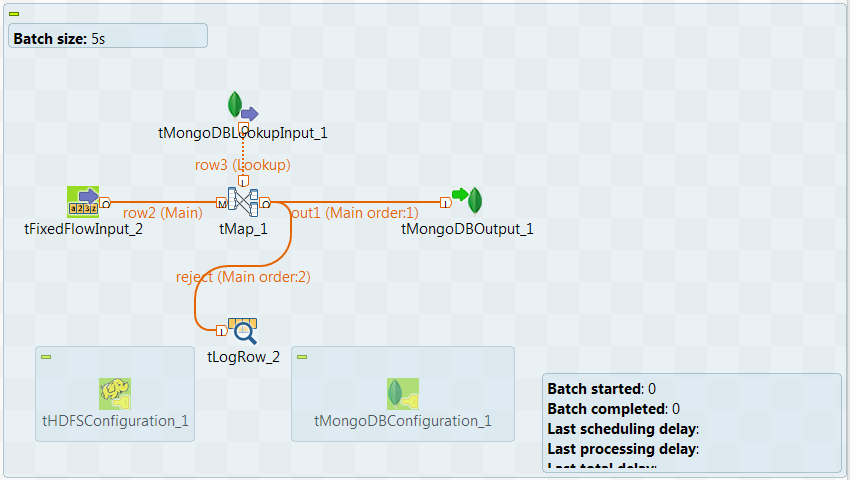
Linking the components
-
In the
Integration
perspective of the Studio, create an empty
Spark Batch Job from the Job Designs node in
the Repository tree view.For further information about how to create a Spark Streaming Job, see
Talend Open Studio for Big Data Getting Started
Guide
. -
In the workspace, enter the name of the component to be used and select this
component from the list that appears. In this scenario, the components are
tHDFSConfiguration, tMongoDBConfiguration, tFixedFlowInput, tMongoDBOutput,
tMongoDBLookupInput, tMap and tLogRow.The tFixedFlowInput components are used to
load the data about movies into the data flow. In the real-world practice, you
can use other components such as tFileInputDelimited instead to design a sophisticated process to
prepare your data to be processed. -
Connect tFixedFlowInput to tMap using the Row >
Main link.This way, the main flow to tMap is created.
The movie information is sent via this flow. -
Connect tMongoDBLookupInput to tMap using the Row >
Main link.This way, the lookup flow to tMap is created.
The movie director information is sent via this flow. -
Connect tMap to tMongoDBOutput using the Row > Main
link and name this connection in the dialog box that is displayed. For example,
name it to out1. - Do the same to connect tMap to tLogRow and name this connection to reject.
-
Leave tHDFSConfiguration and tMongoDBConfiguration alone without any
connection.
Selecting the Spark mode
-
Click Run to open its view and then click the
Spark Configuration tab to display its view
for configuring the Spark connection. -
Select the Use local mode check box to test your Job locally.
In the local mode, the Studio builds the Spark environment in itself on the fly in order to
run the Job in. Each processor of the local machine is used as a Spark
worker to perform the computations.In this mode, your local file system is used; therefore, deactivate the
configuration components such as tS3Configuration or
tHDFSConfiguration that provides connection
information to a remote file system, if you have placed these components
in your Job.You can launch
your Job without any further configuration. -
Clear the Use local mode check box to display the
list of the available Hadoop distributions and from this list, select
the distribution corresponding to your Spark cluster to be used.This distribution could be:If you cannot find the distribution corresponding to yours from this
drop-down list, this means the distribution you want to connect to is not officially
supported by
Talend
. In this situation, you can select Custom, then select the Spark
version of the cluster to be connected and click the
[+] button to display the dialog box in which you can
alternatively:-
Select Import from existing
version to import an officially supported distribution as base
and then add other required jar files which the base distribution does not
provide. -
Select Import from zip to
import the configuration zip for the custom distribution to be used. This zip
file should contain the libraries of the different Hadoop/Spark elements and the
index file of these libraries.In
Talend
Exchange, members of
Talend
community have shared some ready-for-use configuration zip files
which you can download from this Hadoop configuration
list and directly use them in your connection accordingly. However, because of
the ongoing evolution of the different Hadoop-related projects, you might not be
able to find the configuration zip corresponding to your distribution from this
list; then it is recommended to use the Import from
existing version option to take an existing distribution as base
to add the jars required by your distribution.Note that custom versions are not officially supported by
Talend
.
Talend
and its community provide you with the opportunity to connect to
custom versions from the Studio but cannot guarantee that the configuration of
whichever version you choose will be easy. As such, you should only attempt to
set up such a connection if you have sufficient Hadoop and Spark experience to
handle any issues on your own.
For a step-by-step example about how to connect to a custom
distribution and share this connection, see Connecting to a custom Hadoop distribution. -
Configuring a Spark stream for your Apache Spark streaming Job
-
In the Batch size field, enter the time
interval at the end of which the Job reviews the source data to identify changes and
processes the new micro batches. -
If needs be, select the Define a streaming
timeout check box and in the field that is displayed, enter the time frame
at the end of which the streaming Job automatically stops running.
Configuring the connection to the file system to be used by Spark
-
Double-click tHDFSConfiguration to open its
Component view. Note that tHDFSConfiguration is used because the Spark Yarn client mode is used to run Spark Jobs in this scenario.Spark uses this component to connect to the HDFS system to which the jar
files dependent on the Job are transferred. -
In the Version area, select the Hadoop distribution
you need to connect to and its version. -
In the NameNode URI field, enter the location of the
machine hosting the NameNode service of the cluster. If you are using WebHDFS, the location should be
webhdfs://masternode:portnumber; if this WebHDFS is secured
with SSL, the scheme should be swebhdfs and you need to use
a tLibraryLoad in the Job to load the library required by
the secured WebHDFS. -
In the Username field, enter the
authentication information used to connect to the HDFS system to be used. Note
that the user name must be the same as you have put in the Spark configuration tab.
Configuring the connection to the MongoDB database to be used by Spark
-
Double-click tMongoDBConfiguration to open its
Component view.
-
From the DB Version list, select the version
of the MongoDB database to be used. -
In the Server field and the Port field, enter corresponding information of the
MongoDB database. -
In the Database field, enter the name of the
database. This database must already exist.
Loading the movie data
-
Double-click the tFixedFlowIput component to
open its Component view.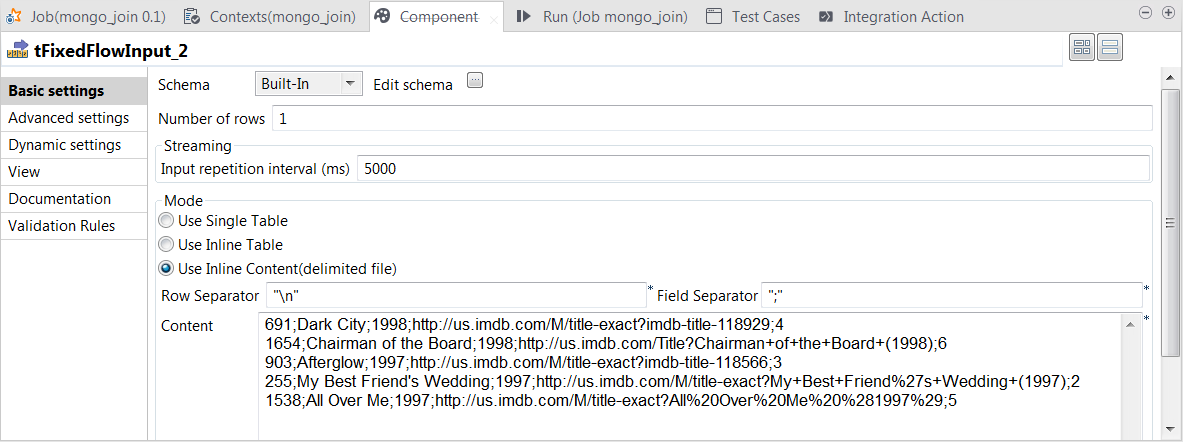
- Click the […] button next to Edit schema to open the schema editor.
-
Click the [+] button to add the schema
columns as shown in this image.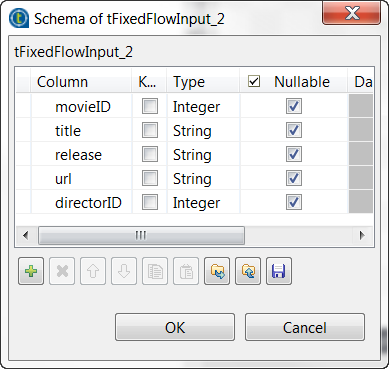
-
Click OK to validate these changes and accept
the propagation prompted by the pop-up dialog box. -
In the Input repetition interval field, enter
the time interval at the end of which tFixedFlowInput sends the movie data another time. This allows you
to generate a stream of data. -
In the Mode area, select the Use Inline Content radio button and paste the following
data into the Content field that is
displayed.
691;Dark City;1998;http://us.imdb.com/M/title-exact?imdb-title-118929;4

1654;Chairman of the Board;1998;http://us.imdb.com/Title?Chairman+of+the+Board+(1998);6

903;Afterglow;1997;http://us.imdb.com/M/title-exact?imdb-title-118566;3

255;My Best Friend's Wedding;1997;http://us.imdb.com/M/title-exact?My+Best+Friend%27s+Wedding+(1997);2

1538;All Over Me;1997;http://us.imdb.com/M/title-exact?All%20Over%20Me%20%281997%29;5
-
In the Field separator field, enter a
semicolon (;).
Extracting director data from MongoDB
-
Double-click tMongoDBLookupInput to open its
Component view.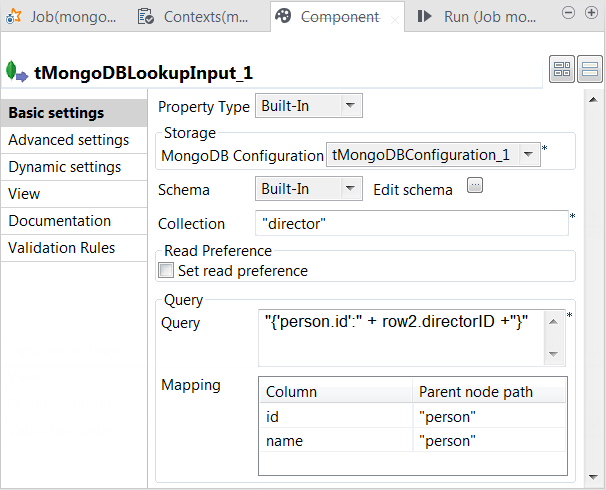
- Click the […] button next to Edit schema to open the schema editor.
-
Click the [+] button to add the schema
columns as shown in this image.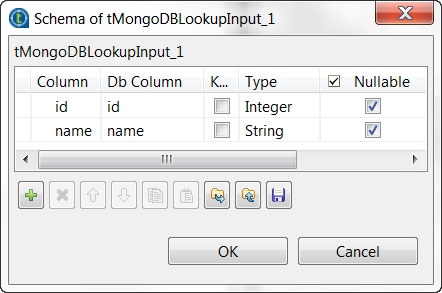
-
In the Collection field, enter the name of
the collection from which tMongoDBLookupInput
extracts data. -
In the Query field, enter the following
query."{'person.id':" + row2.directorID +"}"
In this statement, row2 represents the main
flow to tMap and
row2.directorID the directorID
column of this flow. You need to adapt this row2 to the label of the main flow link in your Job.The whole statement means to select every record in which the id field within the person field has the same value as this directorID column.The example above shows how to use the schema of the main flow to construct
the SQL statement to load only the matched records into the lookup flow. This
approach ensures that no redundant records are stored in memory before being
sent to tMap. -
In the Mapping table, the id and the name
columns have been automatically added. Enter, within double quotation marks,
person in the Parent
node path column for each row.This table defines how the hierarchical construct of the data from MongoDB
should be interpreted in order to fit the schema of tMongoDBLookupInput.
Configuring the transformation in tMap
-
Double-click tMap to open its
Map Editor view.
Creating the output schema
-
On the input side (left side) of the Map
Editor, each of the two tables represents one of the input
flow, the upper one for the main flow and the lower one for the lookup
flow.On the output side (right side), the two tables represent the output flows
that you named as out1 and reject previously.From the main flow table, drop the movieID,
the title, the release and the url columns onto
each of the output flow table. -
Drop as well the directorID column from the
main flow table to the reject output
table. -
From the lookup flow, drop the name column
onto each of the output flow table.Then from the Schema editor view, you can see
the schemas of the both sides have been completed.
Setting the mapping conditions
-
From the main flow table, drop the directorID column onto the lookup table, in the Expr. key column of the id row.
This defines the column used to provide join keys.
-
On the lookup flow table, click the

button to open the setting panel in this table.
- Click the Value column of the Lookup model row to display the […] button and click this button to open the [Options] window.
- Select Reload at each row and click OK to validate this choice.
-
Do the same in the Join model row to display
the corresponding [Options] window. -
Select Inner Join to ensure that only the
matched records between the main flow and the lookup flow are outputted. -
On the reject output flow table, click
thebutton to open the setting panel.
-
In the Catch lookup inner join reject row,
click the Value column to display the […] button and click this button to open the [Options] window. -
Select true to send the records filtered out
by the inner join into the reject flow and
click OK to validate this choice. -
Click Apply, then click OK to validate these changes and accept the
propagation prompted by the pop-up dialog box.
Writing processed data to MongoDB
-
Double-click tMongoDBOutput to open its
Component view.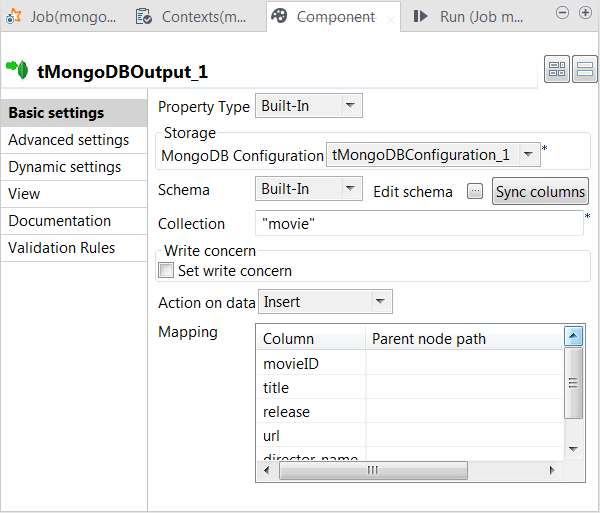
-
If this component does not have the same schema of the preceding
component, a warning icon appears. In this situation, click the Sync columns button to retrieve the schema from the
preceding one and once done, the warning icon disappears. -
In the Collection field, enter the name of
the collection to which you need to write data. If this collection does not
exist, it will be automatically created at runtime. -
From the Action on data list, select the
operation to be performed on the data. In this example, select Insert, which creates documents in MongoDB whether these
documents already exist or not and in either case, generates a new technical ID
for each of the new documents. -
Leave the Mapping table as is. This adds each
record to the root of each document.
Writing rejected data to tLogRow
-
Double-click tLogRow to open its
Component view.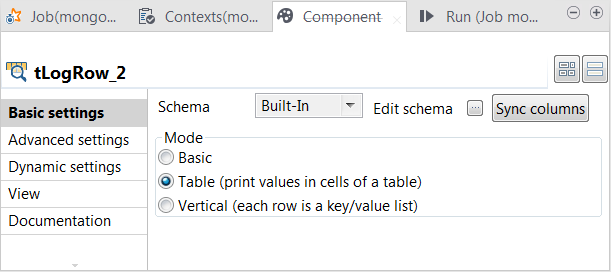
-
If this component does not have the same schema of the preceding
component, a warning icon appears. In this situation, click the Sync columns button to retrieve the schema from the
preceding one and once done, the warning icon disappears. -
Select the Table radio button to present the
result in a table.
Executing the Job
Then you can press F6 to run this Job.
Once done, in the console of the Run view, you can
see the data rejected by inner join.
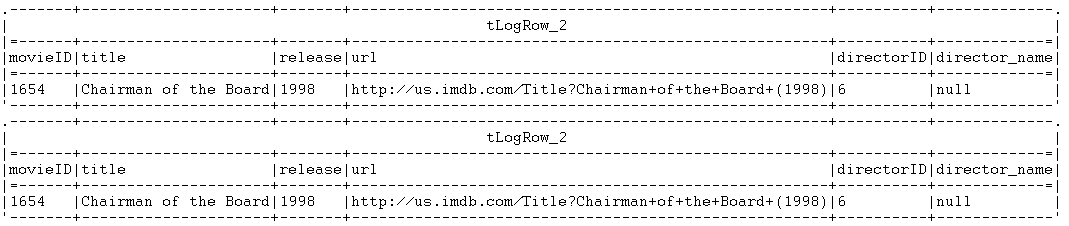
This data is displayed for several times because tFixedFlowInput has created a data stream by regularly sending out the same
records.
Note that you can manage the level of the execution information to be outputted in
this console by selecting the log4jLevel check box in
the Advanced settings tab and then selecting the level
of the information you want to display.
For more information on the log4j logging levels, see the Apache documentation at http://logging.apache.org/log4j/1.2/apidocs/org/apache/log4j/Level.html.
documents that have been created in the movie
collection.
|
1 2 3 4 5 6 7 8 |
{ "_id" : ObjectId("57559a613b1c7e2e6497b2bb"), "movieID" : 691, "title" : "Dark City", "release" : "1998", "url" : "http://us.imdb.com/M/title-exact?imdb-title-118929", "director_name" : "Alex Proyas" } { "_id" : ObjectId("57559a613b1c7e2e6497b2bc"), "movieID" : 903, "title" : "Afterglow", "release" : "1997", "url" : "http://us.imdb.com/M/title-exact?imdb-title-118566", "director_name" : "Alan Rudolph " } { "_id" : ObjectId("57559a613b1c7e2e6497b2be"), "movieID" : 255, "title" : "My Best Friend's Wedding", "release" : "1997", "url" : "http://us.imdb.com/M/title-exact?My+Best+Friend%27s+Wedding+(1997)", "director_name" : "P.J. Hogan " } { "_id" : ObjectId("57559a613b1c7e2e6497b2c0"), "movieID" : 1538, "title" : "All Over Me", "release" : "1997", "url" : "http://us.imdb.com/M/title-exact?All%20Over%20Me%20%281997%29", "director_name" : "Alex Sichel" } { "_id" : ObjectId("57559a613b1c7e2e6497b2ba"), "movieID" : 691, "title" : "Dark City", "release" : "1998", "url" : "http://us.imdb.com/M/title-exact?imdb-title-118929", "director_name" : "Alex Proyas" } { "_id" : ObjectId("57559a613b1c7e2e6497b2bd"), "movieID" : 903, "title" : "Afterglow", "release" : "1997", "url" : "http://us.imdb.com/M/title-exact?imdb-title-118566", "director_name" : "Alan Rudolph " } { "_id" : ObjectId("57559a613b1c7e2e6497b2bf"), "movieID" : 255, "title" : "My Best Friend's Wedding", "release" : "1997", "url" : "http://us.imdb.com/M/title-exact?My+Best+Friend%27s+Wedding+(1997)", "director_name" : "P.J. Hogan " } { "_id" : ObjectId("57559a613b1c7e2e6497b2c1"), "movieID" : 1538, "title" : "All Over Me", "release" : "1997", "url" : "http://us.imdb.com/M/title-exact?All%20Over%20Me%20%281997%29", "director_name" : "Alex Sichel" } |
The movie information now contains the names instead of the IDs of their directors and
the same records have been written several times in the collection but their technical
IDs (the _id field) are all distinct.