tNLPModel
Uses an input in CoNLL format and automatically generates token-level features to
create a model for classification tasks like Named Entity Recognition (NER).
This component can run only with Spark 1.6.
tNLPModel properties for Apache Spark Batch
These properties are used to configure tNLPModel running in
the Spark Batch Job framework.
The Spark Batch
tNLPModel component belongs to the Natural Language Processing family.
The component in this framework is available when you have subscribed to any Talend Platform product with Big Data or Talend Data
Fabric.
Basic settings
|
Define a storage configuration component |
Select the configuration component to be used to provide the configuration If you leave this check box clear, the target file system is the local The configuration component to be used must be present in the same Job. For |
|
Schema and Edit Schema |
A schema is a row description. It defines the number of fields (columns) to Click Sync columns to retrieve the schema from Click Edit schema to make changes to the schema.
The first column in the input schema must be token You can insert columns for features in between. |
|
|
Built-In: You create and store the |
|
|
Repository: You have already created |
|
Feature template |
Features: Select from the list the token-level
Relative position: This is the relative positional
For example -2,-1,0,1,2 means that you use the |
|
Additional Features |
Select this check box to add additional features in the |
|
NLP Library |
From this list, select the library to be used between If the input is a text preprocessed using the |
|
Model location |
Select the Save the model on file system check box If you want to store the model in a specific file system, for example S3 The button for browsing does not work with the Spark Local mode; if you are using the Spark Yarn or the Spark Standalone mode, |
|
Run cross validation evaluation |
If you select this check box, the tNLPModel component The cross-validation process is repeated After evaluating the model, clear this check box and rerun the Job to |
Usage
|
Usage rule |
This component is used as an end component and requires an input link. This component, along with the Spark Batch component Palette it belongs to, appears only |
|
Spark Batch Connection |
You need to use the Spark Configuration tab in
the Run view to define the connection to a given Spark cluster for the whole Job. In addition, since the Job expects its dependent jar files for execution, you must specify the directory in the file system to which these jar files are transferred so that Spark can access these files:
This connection is effective on a per-Job basis. |
Scenario: Generating a classification model
This scenario applies only to a subscription-based Talend Platform solution with Big data or Talend Data Fabric.
This Job uses text data divided into tokens in CoNLL format to train a classification
model, design features and evaluate the model.
You can find more information about natural language processing on
Talend Help Center (https://help.talend.com).
Creating a Job to generate a classification model
entities from manually annotated tokens in CoNLL format.
-
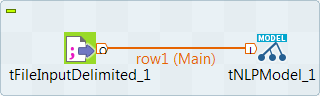
Drop the following components from the Palette onto the
design workspace: tFileInputDelimited and
tNLPModel. - Connect the components using Row > Main connections.
Configuring the input component
-
You annotated the named entities in the CoNLL files to be used for training
the model.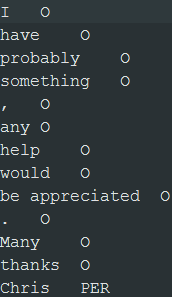
-
Double click the tFileInputDelimited component to open
its Basic settings view and define its properties.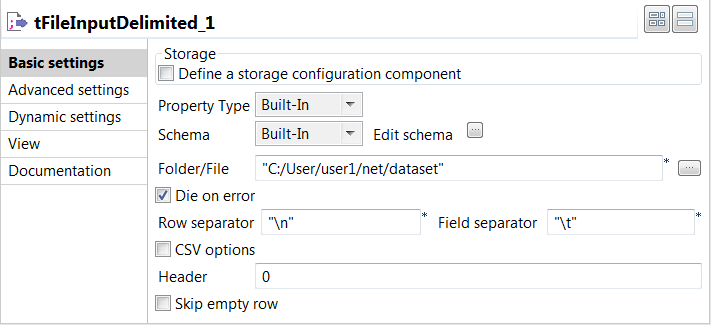
-
Set the Schema as Built-in and click
Edit schema to define the desired
schema.The first column in the output schema must be
tokens and the last one must be
labels. In between, you can have columns
for features you added manually. -
In the Folder/file field, specify the path to
the training data. - Leave the Die on error check box selected.
-
Set the Schema as Built-in and click
-
In the Advanced settings view of the
component, select the Custom encoding check box if you
encounter issues when processing the data.
-
From the Encoding list, select the encoding
to be used, UTF-8 in this example.
Evaluating and generating a classification model
evaluate and generate a classification model.
-
Double click the tNLPModel component to open its
Basic settings view and define its properties.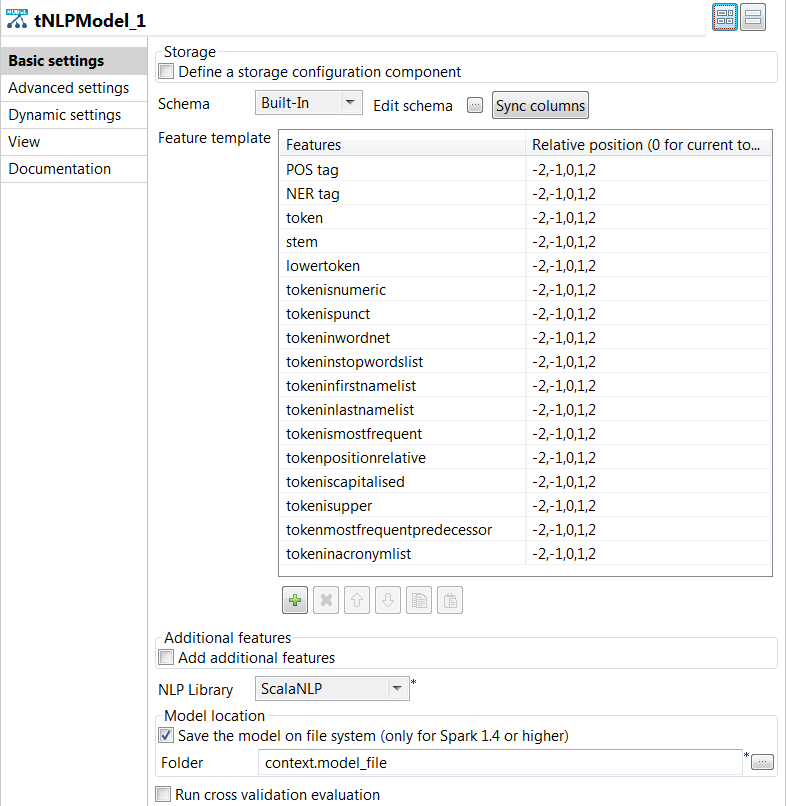
-
Click the [+] button under the
Feature template table to add rows to the
table. -
Click in the Features column to select the
features to be generated. -
For each feature, specify the relative position.
For example -2,-1,0,1,2 means that you use the
current token, the preceding two and the following two context
tokens as features. -
From the NLP Library list, select the same
library you used for preprocessing the training text data.
-
Click the [+] button under the
-
To evaluate the model, select the Run cross validation
evaluation check box and enter 2 in the
Fold field.This means the training data is partitioned into two pieces: the training
data set and the test data set. The validation process is repeated
twice. -
Press F6 to save and execute the
Job.
The results from the K-fold cross-validation process are displayed on the
Run view:-
Precisionis the ratio of correctly predicted named
entities to the total number of predicted named entities. -
Recallis the ratio of correctly predicted named
entities to the total number of named entities. -
F1 scoreis the harmonic mean between
recallandprecision.
-
-
Clear the Run cross validation evaluation check
box. -
Select the Save the model on file system check box to
save the model locally in the folder specified in the
Folder field. -
Press F6 to save and execute the
Job.
The model files are stored in the specified folder. You can now use the generated
model with the tNLPPredict component to predict named entities
and label text data automatically.