tNLPPreprocessing
Prepares a text sample and divides it into tokens, which can be words, numbers or
punctuation marks.
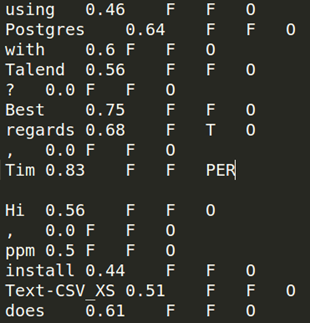
tNLPPreprocessing outputs a column containing all the tokens for the
input text, separated by tabs. You can convert the output to the CoNLL format and
manually annotate the text. Then, you can use it to train a model and design features
with the tNLPModel component.
This component can run only with Spark 1.6 and 2.0.
tNLPPreprocessing properties for Apache Spark Batch
These properties are used to configure tNLPPreprocessing
running in the Spark Batch Job framework.
The Spark Batch
tNLPPreprocessing component belongs to the Natural Language Processing family.
The component in this framework is available when you have subscribed to any Talend Platform product with Big Data or Talend Data
Fabric.
Basic settings
|
Schema and Edit Schema |
A schema is a row description. It defines the number of fields (columns) to Click Sync columns to retrieve the schema from Click Edit schema to make changes to the schema.
The output schema of this component contains a read-only column:
tokens: This column holds the tokens for each row |
|
|
Built-In: You create and store the |
|
|
Repository: You have already created |
|
NLP Library |
From this list, select the library for text preprocessing between |
|
Clean all HTML tags |
Select this check box to remove all the tags from the text. |
|
Column to preprocess |
Select the column from the input schema containing the text to be divided |
Usage
|
Usage rule |
This component is used as an intermediate step. This component, along with the Spark Batch component Palette it belongs to, appears only |
|
Spark Batch Connection |
You need to use the Spark Configuration tab in
the Run view to define the connection to a given Spark cluster for the whole Job. In addition, since the Job expects its dependent jar files for execution, you must specify the directory in the file system to which these jar files are transferred so that Spark can access these files:
This connection is effective on a per-Job basis. |
Natural Language Processing using Talend Studio
understand how humans learn and use natural language.
What is natural language
processing?
-
text tokenization, which divides a text into basic units such as words or
punctuation marks; -
sentence splitting, which divides the input into sentences, based on
ending characters, such as periods or question marks; and -
named entity recognition, which finds and classify person names, dates,
locations and organizations in a text.
-
extract person names or company names from textual resources;
-
group forum discussions together by topics;
-
find discussions where people are mentioned but don’t participate to the
discussion; or -
link entities.
Natural language processing can help you create links between user profiles
and mentions in the text, between persons and organizations, or between persons and any
other information that may be used for re-identification.
Workflow
based on historical data and mathematical heuristics, and the second phase applies
the model on text data. In Talend Studio, the first phase is
implemented by two Jobs:
-
the first one with the tNLPPreprocessing and the
tNormalize components; and -
the second one with the tNLPModel component.
While the second phase is implemented by a third Job with the
tNLPPredict component.

-
divides a text sample in tokens; and
-
cleans the text sample by removing all HTML tags.
Then, tNormalize converts tokens to the CoNLL format.
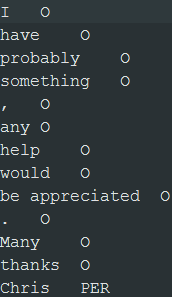
files. For example, you can label person names with
PER:
tNLPModel in the second Job where
tNLPModel:
-
generates fatures for each token; and
-
trains a classification model.
tNLPPredict labels text data automatically using the
classification model generated by tNLPModel.
<PER>labels:

Scenario: Preparing a text sample to be used for learning a model
This scenario applies only to a subscription-based Talend Platform solution with Big data or Talend Data Fabric.
This Job uses tNLPPreprocessing to divide the input text into tokens.
Then, the tokens are converted to the CoNLL format using tNormalize.
You will be able to use this CoNLL file to learn a classification model for extracting
named entities in text data.
-
Preparing a text sample by dividing it into tokens. The tokens will be used
for training a classification model. -
Learning a classification model, designing the features and evaluating the
model.You can find an example of how to generate a named
entity recognition model on Talend Help Center (https://help.talend.com). -
Applying the model on the full text to extract named entities using
tNLPPredict.You can find an example of how to extract named
entities using a classification model on Talend Help Center (https://help.talend.com).
You can find more information about natural language processing on
Talend Help Center (https://help.talend.com).
Creating a Job to divide the input text into tokens in CoNLL format
format into tokens. Then, tokens are converted to the CoNLL format using
tNormalize.
-
Drop the following components from the Palette onto the
design workspace: tXMLFileInput,
tNLPPreprocessing,
tFilterColumns, tNormalize and
tFileOutputDelimited. - Connect the components using Row > Main connections.

Selecting the Spark mode
-
Click Run to open its view and then click the
Spark Configuration tab to display its view
for configuring the Spark connection. -
Select the Use local mode check box to test your Job locally.
In the local mode, the Studio builds the Spark environment in itself on the fly in order to
run the Job in. Each processor of the local machine is used as a Spark
worker to perform the computations.In this mode, your local file system is used; therefore, deactivate the
configuration components such as tS3Configuration or
tHDFSConfiguration that provides connection
information to a remote file system, if you have placed these components
in your Job.You can launch
your Job without any further configuration. -
Clear the Use local mode check box to display the
list of the available Hadoop distributions and from this list, select
the distribution corresponding to your Spark cluster to be used.This distribution could be:If you cannot find the distribution corresponding to yours from this
drop-down list, this means the distribution you want to connect to is not officially
supported by
Talend
. In this situation, you can select Custom, then select the Spark
version of the cluster to be connected and click the
[+] button to display the dialog box in which you can
alternatively:-
Select Import from existing
version to import an officially supported distribution as base
and then add other required jar files which the base distribution does not
provide. -
Select Import from zip to
import the configuration zip for the custom distribution to be used. This zip
file should contain the libraries of the different Hadoop/Spark elements and the
index file of these libraries.In
Talend
Exchange, members of
Talend
community have shared some ready-for-use configuration zip files
which you can download from this Hadoop configuration
list and directly use them in your connection accordingly. However, because of
the ongoing evolution of the different Hadoop-related projects, you might not be
able to find the configuration zip corresponding to your distribution from this
list; then it is recommended to use the Import from
existing version option to take an existing distribution as base
to add the jars required by your distribution.Note that custom versions are not officially supported by
Talend
.
Talend
and its community provide you with the opportunity to connect to
custom versions from the Studio but cannot guarantee that the configuration of
whichever version you choose will be easy. As such, you should only attempt to
set up such a connection if you have sufficient Hadoop and Spark experience to
handle any issues on your own.
For a step-by-step example about how to connect to a custom
distribution and share this connection, see Connecting to a custom Hadoop distribution. -
Configuring the input component
processed.
-
Double click the tFileInputXML component to open its
Basic settings view and define its properties.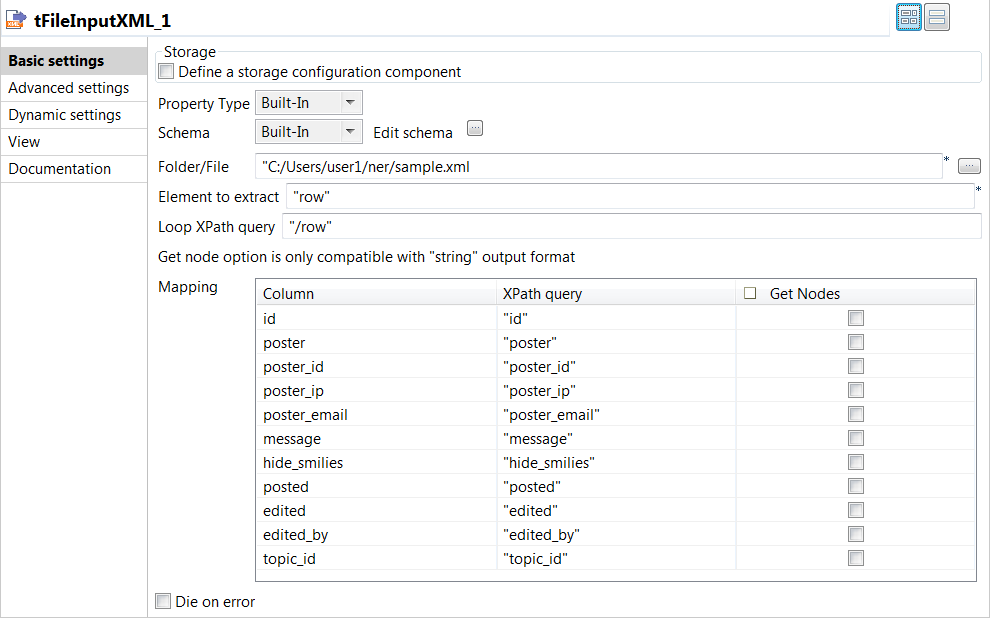
-
Click the […] button next to Edit
schema to add the necessary columns to hold the input
data. -
In the File name field, specify the path to the
file to be processed. -
In the Element to extract, enter
"row". -
In the Loop XPath query field, enter the XPath
query expression between double quotation marks to specify the node on
which the loop is based. -
In the XPath query column of the
Mapping table, specify the fields to be
queried between double quotation marks.
-
Click the […] button next to Edit
-
In the Advanced settings view of the
component, select the Custom encoding check box if you
encounter issues when processing the data.
-
From the Encoding list, select the encoding
to be used, UTF-8 in this example.
Converting the tokenized text to the CoNLL format
into tokens and convert it to the CoNLL format using
tNormalize.
-
Double click the tNLPPreprocessing component to open its
Basic settings view and define its properties.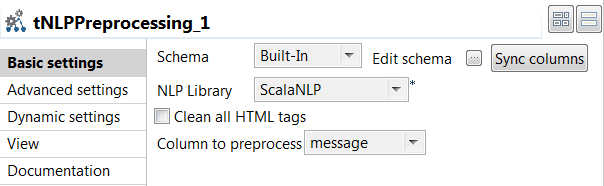
-
Click Sync columns to retrieve the
schema from the previous component connected in the Job.
-
From the NLP Library list, select the library to
be used for tokenization. In this example,
ScalaNLP is used.
-
-
From the Column to preprocess list, select the column
that holds the text to be divided into tokens, which is
message in this example. -
Double click the tFilterColumns component to open its
Basic settings view and define its properties. -
Click Edit schema to add the
tokens column in the output schema because this is
the column to be normalized, and click OK to
validate. -
Double click the tNormalize component to open its
Basic settings view and define its properties.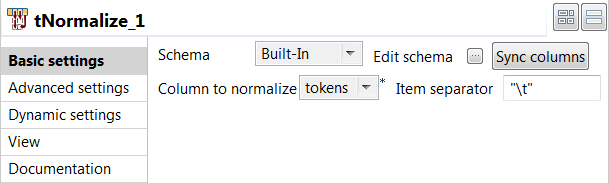
-
Click Sync columns to retrieve the
schema from the previous component connected in the Job.
-
From the Column to normalize list, select
tokens. -
In the Item separator field, enter
" " to separate tokens using a tab in the
output file.
-
-
Double click the tFileOutputDelimited component to open
its Basic settings view and define its properties.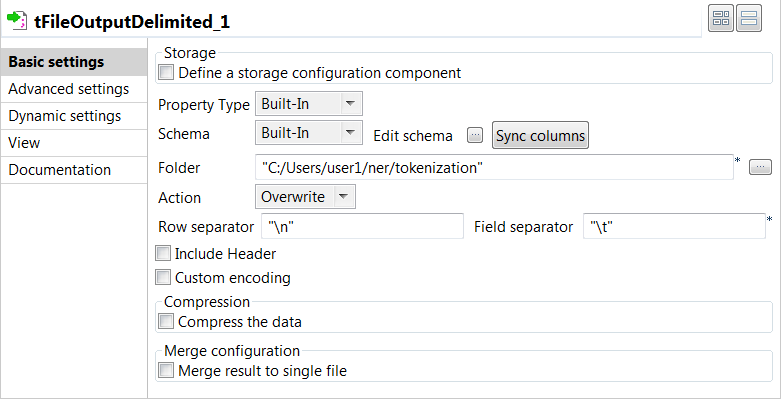
-
Click Sync columns to retrieve the
schema from the previous component connected in the Job.
-
In the Folder field, specify the path to the
folder where the CoNLL files will be stored. -
In the Row Separator field, enter
"
". -
In the Field Separator field, enter
" " to separate fields with a tab.
-
-
Press F6 to save and execute the
Job.
The output files are created in the specified folder. The files contain a single
column with one token per row.
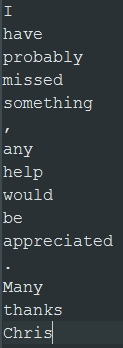
You can then manually label person names with PER and the
other tokens with O before you can learn a classification
model from this text data: