tNormalize
thus eases the data update.
Depending on the Talend solution you
are using, this component can be used in one, some or all of the following Job
frameworks:
-
Standard: see tNormalize Standard properties.
The component in this framework is generally available.
-
MapReduce: see tNormalize MapReduce properties.
The component in this framework is available only if you have subscribed to one
of the
Talend
solutions with Big Data. -
Spark Batch:
see tNormalize properties for Apache Spark Batch.The component in this framework is available only if you have subscribed to one
of the
Talend
solutions with Big Data. -
Spark Streaming:
see tNormalize properties for Apache Spark Streaming.The component in this framework is available only if you have subscribed to Talend Real-time Big Data Platform or Talend Data
Fabric.
tNormalize Standard properties
These properties are used to configure tNormalize running in the Standard Job framework.
The Standard
tNormalize component belongs to the Processing family.
The component in this framework is generally available.
Basic settings
|
Schema and Edit |
A schema is a row description. It defines the number of fields (columns) to Click Edit schema to make changes to the schema.
|
|
|
Built-In: You create and store the |
|
|
Repository: You have already created |
|
Column to normalize |
Select the column from the input flow which the normalization is |
|
Item separator |
Enter the separator which will delimit data in the input Note:
The item separator is based on regular expressions, so the |
Advanced settings
|
Get rid of duplicated rows from output |
Select this check box to deduplicate rows in the data of the |
|
Use CSV parameters |
Select this check box to include CSV specific parameters such as |
|
Discard the trailing empty strings |
Select this check box to discard the trailing empty |
| Trim resulting values |
Select this check box to trim leading and trailing whitespace from Note:
When both Discard the trailing empty |
|
tStatCatcher Statistics |
Select this check box to gather the Job processing metadata at the Job level as well as |
Global Variables
|
Global Variables |
ERROR_MESSAGE: the error message generated by the
NB_LINE: the number of rows read by an input component or A Flow variable functions during the execution of a component while an After variable To fill up a field or expression with a variable, press Ctrl + For further information about variables, see |
Usage
|
Usage rule |
This component can be used as intermediate step in a data |
|
Limitation |
Due to license incompatibility, one or more JARs required to use this component are not |
Scenario: Normalizing data
This simple scenario illustrates a Job that normalizes a list of tags for Web forum
topics, and displays the result in a table on the Run
console.
This list is not well organized and it contains trailing empty strings, leading and
trailing whitespace, and repeated tags, as shown below.
|
1 2 3 4 5 6 7 8 9 10 11 12 |
ldap, db2, jdbc driver, grid computing, talend architecture , content, environment,, tmap,, eclipse, database,java,postgresql, tmap, database,java,sybase, deployment,, repository, database,informix,java |
Setting up the Job
- Drop the following components from the Palette to the design workspace: tFileInputDelimited, tNormalize, tLogRow.
-
Connect the components using Row >
Main connections.
Configuring the components
-
Double-click the tFileInputDelimited
component to open its Basic settings
view.
-
In the File name field, specify the path
to the input file to be normalized. -
Click the […] button next to Edit schema to open the [Schema] dialog box, and set up the input schema by adding
one column named Tags. When done, click OK to validate your schema setup and close the
dialog box, leaving the rest of the settings as they are.
-
Double-click the tNormalize component to
open Basic settings view.
-
Check the schema, and if necessary, click Sync
columns to get the schema synchronized with the input
component. -
Define the column the normalization operation is based on.
In this use case, the input schema has only one column,
Tags, so just accept the default setting. -
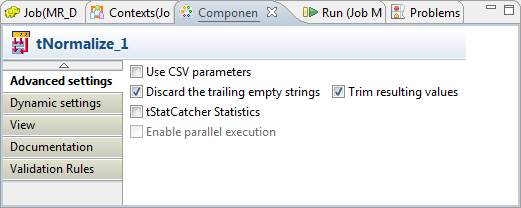
In the Advanced settings view, select the
Get rid of duplicate rows from output,
Discard the trailing empty strings, and
Trim resulting values check
boxes.
-
In the tLogRow component, select the
Print values in the cells of table
radio button.
Saving and executing the Job
- Press Ctrl+S to save your Job.
-
Click Run on the Run tab or press F6 to
execute the Job.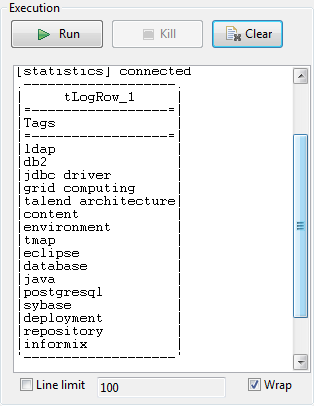 The list is tidied up, with duplicate tags, leading and trailing
whitespace and trailing empty strings removed, and the result is displayed
in a table cell on the console.
tNormalize MapReduce properties
These properties are used to configure tNormalize running in the MapReduce Job framework.
The MapReduce
tNormalize component belongs to the Processing family.
The component in this framework is available only if you have subscribed to one
of the
Talend
solutions with Big Data.
Basic settings
|
Schema and Edit |
A schema is a row description. It defines the number of fields (columns) to Click Edit schema to make changes to the schema.
|
|
|
Built-In: You create and store the |
|
|
Repository: You have already created |
|
Column to normalize |
Select the column from the input flow which the normalization is |
|
Item separator |
Enter the separator which will delimit data in the input Note:
The item separator is based on regular expressions, so the |
Advanced settings
|
Use CSV parameters |
Select this check box to include CSV specific parameters such as |
|
Discard the trailing empty strings |
Select this check box to discard the trailing empty |
| Trim resulting values |
Select this check box to trim leading and trailing whitespace from Note:
When both Discard the trailing empty |
Global Variables
|
Global Variables |
ERROR_MESSAGE: the error message generated by the A Flow variable functions during the execution of a component while an After variable To fill up a field or expression with a variable, press Ctrl + For further information about variables, see |
Usage
|
Usage rule |
In a For further information about a For scenario demonstrating a Map/Reduce Job using this component, Note that in this documentation, unless otherwise |
Scenario: Normalizing data using Map/Reduce components
This scenario applies only to a subscription-based Talend solution with Big data.
You can produce the Map/Reduce version of the Job described earlier using Map/Reduce
components. This
Talend
Map/Reduce Job generates Map/Reduce code and is run
natively in Hadoop.

Note that the
Talend
Map/Reduce components are available to
subscription-based Big Data users only and this scenario can be replicated only with
Map/Reduce components.
The sample data used in this scenario is the same as in the scenario explained
earlier.
|
1 2 3 4 5 6 7 8 9 10 11 12 |
ldap, db2, jdbc driver, grid computing, talend architecture , content, environment,, tmap,, eclipse, database,java,postgresql, tmap, database,java,sybase, deployment,, repository, database,informix,java |
Since
Talend Studio
allows you to convert a Job between its
Map/Reduce and Standard (Non Map/Reduce) versions, you can convert the scenario
explained earlier to create this Map/Reduce Job. This way, many components used can keep
their original settings so as to reduce your workload in designing this Job.
Before starting to replicate this scenario, ensure that you have appropriate rights
and permissions to access the Hadoop distribution to be used. Then proceed as
follows:
Converting the Job
-
In the Repository tree view of the
Integration
perspective of
Talend Studio
,
right-click the Job you have created in the earlier scenario to open its
contextual menu and select Edit
properties.Then the [Edit properties] dialog box is
displayed. Note that the Job must be closed before you are able to make any
changes in this dialog box.This dialog box looks like the image below:
 Note that you can change the Job name as well as the other descriptive
information about the Job from this dialog box. -
From the Job Type list, select Big Data Batch. Then a Map/Reduce Job using the same
name appears under the Big Data Batch sub-node
of the Job Design node.
Rearranging the components
-
Double-click this new Map/Reduce Job to open it in the workspace. The
Map/Reduce components’ Palette is opened
accordingly and in the workspace, the crossed-out components, if any,
indicate that those components do not have the Map/Reduce version. - Right-click each of those components in question and select Delete to remove them from the workspace.
-
Drop a tHDFSInput component and a
tHDFSOutput component in the workspace.
The tHDFSInput component reads data from
the Hadoop distribution to be used, the tHDFSOutput component, replacing tLogRow, writes data in that distribution.If from scratch, you have to drop a tNormalize component, too. -
Connect tHDFSInput to tNormalize using the Row >
Main link and accept to get the schema of tNormalize. -
Connect as well tNormalize to tHDFSOutput using Row >
Main link.
Setting up Hadoop connection
-
Click Run to open its view and then click the
Hadoop Configuration tab to display its
view for configuring the Hadoop connection for this Job. -
From the Property type list,
select Built-in. If you have created the
connection to be used in Repository, then
select Repository and thus the Studio will
reuse that set of connection information for this Job. -
In the Version area, select the
Hadoop distribution to be used and its version.If you cannot find from the list the distribution corresponding to yours,
select Custom so as to connect to a
Hadoop distribution not officially supported in the Studio. For a
step-by-step example about how to use this Custom option, see Connecting to a custom Hadoop distribution.If you use Google Cloud Dataproc, see Defining the Dataproc connection parameters for MapReduce Jobs.
Along with the evolution of Hadoop, please note the following changes:-
If you use Hortonworks Data
Platform V2.2, the configuration files of your
cluster might be using environment variables such as ${hdp.version}. If this is your situation,
you need to set the mapreduce.application.framework.path property in the
Hadoop properties table
with the path value explicitly pointing to the MapReduce
framework archive of your cluster. For
example:1mapreduce.application.framework.path=/hdp/apps/2.2.0.0-2041/mapreduce/mapreduce.tar.gz#mr-framework -
If you use Hortonworks Data
Platform V2.0.0, the type of the operating
system for running the distribution and a
Talend
Job must be the same, such as Windows or Linux.
Otherwise, you have to use
Talend
Jobserver to execute the Job in the same type of
operating system in which the Hortonworks Data Platform V2.0.0 distribution
you are using is run.
-
-
In the Name node field, enter the location of
the master node, the NameNode, of the distribution to be used. For example,
hdfs://tal-qa113.talend.lan:8020.-
If you are using a MapR distribution, you can simply leave maprfs:/// as it is in this field; then the MapR
client will take care of the rest on the fly for creating the connection. The
MapR client must be properly installed. For further information about how to set
up a MapR client, see the following link in MapR’s documentation: http://doc.mapr.com/display/MapR/Setting+Up+the+Client -
If you are using WebHDFS, the location should be
webhdfs://masternode:portnumber; if this WebHDFS is secured
with SSL, the scheme should be swebhdfs and you need to use
a tLibraryLoad in the Job to load the library required by
the secured WebHDFS.
-
-
In the Resource Manager field,
enter the location of the ResourceManager of your distribution. For example,
tal-qa114.talend.lan:8050.-
Then you can continue to set the following parameters depending on the
configuration of the Hadoop cluster to be used (if you leave the check
box of a parameter clear, then at runtime, the configuration about this
parameter in the Hadoop cluster to be used will be ignored):-
Select the Set resourcemanager
scheduler address check box and enter the Scheduler address in
the field that appears. -
Select the Set jobhistory
address check box and enter the location of the JobHistory
server of the Hadoop cluster to be used. This allows the metrics information of
the current Job to be stored in that JobHistory server. -
Select the Set staging
directory check box and enter this directory defined in your
Hadoop cluster for temporary files created by running programs. Typically, this
directory can be found under the yarn.app.mapreduce.am.staging-dir property in the configuration files
such as yarn-site.xml or mapred-site.xml of your distribution. -
Select the Use datanode
hostname check box to allow the Job to access datanodes via
their hostnames. This actually sets the dfs.client.use.datanode.hostname property to true. When connecting to a S3N filesystem, you must select this check
box.
-
-
-
If you are accessing the Hadoop cluster running
with Kerberos security, select this check box, then, enter the Kerberos
principal name for the NameNode in the field displayed. This enables you to use
your user name to authenticate against the credentials stored in Kerberos.
-
If this cluster is a MapR cluster of the version 4.0.1 or later, you can set the MapR
ticket authentication configuration in addition or as an alternative by following the
explanation in Connecting to a security-enabled MapR.Keep in mind that this configuration generates a new MapR security ticket for the username
defined in the Job in each execution. If you need to reuse an existing ticket issued for the
same username, leave both the Force MapR ticket
authentication check box and the Use Kerberos
authentication check box clear, and then MapR should be able to automatically
find that ticket on the fly.
In addition, since this component performs Map/Reduce computations, you
also need to authenticate the related services such as the Job history server and
the Resource manager or Jobtracker depending on your distribution in the
corresponding field. These principals can be found in the configuration files of
your distribution. For example, in a CDH4 distribution, the Resource manager
principal is set in the yarn-site.xml file and the Job history
principal in the mapred-site.xml file.If you need to use a Kerberos keytab file to log in, select Use a keytab to authenticate. A keytab file contains
pairs of Kerberos principals and encrypted keys. You need to enter the principal to
be used in the Principal field and the access
path to the keytab file itself in the Keytab
field. This keytab file must be stored in the machine in which your Job actually
runs, for example, on a Talend
Jobserver.Note that the user that executes a keytab-enabled Job is not necessarily
the one a principal designates but must have the right to read the keytab file being
used. For example, the user name you are using to execute a Job is user1 and the principal to be used is guest; in this
situation, ensure that user1 has the right to read the keytab
file to be used. -
-
In the User name field, enter the login user
name for your distribution. If you leave it empty, the user name of the machine
hosting the Studio will be used. -
In the Temp folder field, enter the path in
HDFS to the folder where you store the temporary files generated during
Map/Reduce computations. -
Leave the default value of the Path separator in
server as it is, unless you have changed the separator used by your
Hadoop distribution’s host machine for its PATH variable or in other words, that
separator is not a colon (:). In that situation, you must change this value to the
one you are using in that host.
-
Leave the Clear temporary folder check box
selected, unless you want to keep those temporary files. -
Leave the Compress intermediate map output to reduce
network traffic check box selected, so as to spend shorter time
to transfer the mapper task partitions to the multiple reducers.However, if the data transfer in the Job is negligible, it is recommended to
clear this check box to deactivate the compression step, because this
compression consumes extra CPU resources. -
If you need to use custom Hadoop properties, complete the Hadoop properties table with the property or
properties to be customized. Then at runtime, these changes will override the
corresponding default properties used by the Studio for its Hadoop
engine.For further information about the properties required by Hadoop, see Apache’s
Hadoop documentation on http://hadoop.apache.org, or
the documentation of the Hadoop distribution you need to use. -
If the HDFS transparent encryption has been enabled in your cluster, select
the Setup HDFS encryption configurations check
box and in the HDFS encryption key provider field
that is displayed, enter the location of the KMS proxy.
For further information about the HDFS transparent encryption and its KMS proxy, see Transparent Encryption in HDFS.
-
If the Hadoop distribution to be used is Hortonworks Data Platform V1.2 or Hortonworks
Data Platform V1.3, you need to set proper memory allocations for the map and reduce
computations to be performed by the Hadoop system.
In that situation, you need to enter the values you need in the Mapred
job map memory mb and the Mapred job reduce memory
mb fields, respectively. By default, the values are both 1000 which are normally appropriate for running the
computations.If the distribution is YARN, then the memory parameters to be set become Map (in Mb), Reduce (in Mb) and
ApplicationMaster (in Mb), accordingly. These fields
allow you to dynamically allocate memory to the map and the reduce computations and the
ApplicationMaster of YARN.For further information about the Resource Manager, its scheduler and the
ApplicationMaster, see YARN’s documentation such as http://hortonworks.com/blog/apache-hadoop-yarn-concepts-and-applications/.For further information about how to determine YARN and MapReduce memory configuration
settings, see the documentation of the distribution you are using, such as the following
link provided by Hortonworks: http://docs.hortonworks.com/HDPDocuments/HDP2/HDP-2.0.6.0/bk_installing_manually_book/content/rpm-chap1-11.html. -
If you are using Cloudera V5.5+, you can select the Use Cloudera Navigator check box to enable the Cloudera Navigator of your
distribution to trace your Job lineage to the component level, including the schema
changes between components.
With this option activated, you need to set the following parameters:
-
Username and Password: this is the credentials you use to connect to your Cloudera
Navigator. -
Cloudera Navigator URL : enter the location
of the Cloudera Navigator to be connected to. -
Cloudera Navigator Metadata URL: enter the
location of the Navigator Metadata. -
Activate the autocommit option: select this
check box to make Cloudera Navigator generate the lineage of the current Job at the end
of the execution of this Job.Since this option actually forces Cloudera Navigator to generate lineages of
all its available entities such as HDFS files and directories, Hive queries or Pig
scripts, it is not recommended for the production environment because it will slow the
Job. -
Kill the job if Cloudera Navigator fails: select this check
box to stop the execution of the Job when the connection to your Cloudera Navigator fails.Otherwise, leave it clear to allow your Job to continue to run.
-
Disable SSL validation: select this check box to
make your Job to connect to Cloudera Navigator without the SSL validation
process.This feature is meant to facilitate the test of your Job but is not
recommended to be used in a production cluster.
-
-
If you are using Hortonworks Data Platform V2.4.0 onwards and you have
installed Atlas in your cluster, you can select the Use
Atlas check box to enable Job lineage to the component level, including the
schema changes between components.
With this option activated, you need to set the following parameters:
-
Atlas URL : enter the location of the Atlas
to be connected to. It is often http://name_of_your_atlas_node:port -
Die on error: select this check box to stop the Job
execution when Atlas-related issues occur, such as connection issues to Atlas.Otherwise, leave it clear to allow your Job to continue to run.
In the Username field and the Password field, enter the authentication information for access
to Atlas. -
Configuring input and output components
Configuring tHDFSInput
-
Double-click tHDFSInput to open its
Component view.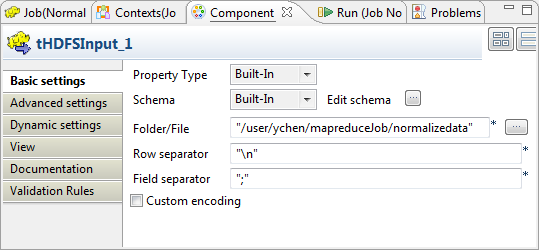
-
Click the

button next to Edit
schema to verify that the schema received in the earlier
steps is properly defined.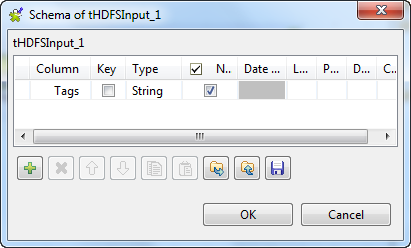 Note that if you are creating this Job from scratch, you need to click the
button to manually define the schema; otherwise, if the
schema has been defined in Repository, you
can select the Repository option from the
Schema list in the Basic settings view to reuse it. For further
information about how to define a schema in Repository, see the chapter describing metadata management
in the
Talend Studio User Guide or the chapter describing the
Hadoop cluster node in Repository of
Talend Open Studio for Big Data Getting Started
Guide
. -
If you make changes in the schema, click OK to validate these changes and accept the propagation
prompted by the pop-up dialog box. -
In the Folder/File field, enter the path,
or browse to the source file you need the Job to read.If this file is not in the HDFS system to be used, you have to place it in
that HDFS, for example, using tFileInputDelimited and tHDFSOutput in a Standard
Job.
Reviewing the transformation component
Component view.
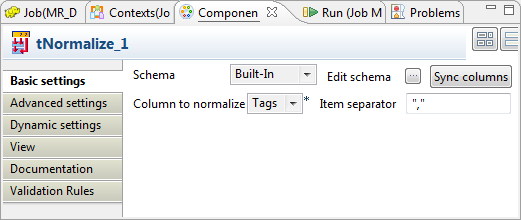
settings and Advanced
settings used by the original Job. It normalizes the
Tags column of the input flow.
Configuring tHDFSOutput
-
Double-click tHDFSOutput to open its
Component view.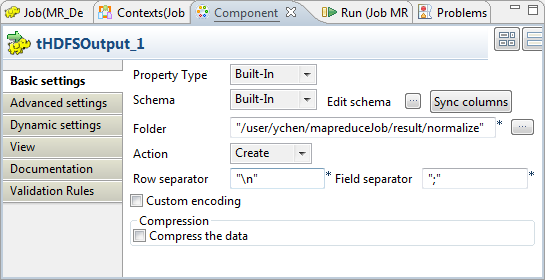
-
As explained earlier for verifying the schema of tHDFSInput, do the same to verify the schema of tHDFSOutput. If it is not consistent with that of
its preceding component, tNormalize, click
Sync column to retrieve the schema of
tNormalize.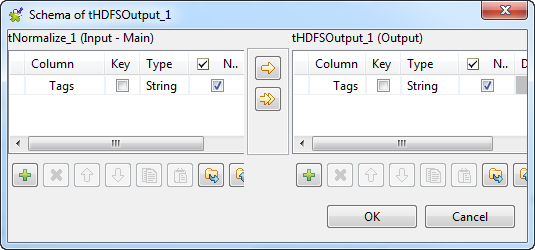
-
In the Folder field, enter the path, or
browse to the folder you want to write data in. -
From the Action list, select the
operation you need to perform on the folder in question. If the folder
already exists, select Overwrite;
otherwise, select Create.
Executing the Job
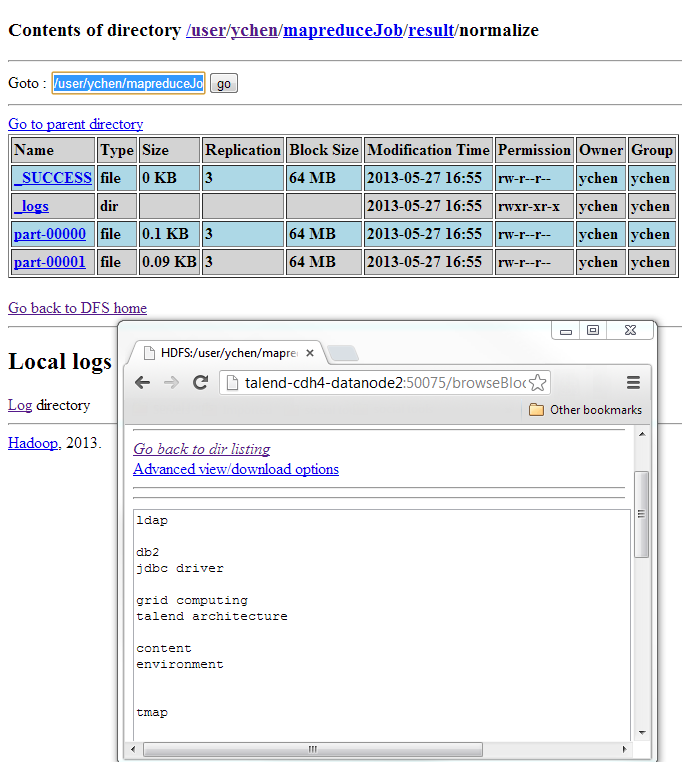
Then you can press F6 to run this Job.
Once done, view the execution results in the web console of HDFS.
If you need to obtain more details about the Job, it is recommended to use the web
console of the Jobtracker provided by the Hadoop distribution you are using.
tNormalize properties for Apache Spark Batch
These properties are used to configure tNormalize running in the Spark Batch Job framework.
The Spark Batch
tNormalize component belongs to the Processing family.
The component in this framework is available only if you have subscribed to one
of the
Talend
solutions with Big Data.
Basic settings
|
Schema and Edit |
A schema is a row description. It defines the number of fields (columns) to Click Edit schema to make changes to the schema.
|
|
|
Built-In: You create and store the |
|
|
Repository: You have already created |
|
Column to normalize |
Select the column from the input flow which the normalization is |
|
Item separator |
Enter the separator which will delimit data in the input Note:
The item separator is based on regular expressions, so the |
Advanced settings
|
Use CSV parameters |
Select this check box to include CSV specific parameters such as |
|
Discard the trailing empty strings |
Select this check box to discard the trailing empty |
| Trim resulting values |
Select this check box to trim leading and trailing whitespace from Note:
When both Discard the trailing empty |
Usage
|
Usage rule |
This component is used as an intermediate step. This component, along with the Spark Batch component Palette it belongs to, appears only Note that in this documentation, unless otherwise |
|
Spark Connection |
You need to use the Spark Configuration tab in
the Run view to define the connection to a given Spark cluster for the whole Job. In addition, since the Job expects its dependent jar files for execution, you must specify the directory in the file system to which these jar files are transferred so that Spark can access these files:
This connection is effective on a per-Job basis. |
Related scenarios
No scenario is available for the Spark Batch version of this component
yet.
tNormalize properties for Apache Spark Streaming
These properties are used to configure tNormalize running in the Spark Streaming Job framework.
The Spark Streaming
tNormalize component belongs to the Processing family.
The component in this framework is available only if you have subscribed to Talend Real-time Big Data Platform or Talend Data
Fabric.
Basic settings
|
Schema and Edit |
A schema is a row description. It defines the number of fields (columns) to Click Edit schema to make changes to the schema.
|
|
|
Built-In: You create and store the |
|
|
Repository: You have already created |
|
Column to normalize |
Select the column from the input flow which the normalization is |
|
Item separator |
Enter the separator which will delimit data in the input Note:
The item separator is based on regular expressions, so the |
Advanced settings
|
Use CSV parameters |
Select this check box to include CSV specific parameters such as |
|
Discard the trailing empty strings |
Select this check box to discard the trailing empty |
| Trim resulting values |
Select this check box to trim leading and trailing whitespace from Note:
When both Discard the trailing empty |
Usage
|
Usage rule |
This component is used as an intermediate step. This component, along with the Spark Streaming component Palette it belongs to, appears Note that in this documentation, unless otherwise explicitly stated, a scenario presents |
|
Spark Connection |
You need to use the Spark Configuration tab in
the Run view to define the connection to a given Spark cluster for the whole Job. In addition, since the Job expects its dependent jar files for execution, you must specify the directory in the file system to which these jar files are transferred so that Spark can access these files:
This connection is effective on a per-Job basis. |
Related scenarios
No scenario is available for the Spark Streaming version of this component
yet.