tPigMap
Transforms and routes data from single or multiple sources to single or multiple
destinations.
The tPigMap transforms and routes the
data in a Pig process. It provides a graphic interface that enables sophisticated
configuration of multiple data flows.
Optional map settings
|
Lookup properties |
Value |
||
|---|---|---|---|
|
Join Model |
Inner Join; Left Outer Join; Right Outer Join; Full Outer Join. The default join option is Left Outer When more than one lookup tables need joining, the main input |
||
|
Join Optimization |
None; Replicated; Skewed; Merge. The default join option is None when you do not activate this option Each of these options is subject to the constraints explained |
||
|
Custom Partitioner |
Enter the Hadoop partitioner you need to use to control the
partitioning of the keys of the intermediate map-outputs. For example, enter, in double quotation marks,
to use the partitioner SimpleCustomPartitioner. For further information about the code of this SimpleCustomPartitioner, see |
||
|
Increase Parallelism |
Enter the number of reduce tasks. For further information |
|
Output properties |
Value |
|---|---|
|
Catch Output Reject |
True; False. This option, once activated, allows you to catch the records |
|
Catch Lookup Inner Join |
True; False. This option, once activated, allows you to catch the records |
tPigMap Standard properties
These properties are used to configure tPigMap running in the Standard Job framework.
The Standard
tPigMap component belongs to the Big Data and the Processing families.
The component in this framework is available when you are using one of the Talend solutions with Big Data.
Basic settings
|
Mapping links display as |
Auto: the default setting is
Curves: the mapping display as
Lines: the mapping displays as |
|
Map editor |
It allows you to define the tPigMap routing and transformation |
Advanced settings
|
tStatCatcher Statistics |
Select this check box to collect log data at the component level. |
Global Variables
|
Global Variables |
ERROR_MESSAGE: the error message generated by the A Flow variable functions during the execution of a component while an After variable To fill up a field or expression with a variable, press Ctrl + For further information about variables, see |
Usage
|
Usage rule |
Possible uses are from a simple reorganization of fields to the |
|
Limitation |
The use of tPigMap supposes This component is a junction step, and for this reason cannot be |
Scenario: Joining data about road conditions in a Pig process
This scenario applies only to a Talend solution with Big Data.
The Job in this scenario uses two tPigLoad components
to read data about the traffic conditions and the related events on given roads from a
given Hadoop distribution, joins and filters the data using tPigMap, and writes the results into that Hadoop distribution using
two tPigStoreResult.

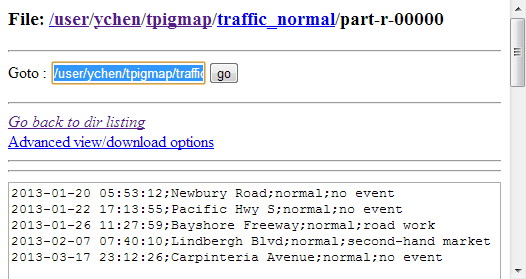
The Hadoop distribution to be used is keeping the data about traffic situation such as
normal or jam and the data about the traffic-related events such as road work, rain and
even no event. In this example, the data to be used reads as follows:
-
The traffic situation data stored in the directory /user/ychen/tpigmap/date&traffic:
123456789102013-01-11 00:27:53;Bayshore Freeway;jam2013-02-28 07:01:18;Carpinteria Avenue;jam2013-01-26 11:27:59;Bayshore Freeway;normal2013-03-07 20:48:51;South Highway;jam2013-02-07 07:40:10;Lindbergh Blvd;normal2013-01-22 17:13:55;Pacific Hwy S;normal2013-03-17 23:12:26;Carpinteria Avenue;normal2013-01-15 08:06:53;San Diego Freeway;jam2013-03-19 15:18:28;Monroe Street;jam2013-01-20 05:53:12;Newbury Road;normal -
The event data stored in the directory /user/ychen/tpigmap/date&event:
123456789102013-01-11 00:27:53;Bayshore Freeway;road work2013-02-28 07:01:18;Carpinteria Avenue;rain2013-01-26 11:27:59;Bayshore Freeway;road work2013-03-07 20:48:51;South Highway;no event2013-02-07 07:40:10;Lindbergh Blvd;second-hand market2013-01-22 17:13:55;Pacific Hwy S;no event2013-03-17 23:12:26;Carpinteria Avenue;no event2013-01-15 08:06:53;San Diego Freeway;second-hand market2013-03-19 15:18:28;Monroe Street;road work2013-01-20 05:53:12;Newbury Road;no event
For any given moment shown in the timestamps in the data, one row is logged to reflect
the traffic situation and another row to reflect the traffic-related event. You need to
join the data into one table in order to easily detect how the events on a given road
are impacting the traffic.
The data used in this example is a sample with limited size.
To replicate this scenario, ensure that the Studio to be used has the appropriate
right to read and write data in that Hadoop distribution and then proceed as
follows:
Linking the components
-
In the
Integration
perspective
of
Talend Studio
,
create an empty Job, named pigweather for
example, from the Job Designs node in the
Repository tree view.For further information about how to create a Job, see the
Talend Studio
User Guide. -
Drop two tPigLoad components, tPigMap and two tPigStoreResult onto the workspace.
The components can be labelled if needs be. In this scenario, we label the
two tPigLoad components as traffic and event, respectively, which load accordingly the traffic data
and the related event data. Then we label the two tPigStoreResult components as normal and jam,
respectively, which write accordingly the results to the Hadoop distribution
to be used. For further information about how to label a component, see the
Talend Studio
User Guide. -
Right-click the tPigLoad component
labeled traffic to connect it to
tPigMap using the Row > Pig combine link from the contextual menu. -
Repeat this operation to link the tPigLoad component labeled event to tPigMap, too. As
this is the second link created, it becomes automatically the lookup
link. -
Use the Row > Pig combine link again to
connect tPigMap to each of the two
tPigStoreResult components.You need to name these links in the dialog box popped up once you select
the link type from the contextual menu. In this scenario, we name the link
to tPigStoreResult labeled normal as out and the link to tPigStoreResult labeled jam as reject.
Configuring tPigLoad
Loading the traffic data
-
Double-click the tPigLoad labeled
traffic to open its Component view.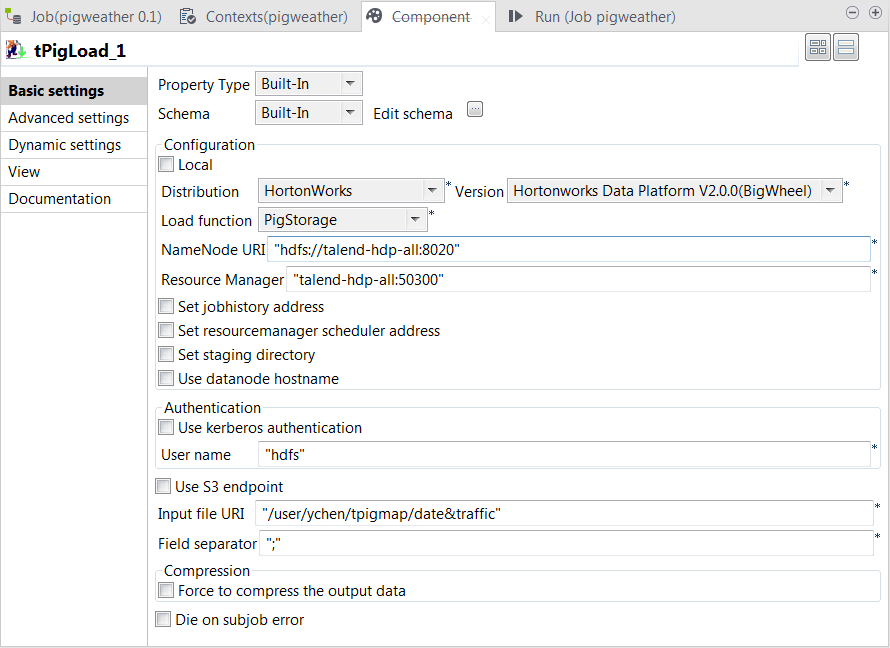
-
Click the

button next to Edit
schema to open the schema editor. -
Click the

button three times to add three rows and in the
Column column, rename them as date, street
and traffic, respectively.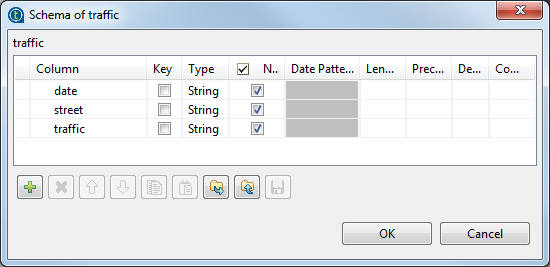
-
Click OK to validate these
changes. -
In the Mode area, select the Map/Reduce option, as we need the Studio to
connect to a remote Hadoop distribution. -
In the Distribution list and the
Version field, select the Hadoop
distribution to be used. In this example, it is Hortonworks Data Platform V1.0.0. -
In the Load function list, select the
PigStorage function to read the source
data, as the data is a structured file in human-readable UTF-8
format. -
In the NameNode URI and the
Resource Manager fields, enter the
locations of the master node and the Resource Manager of the Hadoop distribution to
be used, respectively. If you are using WebHDFS, the location should be
webhdfs://masternode:portnumber; if this WebHDFS is secured
with SSL, the scheme should be swebhdfs and you need to use
a tLibraryLoad in the Job to load the library required by
the secured WebHDFS. -
In the Input file URI field, enter the
directory where the data about the traffic situation is stored. As explained
earlier, the directory in this example is /user/ychen/tpigmap/date&traffic. -
In the Field separator field, enter
; depending on the separator used by
the source data.
Loading the event data
-
Double-click the tPigLoad labeled
event to open its Component view.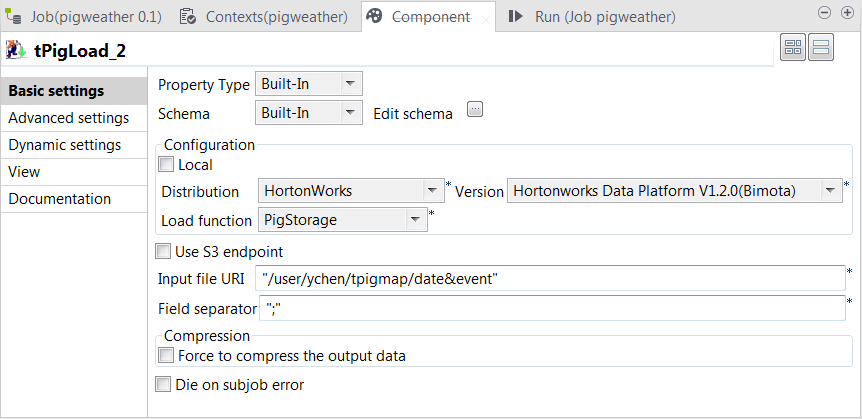
-
Click the
button next to Edit
schema to open the schema editor. -
Click the
button three times to add three rows and in the
Column column, rename them as date, street
and event, respectively.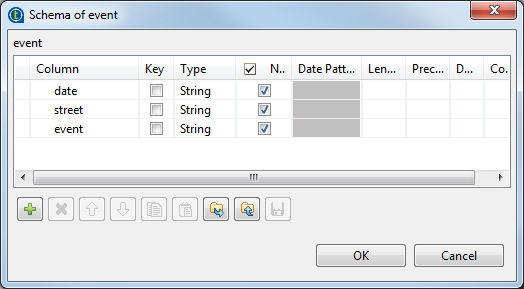
-
Click OK to validate these
changes. -
In the Mode area, select Map/Reduce.
As you have configured the connection to the given Hadoop distribution in
that first tPigLoad component, traffic, this event component reuses that connection and therefore, the
corresponding options in the Distribution
and the Version lists have been
automatically selected. -
In the Load function field, select the
PigStorage function to read the source
data. -
In the Input file URI field, enter the
directory where the event data is stored. As explained earlier, the
directory in this example is “/user/ychen/tpigmap/date&event”.
Configuring tPigMap
-
Double-click tPigMap to open its
Map Editor view.
Creating the output schema
-
On the input side (left side) of the Map
Editor, each of the two tables represents one of the input
flow, the upper one for the main flow and the lower one for the lookup
flow.On the output side (right side), the two tables represent the output flows
that you named as out1 and reject earlier.From the main flow table, drop its three columns onto each of the output
flow table. -
From the lookup flow, drop the event
column onto each of the output flow table.Then from the Schema editor view, you can
see the schemas of the both sides have been completed and as well, click
each table to display its schema in this view.
Setting the mapping conditions
-
On the lookup flow table, click the

button to open the setting panel in this table.
-
In the Join Model row, select Left Outer Join to ensure that every record of
the main flow is included in this join. -
On the out1 output flow table, click
the
button to display the editing field for the filter
expression. -
Enter
'normal'== row1.traffic
This allows tPigMap to output only the
traffic records reading normal in the
out1 flow. -
On the reject output flow table, click
thebutton to open the setting panel.
-
In the Catch Output Reject row, select
true to output the traffic records
reading jam in the reject flow. -
Click Apply, then click OK to validate these changes and accept the
propagation prompted by the pop-up dialog box.
Configuring tPigStoreResult
-
Double-click the tPigStoreResult labeled
normal to open its Component view.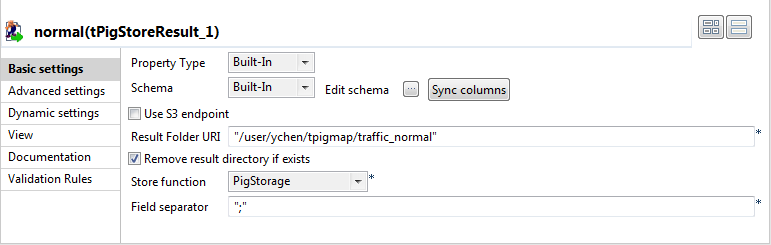
-
In the Result file field, enter the
directory you need to write the result in. In this scenario, it is /user/ychen/tpigmap/traffic_normal, which
receives the records reading normal. -
Select Remove result directory if exists
check box. -
In the Store function list, select
PigStorage to write the records in
human-readable UTF-8 format. -
In the Field separator field, enter
;. - Repeat the same operations to configure the tPigStoreResult labeled jam, but set the directory, in the Result file field, as /user/ychen/tpigmap/traffic_jam.
If either of the components does not retrieve its schema from tPigMap, a warning icon appears. In this case, click
the Sync columns button to retrieve the schema
from the preceding one and once done, the warning icon disappears.
Executing the Job
Then you can press F6 to run this Job.
Once done, verify the results in the Hadoop distribution used.
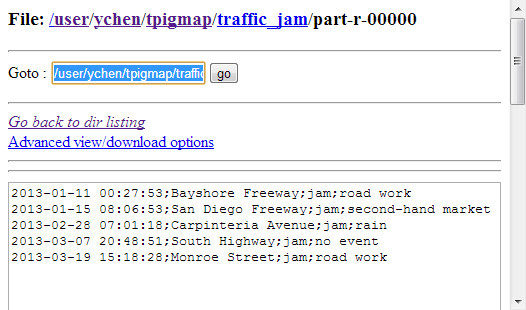
From the traffic_jam records, you can analyze
what event is often going on in the meantime of a traffic jam and from the traffic_normal records, how the smooth traffic
situation is maintained.
If you need to obtain more details about the Job, it is recommended to use the web
console of the Jobtracker provided by the Hadoop distribution you are using.
In JobHistory, you can easily find the execution status of your Pig Job because the name of
the Job is automatically created by concatenating the name of the project that contains the
Job, the name and version of the Job itself and the label of the first tPigLoad component used in it. The naming convention of a Pig Job in JobHistory
is ProjectName_JobNameVersion_FirstComponentName.