Tracking data insertion changes and writing the changes into a SCD dimension
table
-
Double-click the first tJDBCSCDELT component to open its
Basic settings view.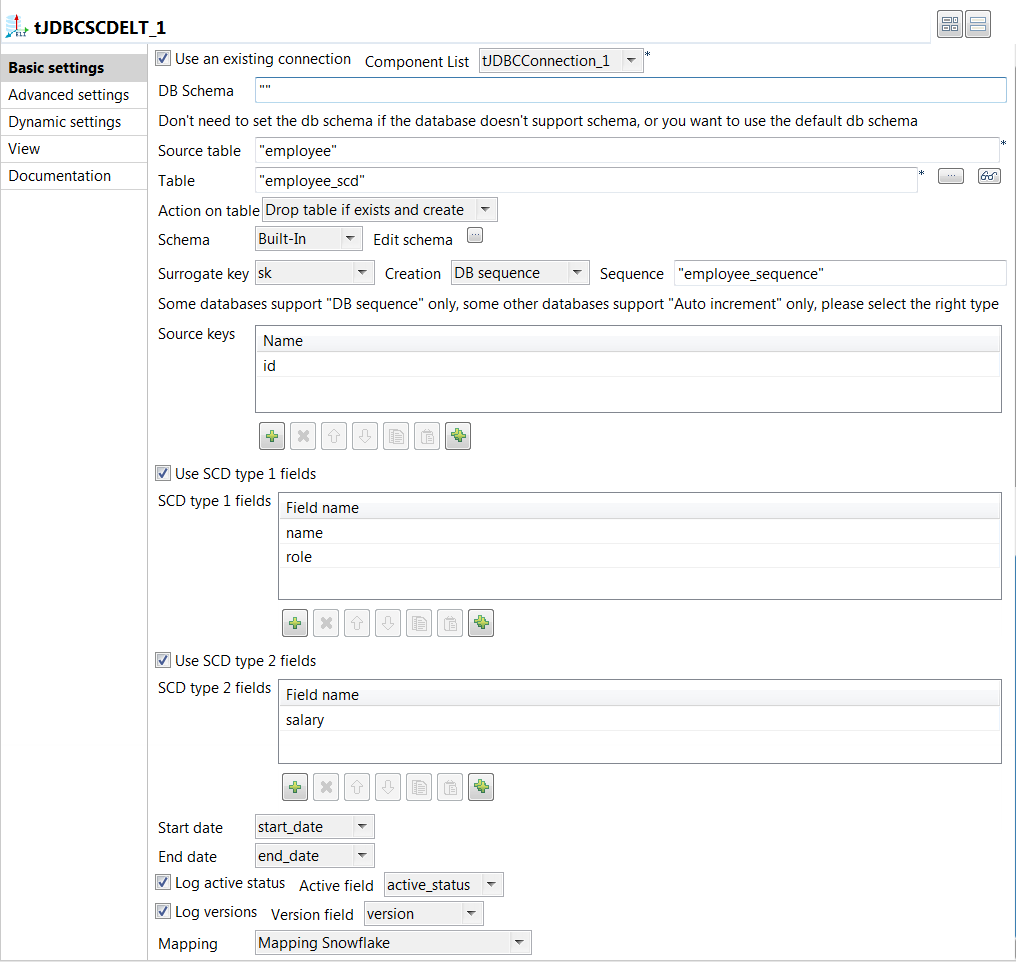
-
Select the Use an existing connection check box and from
the Component List drop-down list displayed, select the
connection component to reuse the connection created by it,
tJDBCConnection_1 in this example. -
In the Source table field, enter the name of the table
whose data changes will be captured, employee in this
example. -
In the Table field, enter the name of the SCD dimension
table that will store both the current and historical employee data,
employee_scd in this example. -
Select Drop table if exists and create from the
Action on table drop-down list to create the SCD
dimension table. -
Click the […] button next to Edit
schema and in the pop-up dialog box, define the schema by adding
nine columns: sk and id of Integer
type as the primary key, name and
role of String type, salary of
Double type, start_date and
end_date of Date type with the Date Pattern
yyyy-MM-dd, and active_status
and version of Integer type. When done, click
OK to save the changes and close the dialog
box.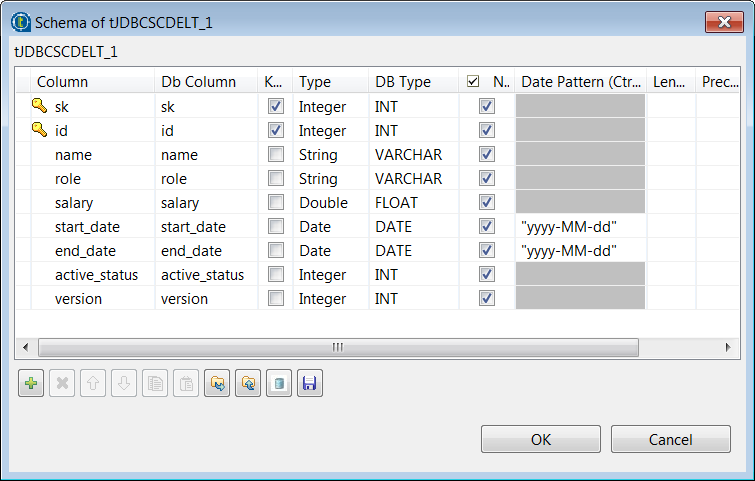
-
From the Surrogate key drop-down list, select the name
of the column that will be used as the primary key of the SCD dimension table,
sk in this example. -
Select DB sequence from the
Creation drop-down list and in the
Sequence field displayed, enter the name of the
Snowflake sequence used to generate the surrogate key for the SCD Type 2
method. -
Click the [+] button below the Source
keys table to add a new line, and click the
Name cell and select the key column of the source
table from the drop-down list, id in this example. -
Select the Use SCD type 1 fields check box, click the
[+] button below the SCD type 1
fields table twice to add two lines. Then click each cell and
from the drop-down list, select the column on which the SCD Type 1 method will
be performed. In this example, they are name and
role. -
Select the Use SCD type 2 fields check box, click the
[+] button below the SCD type 2
fields table to add a line. Then click the cell and select the
column on which the SCD Type 2 method will be performed. In this example, it is
salary. -
From the Start date and End date
drop-down lists, select the columns used to hold the start date and end date
values for the SCD Type 2 method respectively, start_date
and end_date in this example. -
Select the Log active status check box and from the
Active field drop-down list displayed, select the
column used to hold the active status value for the SCD Type 2 method, which
helps identify the active records, active_status in this
example. -
Select the Log versions check box and from the
Version field drop-down list, select the column used
to hold the version number of the records for the SCD Type 2 method,
version in this example. -
Select Mapping Snowflake from the
Mapping drop-down list to use the Snowflake metadata
mapping file.
Document get from Talend https://help.talend.com
Thank you for watching.
Subscribe
Login
0 Comments