tRandomForestModel
Analyzes feature vectors.
These vectors are usually pre-processed by tModelEncoder to
generate a classifier model that is used by tPredict to classify
given elements.
tRandomForestModel analyzes incoming
datasets based on applying the Random Forest algorithm.
It generates a classification model out of this analysis and writes
this model either in memory or in a given file system.
tRandomForestModel properties for Apache Spark Batch
These properties are used to configure tRandomForestModel running in the Spark Batch Job framework.
The Spark Batch
tRandomForestModel component belongs to the Machine Learning family.
This component is available in the Palette of the Studio only if you have subscribed to any Talend Platform product with Big Data or Talend Data Fabric.
Basic settings
|
Label column |
Select the input column used to provide classification labels. The records of this column |
|
Feature column |
Select the input column used to provide features. Very often, this column is the output of |
|
Save the model on file |
Select this check box to store the model in a given file system. Otherwise, the model is |
|
Number of trees in the forest |
Enter the number of decision trees you want tRandomForestModel to build. Each decision tree is trained independently using a random sample of Increasing this number can improve the accuracy by decreasing the |
|
Maximum depth of each tree in the |
Enter the decision tree depth at which the training should stop adding new nodes. New For a tree of n depth, the number of internal nodes is Generally speaking, a deeper decision tree is more expressive and thus potentially more |
Advanced settings
|
Subsampling rate |
Enter the numeric value to indicate the fraction of the input dataset |
|
Subset strategy |
Select the strategy about how many features should be considered on Each strategy takes a different number of features into account to
|
|
Max bins |
Enter the numeric value to indicate the maximum number of bins used for splitting The continuous features are automatically transformed to ordered discrete features. |
|
Min info gain |
Enter the minimum number of information gain to be expected from a parent node to its The default value of the minimum number of information gain is 0.0, meaning that no further information is obtained by splitting a given node. For further information about how the information gain is calculated, see Impurity and Information gain from the Spark documentation. |
|
Min instances per node |
Enter the minimum number of training instances a node should have to make it valid for The default value is 1, which means when a node has |
|
Impurity |
Select the measure used to select the best split from each set of
For further information about how each of the measures is calculated, see Impurity measures from the Spark documentation. |
|
Set a random seed |
Enter the random seed number to be used for bootstrapping and choosing feature |
Usage
|
Usage rule |
This component is used as an end component and requires an input link. You can accelerate the training process by adjusting the stopping |
|
Model evaluation |
The parameters you need to set are free parameters and so their values may be provided by Therefore, you need to train the classifier model you are generating with different sets You need to select the scores to be used depending on the algorithm you want to use to For examples about how the confusion matrix is used in a For a general explanation about confusion matrix, see https://en.wikipedia.org/wiki/Confusion_matrix from Wikipedia. |
|
Spark Connection |
You need to use the Spark Configuration tab in
the Run view to define the connection to a given Spark cluster for the whole Job. In addition, since the Job expects its dependent jar files for execution, you must specify the directory in the file system to which these jar files are transferred so that Spark can access these files:
This connection is effective on a per-Job basis. |
Creating a classification model to filter spam
This scenario applies only to a subscription-based Talend Platform solution with Big data or Talend Data Fabric.
-
tModelEncoder: several tModelEncoder components are used to transform given SMS text messages
into feature sets. -
tRandomForestModel: it analyzes the features
incoming from tModelEncoder to build a
classification model that understands what a junk message or a normal message could
look like. -
tClassify: in a new Job, it applies this
classification model to process a new set of SMS text messages to classify the spam
and the normal messages. In this scenario, the result of this classification is used
to evaluate the accuracy of the model, since the classification of the messages
processed by tClassify is already known and
explicitly marked. -
A configuration component such as tHDFSConfiguration in each Job: this component is used to connect to the
file system to which the jar files dependent on the Job are transferred during the
execution of the Job.This file-system-related configuration component is required unless you run your
Spark Jobs in the Local mode.
Prerequisites:
-
Two sets of SMS text messages: one is used to train classification models
and the other is used to evaluate the created models. You can download the
train set from trainingSet.zip and the test
set from testSet.zip.
Talend
created these two sets out of the dataset
downloadable from https://archive.ics.uci.edu/ml/datasets/SMS+Spam+Collection, by
using this
dataSet_preparation
Job to add 3
feature columns (number of currency symbols, number of numeric values and
number of exclamation marks) to the raw dataset and proportionally split the
dataset.An example of the junk messages reads as
follows:1Free entry in 2 a wkly comp to win FA Cup final tkts 21st May 2005. Text FA to 87121 to receive entry question(std txt rate)T&C's apply 08452810075over18'sAn example of the normal messages reads as
follows:1Ahhh. Work. I vaguely remember that! What does it feel like? LolNote that the new features added to the raw dataset were discovered as the
result of the observation of the junk messages used specifically in this
scenario (these junk messages often contain prices and/or exclamation marks)
and so cannot be generalized for whatever junk messages you want to analyze.
In addition, the dataset was randomly split into two sets and used as is but
in a real-world practice, you can continue to preprocess them using many
different methods such as dataset balancing in order to better train your
classification model. -
The two sets must be stored in the machine where the Job is going to be
executed, for example in the HDFS system of your Yarn cluster if you use the
Spark Yarn client mode to run
Talend
Spark Jobs, and you have appropriate rights and
permissions to read data from and write data in this system.In this scenario, the Spark Yarn client
will be used and the datasets are stored in the associated HDFS
system. -
The Spark cluster to be used must have been properly set up and is
running.
Creating a classification model using Random Forest

Arranging the data
flow
-
In the
Integration
perspective of the Studio, create an empty
Spark Batch Job, named rf_model_creation
for example, from the Job Designs node in
the Repository tree view.For further information about how to create a Spark Batch Job, see the Getting Started Guide of the Studio. -
In the workspace, enter the name of the component to be used and select this component from the list that appears. In this scenario, the components are tHDFSConfiguration, tFileInputDelimited, tRandomForestModel component, and 4 tModelEncoder components.
It is recommended to label the 4 tModelEncoder components to
different names so that you can easily recognize the task each of them is
used to complete. In this scenario, they are labelled Tokenize, tf,
tf_idf and features_assembler, respectively. -
Except tHDFSConfiguration, connect the other
components using the Row > Main link as is
previously displayed in the image.
Configuring the connection to the file system to be used by Spark
-
Double-click tHDFSConfiguration to open its
Component view. Note that tHDFSConfiguration is used because the Spark Yarn client mode is used to run Spark Jobs in this scenario.Spark uses this component to connect to the HDFS system to which the jar
files dependent on the Job are transferred. -
In the Version area, select the Hadoop distribution
you need to connect to and its version. -
In the NameNode URI field, enter the location of the
machine hosting the NameNode service of the cluster. If you are using WebHDFS, the location should be
webhdfs://masternode:portnumber; if this WebHDFS is secured
with SSL, the scheme should be swebhdfs and you need to use
a tLibraryLoad in the Job to load the library required by
the secured WebHDFS. -
In the Username field, enter the
authentication information used to connect to the HDFS system to be used. Note
that the user name must be the same as you have put in the Spark configuration tab.
Reading the training
set
-
Double-click tFileInputDelimited to open its
Component view.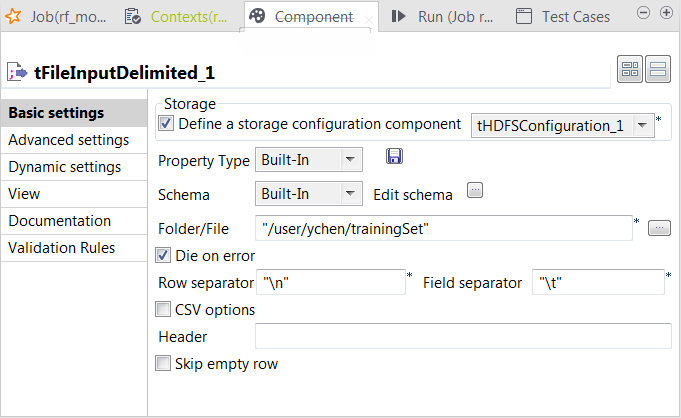
-
Select the Define a storage configuration component check box
and select the tHDFSConfiguration component
to be used.tFileInputDelimited uses this
configuration to access the training set to be used. -
Click the […] button next to Edit
schema to open the schema editor. -
Click the [+] button five times to add five rows and in the
Column column, rename them to label, sms_contents, num_currency,
num_numeric and num_exclamation, respectively.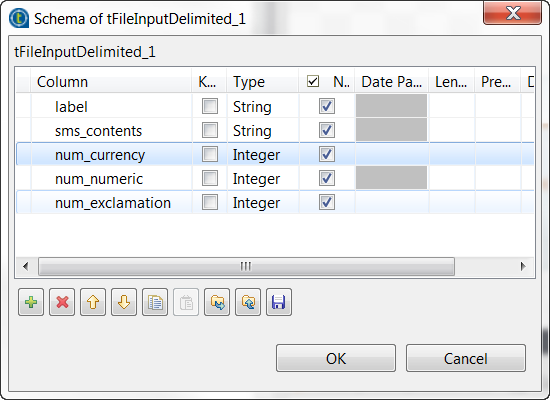 The label and the sms_contents columns carries the raw data which is composed of
the SMS text messages in the sms_contents
column and the labels indicating whether a message is spam in the label column.The other columns are used to carry the features added to the raw datasets
as explained previously in this scenario. These three features are the
number of currency symbols, the number of numeric values and the number of
exclamation marks found in each SMS message. -
In the Type column, select Integer for the num_currency, num_numeric and
num_exclamation columns. - Click OK to validate these changes.
-
In the Folder/File field, enter the
directory where the training set to be used is stored. -
In the Field separator field, enter
, which is the separator used by the
datasets you can download for use in this scenario.
Transforming SMS text messages to feature vectors using tModelEncoder
This step is meant to implement the feature engineering process.
Transforming messages to words
-
Double-click the tModelEncoder component labelled Tokenize to
open its Component view. This component
tokenize the SMS messages into words.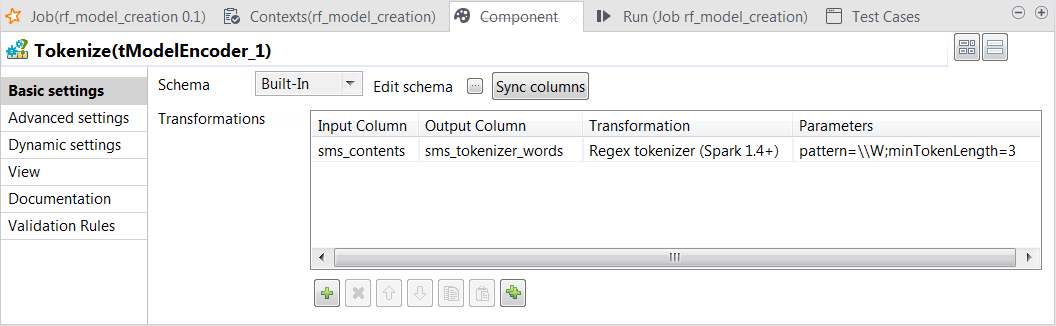
-
Click the Sync columns button to retrieve the schema from the
preceding one. -
Click the […] button next to Edit
schema to open the schema editor. -
On the output side, click the [+] button to add one row and in the Column column, rename it to
sms_tokenizer_words. This column is used to carry the
tokenized messages.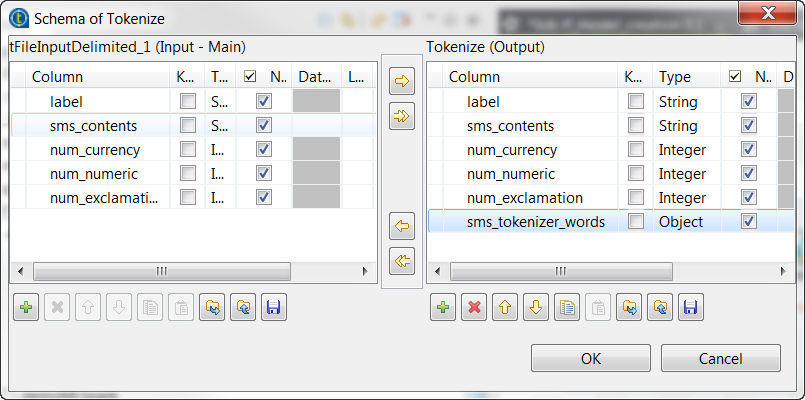
-
In the Type column,
select Object for this
sms_tokenizer_words row. - Click OK to validate these changes.
-
In the Transformations
table, add one row by clicking the [+]
button and then proceed as follows:-
In the Input column column, select the column
that provides data to be transformed to features. In this scenario, it
is sms_contents. -
In the Output column column, select the column
that carry the features. In this scenario, it is
sms_tokenizer_words. -
In the Transformation column, select the
algorithm to be used for the transformation. In this scenario, it is
Regex tokenizer. -
In the Parameters column, enter the parameters
you want to customize for use in the algorithm you have selected. In
this scenario, enter
pattern=\W;minTokenLength=3.
-
In the Input column column, select the column
Using this transformation, tModelEncoder
splits each input message by whitespace, selects only the words contains at least 3
letters and put the result of the transformation in the sms_tokenizer_words column. Thus currency symbols, numeric values,
punctuations and words such as a, an
or to are excluded from this column.
Calculating the weight of a word in each message
-
Double-click the tModelEncoder component
labelled tf to open its Component view.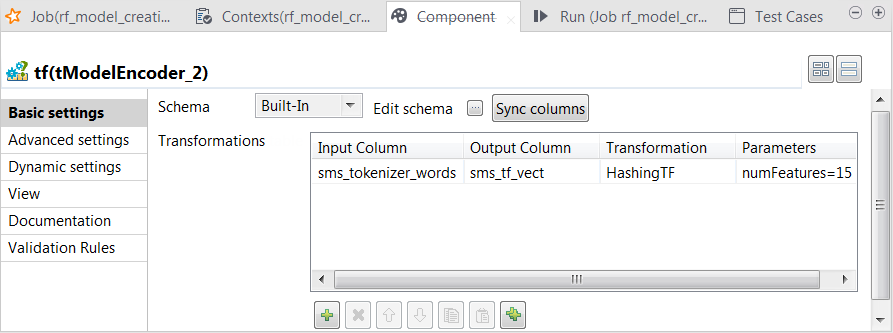
-
Repeat the operations described previously over the tModelEncoder labelled Tokenizer to add the sms_tf_vect column of the Vector type to the output schema and define the
transformation as displayed in the image above.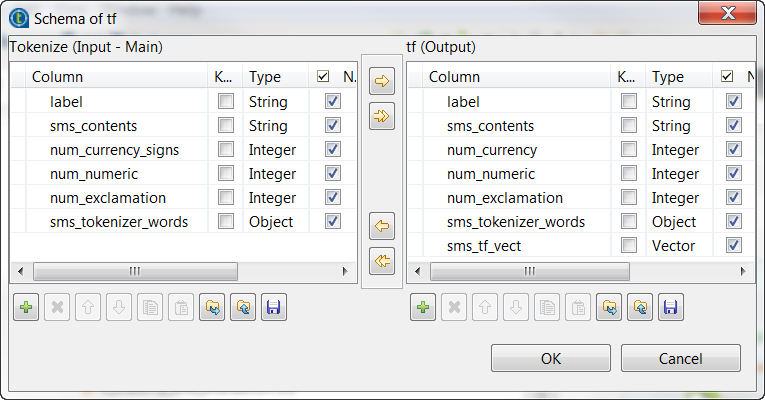 In this transformation, tModelEncoder
uses HashingTF to convert the already
tokenized SMS messages into fixed-length (15 in this scenario) feature vectors to reflect the importance
of a word in each SMS message.
Downplaying the weight of the irrelevant words in each message
-
Double-click the tModelEncoder component labelled tf_idf to open its Component view. In this process, tModelEncoder reduces the weight of the words that appears very
often but in too many messages, because a word like this often brings no
meaningful information for text analysis, such as the word the.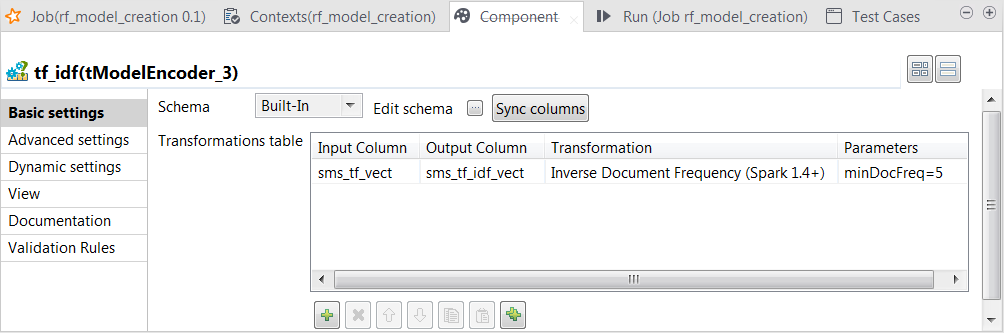
-
Repeat the operations described previously over the tModelEncoder labelled Tokenizer to add the sms_tf_idf_vect column of the Vector type to the output schema and define the
transformation as displayed in the image above.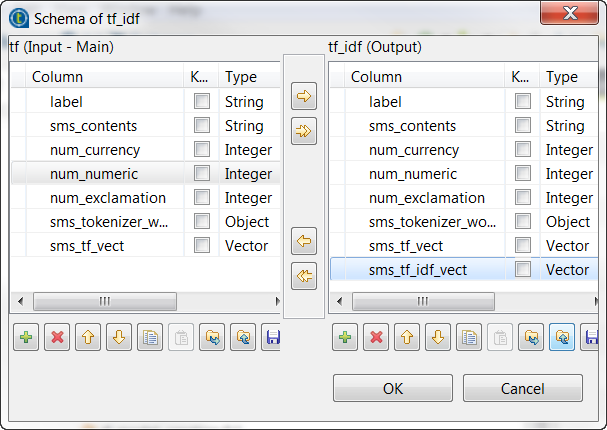 In this transformation, tModelEncoder uses
Inverse Document Frequency to downplay the
weight of the words that appears in 5 or more than 5 messages.
Combining feature vectors
-
Double-click the tModelEncoder component labelled features_assembler to open its Component view.
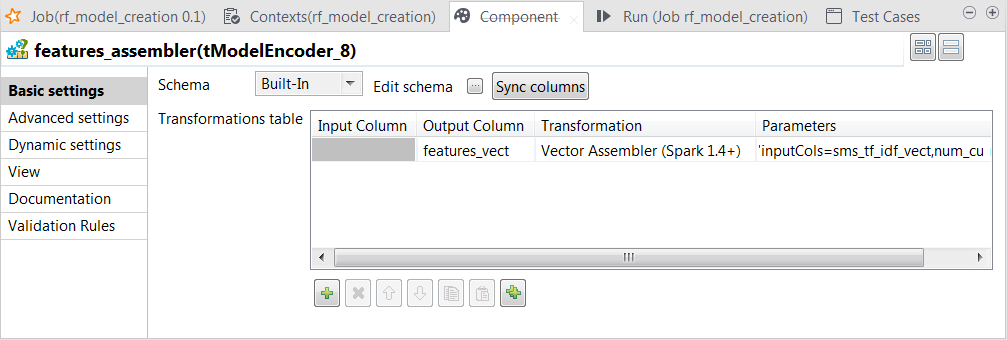
-
Repeat the operations described previously over the tModelEncoder labelled Tokenizer to add the features_vect column of the Vector type to the output schema and define the
transformation as displayed in the image above.Note that the parameter to be put in the Parameters column is inputCols=sms_tf_idf_vect,num_currency,num_numeric,num_exclamation.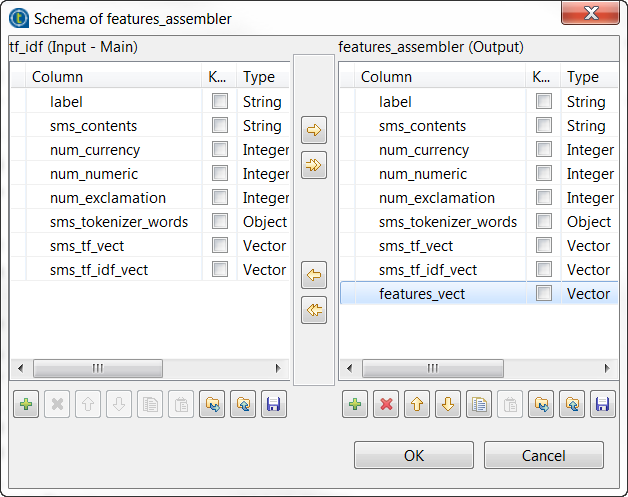 In this transformation, tModelEncoder
combines all feature vectors into one single feature column.
Training the model using Random Forest
-
Double-click tRandomForestModel to open its
Component view.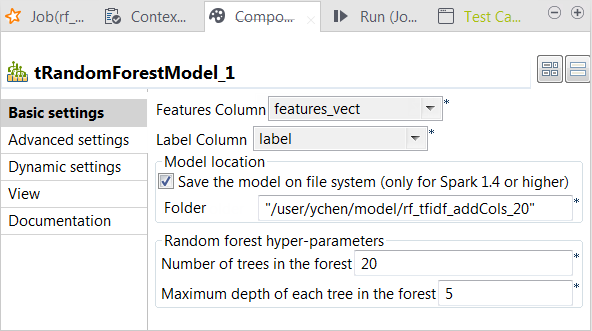
-
From the Label column list, select the
column that provides the classes to be used for classification. In this
scenario, it is label, which contains two
class names: spam for junk messages and
ham for normal messages. -
From the Features column list, select the
column that provides the feature vectors to be analyzed. In this scenario,
it is features_vect, which combines all
features. -
Select the Save the model on file system
check box and in the HDFS folder field that
is displayed, enter the directory you want to use to store the generated
model. -
In the Number of trees in the forest
field, enter the number of decision trees you want tRandomForestModel to build. You need to try different numbers
to run the current Job to create the classification model several times;
after comparing the evaluation results of every model created on each run,
you can decide the number you need to use. In this scenario, put 20.An evaluation Job will be presented in one of the following
sections. - Leave the other parameters as is.
Selecting the Spark mode
-
Click Run to open its view and then click the
Spark Configuration tab to display its view
for configuring the Spark connection. -
Select the Use local mode check box to test your Job locally.
In the local mode, the Studio builds the Spark environment in itself on the fly in order to
run the Job in. Each processor of the local machine is used as a Spark
worker to perform the computations.In this mode, your local file system is used; therefore, deactivate the
configuration components such as tS3Configuration or
tHDFSConfiguration that provides connection
information to a remote file system, if you have placed these components
in your Job.You can launch
your Job without any further configuration. -
Clear the Use local mode check box to display the
list of the available Hadoop distributions and from this list, select
the distribution corresponding to your Spark cluster to be used.This distribution could be:If you cannot find the distribution corresponding to yours from this
drop-down list, this means the distribution you want to connect to is not officially
supported by
Talend
. In this situation, you can select Custom, then select the Spark
version of the cluster to be connected and click the
[+] button to display the dialog box in which you can
alternatively:-
Select Import from existing
version to import an officially supported distribution as base
and then add other required jar files which the base distribution does not
provide. -
Select Import from zip to
import the configuration zip for the custom distribution to be used. This zip
file should contain the libraries of the different Hadoop/Spark elements and the
index file of these libraries.In
Talend
Exchange, members of
Talend
community have shared some ready-for-use configuration zip files
which you can download from this Hadoop configuration
list and directly use them in your connection accordingly. However, because of
the ongoing evolution of the different Hadoop-related projects, you might not be
able to find the configuration zip corresponding to your distribution from this
list; then it is recommended to use the Import from
existing version option to take an existing distribution as base
to add the jars required by your distribution.Note that custom versions are not officially supported by
Talend
.
Talend
and its community provide you with the opportunity to connect to
custom versions from the Studio but cannot guarantee that the configuration of
whichever version you choose will be easy. As such, you should only attempt to
set up such a connection if you have sufficient Hadoop and Spark experience to
handle any issues on your own.
For a step-by-step example about how to connect to a custom
distribution and share this connection, see Connecting to a custom Hadoop distribution. -
Executing the Job to create the classification model
Then you can run this Job.
F6
to run this
Job.
Once done, the model file is created in the directory you have specified in tRandomForestModel.
Evaluating the classification model

Linking the components
-
In the
Integration
perspective of the
Studio, create another empty Spark Batch Job, named classify_and_evaluation for example, from the Job Designs node in the Repository tree view. -
In the workspace, enter the name of the component to be used and select
this component from the list that appears. In this Job, the components are
tHDFSConfiguration, tFileInputDelimited, tClassify,
tReplicate, tJava, tFilterColumns and
tLogRow. -
Except tHDFSConfiguration, connect them
using the Row > Main link as is displayed
in the image above. -
Double-click tHDFSConfiguration to open
its Component view and configure it as
explained previously in this scenario.
Loading the test set into the Job
-
Double-click tFileInputDelimited to open its
Component view.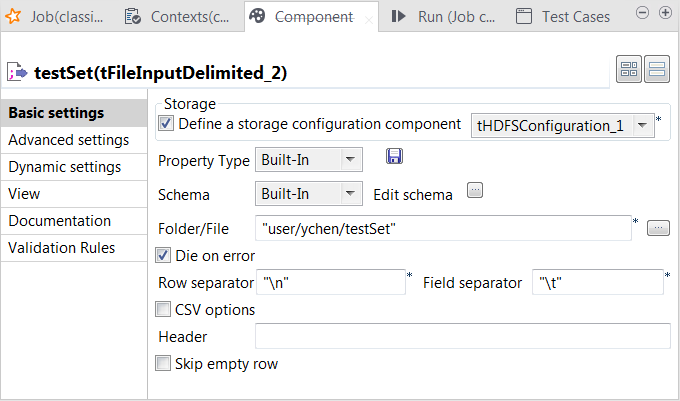
-
Select the Define a storage configuration component check box
and select the tHDFSConfiguration component
to be used.tFileInputDelimited uses this
configuration to access the training set to be used. -
Click the […] button next to Edit
schema to open the schema editor. -
Click the [+] button five times to add five rows and in the
Column column, rename them to reallabel, sms_contents, num_currency,
num_numeric and num_exclamation, respectively. The reallabel and the sms_contents columns carries the raw data which is
composed of the SMS text messages in the sms_contents column and the labels indicating whether a message
is spam in the reallabel column.The other columns are used to carry the features added to the raw datasets
as explained previously in this scenario. They contains the number of
currency symbols, the number of numeric values and the number of exclamation
marks found in each SMS message. -
In the Type column, select Integer for the num_currency, num_numeric and
num_exclamation columns. - Click OK to validate these changes.
-
In the Folder/File field, enter the
directory where the test set to be used is stored. -
In the Field separator field, enter
, which is the separator used by the
datasets you can download for use in this scenario.
Applying the classification model
-
Double-click tClassify to open its
Component view.
-
Select the Model on filesystem radio button and enter the
directory in which the classification model to be used is stored.The tClassify component contains a read-only column called
label in which the model provides the
classes to be used in the classification process, while the reallabel column retrieved from the input schema
contains the classes to which each message actually belongs. The model will
be evaluated by comparing the actual label of each message with the label
the model determines.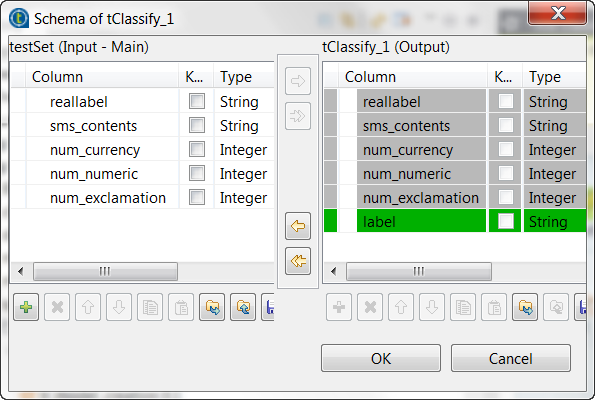
Replicating the classification result
-
Double-click tReplicate to open its
Component view.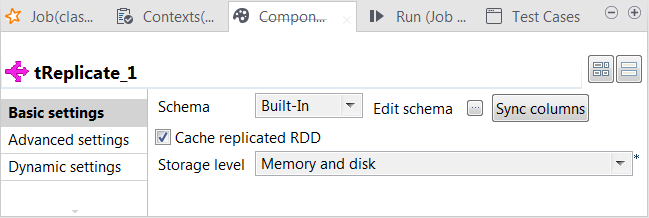
- Leave the default configuration as is.
Filtering the classification result
-
Double-click tFilterColumns to open its
Component view. -
Click the […] button next to Edit
schema to open the schema editor. -
On the output side, click the [+] button three times to add
three rows and in the Column column, rename
them to reallabel, label and sms_contents, respectively. They receive data from the input
columns that are using the same names.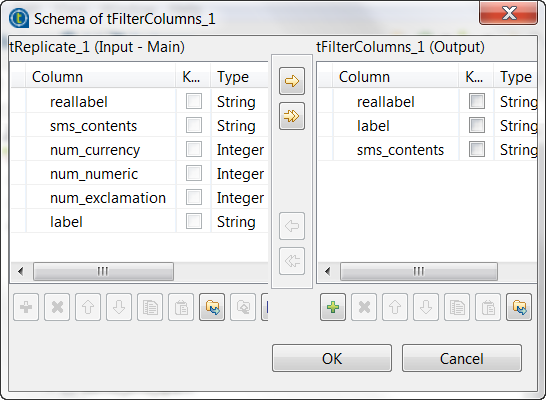
-
Click OK to validate these changes and accept the
propagation prompted by the pop-up dialog box.
Writing the evaluation program in tJava
-
Double-click tJava to open its
Component view. -
Click Sync columns to ensure that
tJava retrieves the replicated schema of
tClassify. -
Click the Advanced settings tab to open its view.
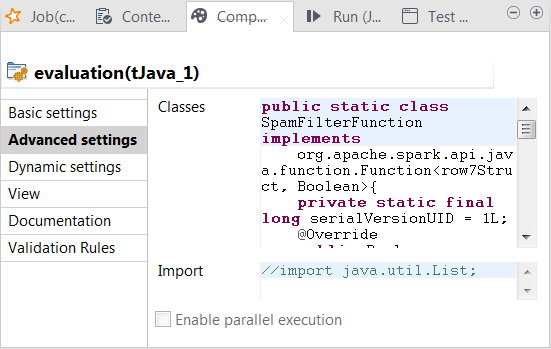
-
In the Classes field, enter code to
define the Java classes to be used to verify whether the predicted class
labels match the actual class labels (spam for junk messages and ham for normal messages). In this scenario, row7 is the ID of the connection between
tClassify and tReplicate and carries the classification result to be sent
to its following components and row7Struct is the Java class of the RDD for the
classification result. In your code, you need to replace row7, whether it is used alone or within
row7Struct, with the corresponding
connection ID used in your Job.Column names such as reallabel or
label were defined in the previous step
when configuring different components. If you named them differently, you
need to keep them consistent for use in your code.1234567891011121314151617181920212223242526272829303132333435363738394041424344454647484950515253545556575859public static class SpamFilterFunction implementsorg.apache.spark.api.java.function.Function<row7Struct, Boolean>{private static final long serialVersionUID = 1L;@Overridepublic Boolean call(row7Struct row7) throws Exception {return row7.reallabel.equals("spam");}}// 'negative': ham// 'positive': spam// 'false' means the real label & predicted label are different// 'true' means the real label & predicted label are the samepublic static class TrueNegativeFunction implementsorg.apache.spark.api.java.function.Function<row7Struct, Boolean>{private static final long serialVersionUID = 1L;@Overridepublic Boolean call(row7Struct row7) throws Exception {return (row7.label.equals("ham") && row7.reallabel.equals("ham"));}}public static class TruePositiveFunction implementsorg.apache.spark.api.java.function.Function<row7Struct, Boolean>{private static final long serialVersionUID = 1L;@Overridepublic Boolean call(row7Struct row7) throws Exception {// true positive casesreturn (row7.label.equals("spam") && row7.reallabel.equals("spam"));}}public static class FalseNegativeFunction implementsorg.apache.spark.api.java.function.Function<row7Struct, Boolean>{private static final long serialVersionUID = 1L;@Overridepublic Boolean call(row7Struct row7) throws Exception {// false positive casesreturn (row7.label.equals("spam") && row7.reallabel.equals("ham"));}}public static class FalsePositiveFunction implementsorg.apache.spark.api.java.function.Function<row7Struct, Boolean>{private static final long serialVersionUID = 1L;@Overridepublic Boolean call(row7Struct row7) throws Exception {// false positive casesreturn (row7.label.equals("ham") && row7.reallabel.equals("spam"));}} -
Click the Basic settings tab to open its
view and in the Code field, enter the code
to be used to compute the accuracy score and the Matthews Correlation
Coefficient (MCC) of the classification model.For general explanation about Mathews Correlation Coefficient, see https://en.wikipedia.org/wiki/Matthews_correlation_coefficient from Wikipedia.12345678910111213141516171819202122232425long nbTotal = rdd_tJava_1.count();long nbSpam = rdd_tJava_1.filter(new SpamFilterFunction()).count();long nbHam = nbTotal - nbSpam;// 'negative': ham// 'positive': spam// 'false' means the real label & predicted label are different// 'true' means the real label & predicted label are the samelong tn = rdd_tJava_1.filter(new TrueNegativeFunction()).count();long tp = rdd_tJava_1.filter(new TruePositiveFunction()).count();long fn = rdd_tJava_1.filter(new FalseNegativeFunction()).count();long fp = rdd_tJava_1.filter(new FalsePositiveFunction()).count();double mmc = (double)(tp*tn -fp*fn) / java.lang.Math.sqrt((double)((tp+fp)*(tp+fn)*(tn+fp)*(tn+fn)));System.out.println("Accuracy:"+((double)(tp+tn)/(double)nbTotal));System.out.println("Spams caught (SC):"+((double)tp/(double)nbSpam));System.out.println("Blocked hams (BH):"+((double)fp/(double)nbHam));System.out.println("Matthews correlation coefficient (MCC):" + mmc);
Configuring Spark connection
Repeat the operations described above in the section that addresses the same subject.
Executing the Job
Then you can run this Job.
-
The tLogRow component is used to present the execution
result of the
Job.If you want to configure the presentation mode on its Component view, double-click the tLogRow component to open the Component view and in the Mode area, select the Table (print
values in cells of a table) radio button. -
If you need to display only the error-level information of Log4j logging in the console of the
Run view, click Run to open its view and then click the Advanced settings tab. -
Select the log4jLevel check box from its view and select
Error from the list. -
Press
F6
to run this
Job.
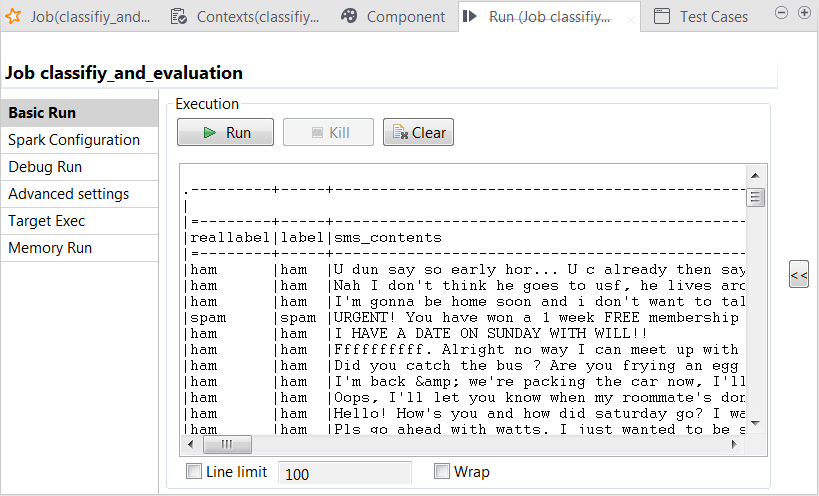
In the console of the Run view, you can read the classification result along with the actual labels:
You can also read the computed scores in the same console:
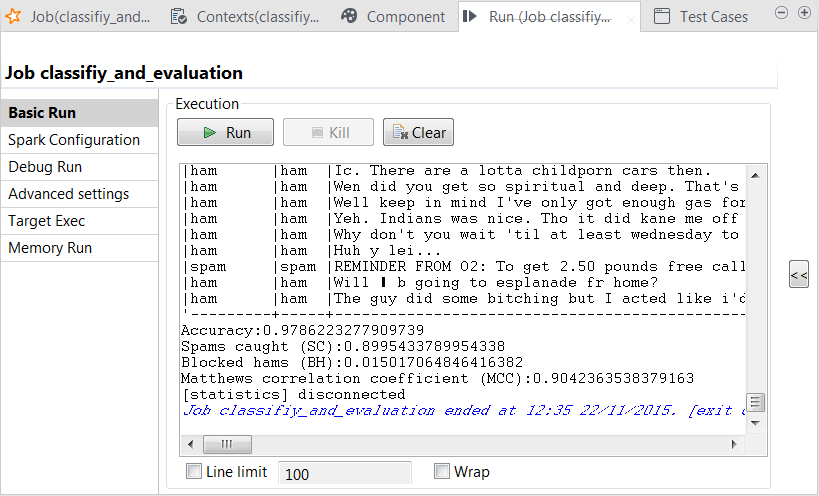
The scores show a good quality of the model. But you can still enhance the model
by continuing to tune the parameters used in tRandomForestModel and run the model-creation Job with new
parameters to obtain and then evaluate new versions of the model.