tRedshiftBulkExec
Loads data into Amazon Redshift from Amazon S3, Amazon EMR cluster, Amazon
DynamoDB, or remote hosts.
The tRedshiftOutputBulk and tRedshiftBulkExec components can be used together in a two step process
to load data to Amazon Redshift from a delimited/CSV file on Amazon S3. In the first
step, a delimited/CSV file is generated. In the second step, this file is used in the
INSERT statement used to feed Amazon Redshift. These two steps are fused together in the
tRedshiftOutputBulkExec component. The advantage of
using two separate steps is that the data can be transformed before it is loaded to
Amazon Redshift.
tRedshiftBulkExec loads data into an Amazon Redshift
table from an Amazon DynamoDB table or from data files located in an
Amazon S3 bucket, an Amazon EMR cluster, or a remote host that is
accessed using an SSH connection.
tRedshiftBulkExec Standard properties
These properties are used to configure tRedshiftBulkExec running in the Standard Job framework.
The Standard
tRedshiftBulkExec component belongs to the Cloud and the Databases families.
The component in this framework is generally available.
Basic settings
|
Property Type |
Either Built-In or Repository.
|
|
Use an existing connection |
Select this check box and in the Component |
|
Host |
Type in the IP address or hostname of the database server. |
|
Port |
Type in the listening port number of the database server. |
|
Database |
Type in the name of the database. |
|
Schema |
Type in the name of the schema. |
|
Username and Password |
Type in the database user authentication data. To enter the password, click the […] button next to the |
|
Additional JDBC Parameters |
Specify additional JDBC properties for the connection you are creating. The |
|
Table Name |
Specify the name of the table to be written. Note that only one table |
|
Action on table |
On the table defined, you can perform one of the following
|
|
Schema and Edit schema |
A schema is a row description. It defines the number of fields (columns) to
|
|
|
Click Edit schema to make changes to the schema.
|
|
Data source type |
Select the location of the source data to be loaded.
For more information, see Data Sources. |
|
Access Key |
Specify the Access Key ID that uniquely identifies an AWS Account. For |
|
Secret Key |
Specify the Secret Access Key, constituting the security credentials To enter the secret key, click the […] button next to |
|
Bucket |
Specify the name of the Amazon S3 bucket in which the file is This field is available only when S3 |
|
Key |
Specify the object key for the file that contains the data to be This field is available only when S3 |
|
Cluster id |
Specify the ID of the cluster that stores the data to be This field is available only when EMR |
|
HDFS path |
Specify the HDFS file path that references the data file. This field is available only when EMR |
|
Table |
Specify the name of the DynamoDB table that contains the data to be This field is available only when DynamoDB is selected from the Data |
|
Read ratio |
Specify the percentage of the DynamoDB table’s provisioned throughput This field is available only when DynamoDB is selected from the Data |
|
SSH manifest file |
Specify the object key for the SSH manifest file that provides the This field is available only when Remote |
Advanced settings
|
File type |
Select the type of the file that contains the data to be
This list is available when S3, |
|
Fields terminated by |
Enter the character used to separate fields. This field is available only when Delimited file |
|
Enclosed by |
Select the character in which the fields are enclosed. This list is available only when Delimited file |
|
JSON mapping |
Specify how to map the data elements in the source file to the columns
This field is available only when JSON or AVRO is |
|
Fixed width mapping |
Enter a string that specifies a user-defined column label and column
Note that the column label in the string has no relation to the table This field is available only when Fixed |
|
Compressed by |
Select this check box and from the list displayed select the This check box is available when S3, |
|
Decrypt |
Select this check box if the file is encrypted using Amazon S3 client-side encryption. This check box is available when S3, |
|
Encoding |
Select the encoding type of the data to be loaded from the This list is available when S3, |
|
Date format |
Select one of the following items from the list to specify the date
|
|
Time format |
Select one of the following items from the list to specify the time
|
|
Settings |
Click the [+] button below the table
For more information about the parameters, see http://docs.aws.amazon.com/redshift/latest/dg/r_COPY.html. |
|
tStatCatcher Statistics |
Select this check box to gather the Job processing metadata at the Job level |
Global Variables
|
Global Variables |
ERROR_MESSAGE: the error message generated by the A Flow variable functions during the execution of a component while an After variable To fill up a field or expression with a variable, press Ctrl + For further information about variables, see |
Usage
|
Usage rule |
The tRedshiftBulkExec component |
|
Dynamic settings |
Click the [+] button to add a The Dynamic settings table is For examples on using dynamic parameters, see Scenario: Reading data from databases through context-based dynamic connections and Scenario: Reading data from different MySQL databases using dynamically loaded connection parameters. For more information on Dynamic |
Scenario: loading/unloading data from/to Amazon S3
This scenario describes a Job that generates a delimited file and uploads the file to S3,
loads data from the file on S3 to Redshift and displays the data on the console, then
unloads the data from Redshift to files on S3 per slice of the Redshift cluster, and
finally lists and gets the unloaded files on S3.

Prerequisites:
The following context variables have been created and saved in the Repository tree view. For more information about context
variables, see
Talend Studio User Guide.
-
redshift_host: the connection endpoint URL of the
Redshift cluster. -
redshift_port: the listening port number of the
database server. -
redshift_database: the name of the database.
-
redshift_username: the username for the database
authentication. -
redshift_password: the password for the database
authentication. -
redshift_schema: the name of the schema.
-
s3_accesskey: the access key for accessing Amazon
S3. -
s3_secretkey: the secret key for accessing Amazon
S3. -
s3_bucket: the name of the Amazon S3 bucket.

Note that all context values in the above screenshot are for demonstration purposes
only.
Adding and linking components
-
Create a new Job and apply all context variables listed above to the new
Job. -
Add the following components by typing their names in the design workspace or dropping
them from the Palette: a tRowGenerator component, a tRedshiftOutputBulk component, a tRedshiftBulkExec component, a tRedshiftInput component, a tLogRow component, a tRedshiftUnload component, a tS3List component, and a tS3Get component. -
Link tRowGenerator to tRedshiftOutputBulk using a Row > Main
connection. -
Do the same to link tRedshiftInput to
tLogRow. -
Link tS3List to tS3Get using a Row >
Iterate connection. -
Link tRowGenerator to tRedshiftBulkExec using a Trigger > On Subjob Ok
connection. -
Do the same to link tRedshiftBulkExec to
tRedshiftInput, link tRedshiftInput to tRedshiftUnload, link tRedshiftUnload to tS3List.
Configuring the components
Preparing a file and uploading the file to S3
-
Double-click tRowGenerator to open its
RowGenerator Editor.
- Click the [+] button to add two columns: ID of Integer type and Name of String type.
-
Click the cell in the Functions column and select a
function from the list for each column. In this example, select Numeric.sequence to generate sequence numbers for
the ID column and select TalendDataGenerator.getFirstName to generate
random first names for the Name
column. -
In the Number of Rows for RowGenerator field, enter the
number of data rows to generate. In this example, it is 20. -
Click OK to close the schema editor and
accept the propagation prompted by the pop-up dialog box. -
Double-click tRedshiftOutputBulk to open its Basic settings view on the Component tab.
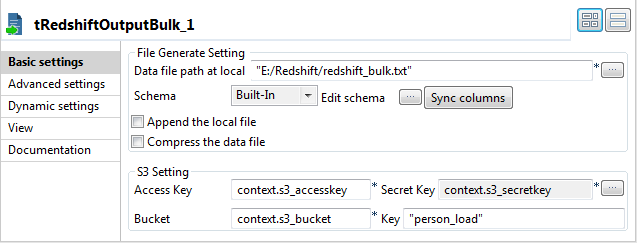
-
In the Data file path at local field,
specify the local path for the file to be generated. In this example, it is
E:/Redshift/redshift_bulk.txt. -
In the Access Key field, press Ctrl + Space and from the list select context.s3_accesskey to fill in this
field.Do the same to fill the Secret Key field
with context.s3_accesskey and the
Bucket field with context.s3_bucket. -
In the Key field, enter a new name for the file to be
generated after being uploaded on Amazon S3. In this example, it is
person_load.
Loading data from the file on S3 to Redshift
-
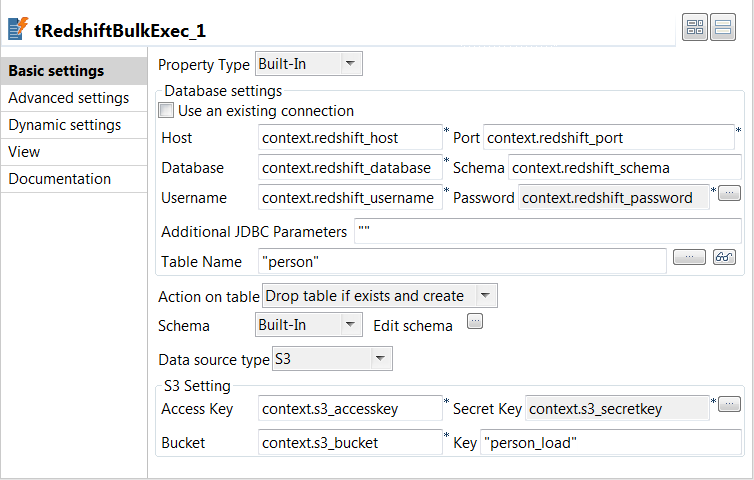
Double-click tRedshiftBulkExec to open its Basic settings view on the Component tab.
-
In the Host field, press Ctrl + Space and from the list select context.redshift_host to fill in this
field.Do the same to fill:-
the Port field with context.redshift_port,
-
the Database field with context.redshift_database,
-
the Schema field with context.redshift_schema,
-
the Username field with context.redshift_username,
-
the Password field with context.redshift_password,
-
the Access Key field with
context.s3_accesskey, -
the Secret Key field with context.s3_secretkey, and
-
the Bucket field with context.s3_bucket.
-
-
In the Table Name field, enter the name
of the table to be written. In this example, it is person. -
From the Action on table list, select
Drop table if exists and create. -
In the Key field, enter the name of the file on Amazon
S3 to be loaded. In this example, it is person_load. -
Click the […] button next to Edit schema and in the pop-up window define the schema by
adding two columns: ID of Integer type
and Name of String type.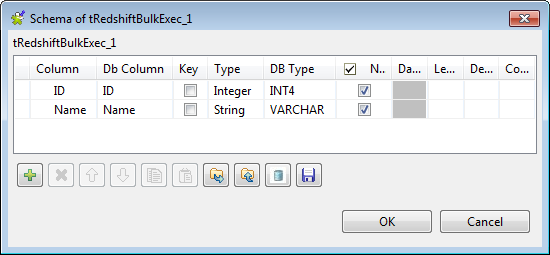
Retrieving data from the table on Redshift
-
Double-click tRedshiftInput to open its
Basic settings view on the Component tab.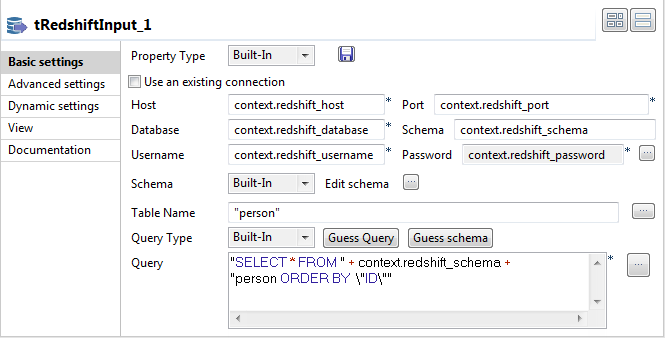
-
Fill the Host, Port, Database, Schema, Username, and Password fields
with their corresponding context variables. -
In the Table Name field, enter the name
of the table to be read. In this example, it is person. -
Click the […] button next to Edit schema and in the pop-up window define the
schema by adding two columns: ID of
Integer type and Name of String
type. -
In the Query field, enter the following
SQL statement based on which the data are retrieved.1"SELECT * FROM" + context.redshift_schema + "person ORDER BY "ID"" -
Double-click tLogRow to open its
Basic settings view on the Component tab.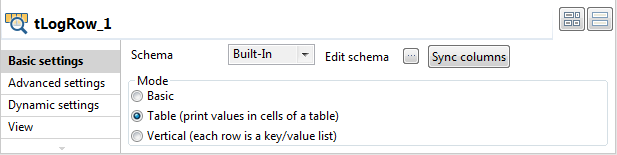
-
In the Mode area, select Table (print values in cells of a table) for a
better display of the result.
Unloading data from Redshift to file(s) on S3
-
Double-click tRedshiftUnload to open its
Basic settings view on the Component tab.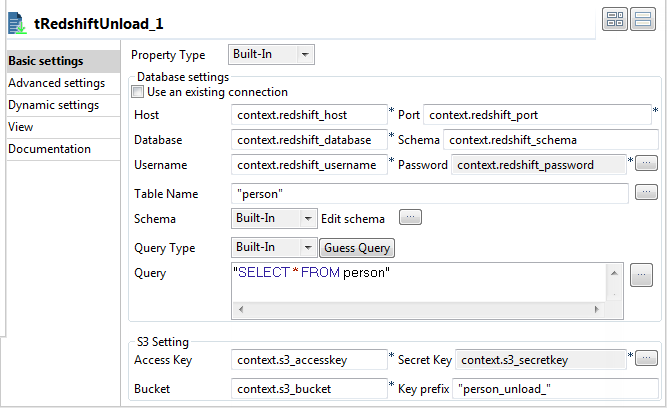
-
Fill the Host, Port, Database, Schema, Username, and Password fields
with their corresponding context variables.Fill the Access Key, Secret Key, and Bucket fields also with their corresponding context
variables. -
In the Table Name field, enter the name
of the table from which the data will be read. In this example, it is
person. -
Click the […] button next to Edit schema and in the pop-up window define the
schema by adding two columns: ID of
Integer type and Name of String
type. -
In the Query field, enter the following
SQL statement based on which the result will be unloaded.1"SELECT * FROM person" -
In the Key prefix field, enter the name
prefix for the unload files. In this example, it is person_unload_.
Retrieving files unloaded to Amazon S3
-
Double-click tS3List to open its
Basic settings view on the Component tab.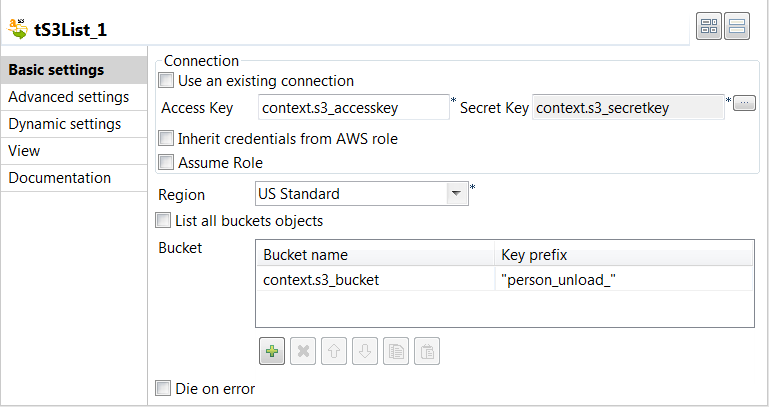
-
Fill the Access Key and Secret
Key fields with their corresponding context variables. -
From the Region list, select the AWS
region where the unload files are created. In this example, it is US Standard. -
Clear the List all buckets objects check
box, and click the [+] button under the
table displayed to add one row.Fill in the Bucket name column with the name of the
bucket in which the unload files are created. In this example, it is the
context variable context.s3_bucket.Fill in the Key prefix column with the name prefix for
the unload files. In this example, it is person_unload_. -
Double-click tS3Get to open its Basic settings view on the Component tab.
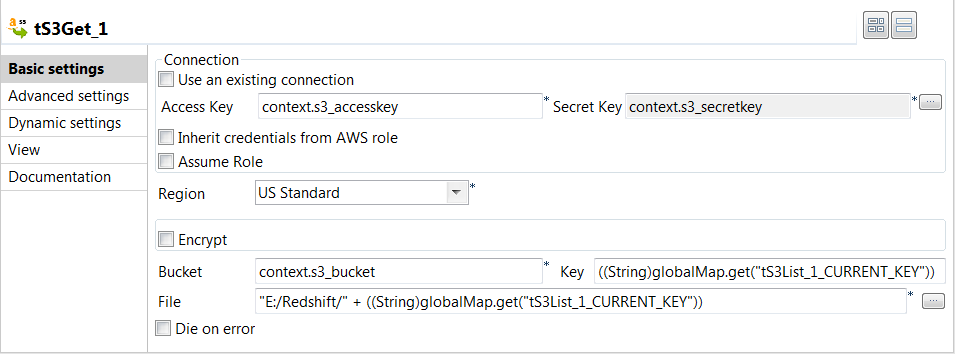
-
Fill the Access Key field and Secret Key field with their corresponding context
variables. -
From the Region list, select the AWS
region where the unload files are created. In this example, it is US Standard. -
In the Bucket field, enter the name of
the bucket in which the unload files are created. In this example, it is the
context variable context.s3_bucket.In the Key field, enter the name of the
unload files by pressing Ctrl + Space and
from the list selecting the global variable ((String)globalMap.get(“tS3List_1_CURRENT_KEY”)). -
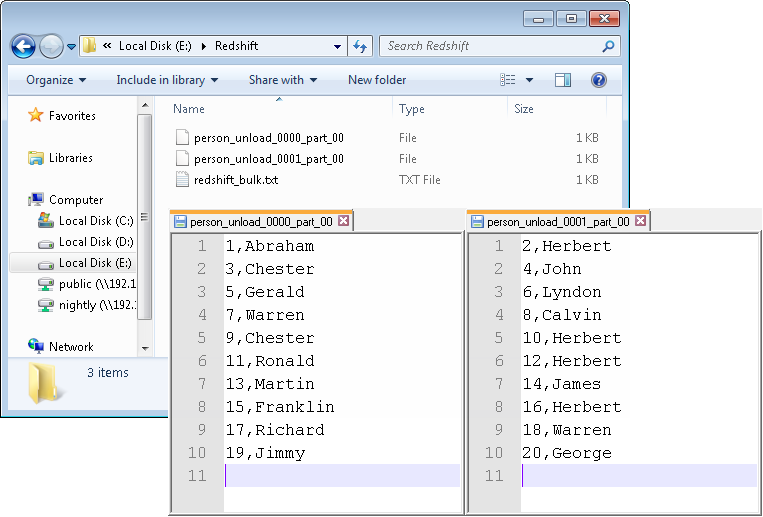
In the File field, enter the local path
where the unload files are saved. In this example, it is “E:/Redshift/” +
((String)globalMap.get(“tS3List_1_CURRENT_KEY”)).
Saving and executing the Job
- Press Ctrl + S to save the Job.
-
Execute the Job by pressing F6 or
clicking Run on the Run tab.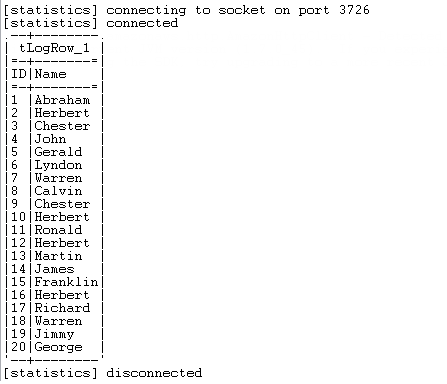
 As shown above, the generated data is written into the local file redshift_bulk.txt, the file is uploaded on S3 with the new
name person_load, and then the data is
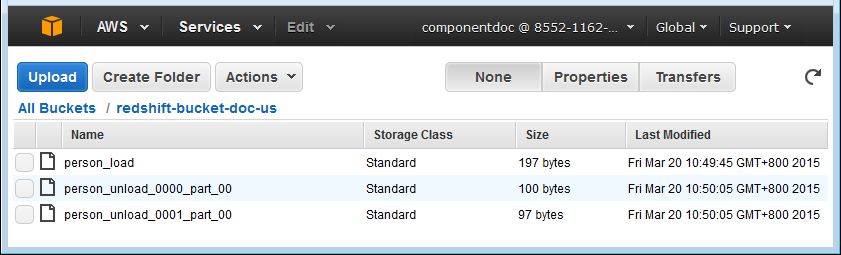
loaded from the file on S3 to the table person in Redshift and displayed on the console. After that,
the data is unloaded from the table person in Redshift to two files person_unload_0000_part_00 and person_unload_0001_part_00 on S3 per slice of the Redshift
cluster, and finally the unloaded files on S3 are listed and retrieved in
the local folder.