tSalesforceConnection
Opens a connection to a Salesforce.
tSalesforceConnection opens a
connection to a Salesforce system in order to carry out a
transaction.
tSalesforceConnection Standard properties
These properties are used to configure tSalesforceConnection running in the Standard Job framework.
The Standard
tSalesforceConnection component belongs to the Business and the Cloud families.
The component in this framework is generally available.
Basic settings
|
Property Type |
Select the way the connection details
|
|
Connection type |
Select the type of the connection from the drop-down list, either Basic or OAuth.
|
Advanced settings
|
Salesforce URL |
Enter the Webservice URL required to connect to |
|
Bulk Connection |
Select this check box if you need to use bulk data processing function. |
| Use or save the connection session |
Select this check box and in the Session directory field This session file can be shared by different Jobs to retrieve a connection When an expired session is detected, if the correct connection information (the This check box is available only when Basic is selected |
|
Need compression |
Select this check box to activate SOAP message compression, which can result in increased |
|
Trace HTTP message |
Select this check box to output the HTTP interactions on the console. This check box is available only when the Bulk Connection check box is selected. |
|
Use HTTP Chunked |
Select this check box to use the HTTP chunked data transfer mechanism. This check box is available only when the Bulk Connection check box is cleared. |
|
Client Id |
Enter the ID of the real user to differentiate between those who use the same account and |
|
Timeout (milliseconds) |
Enter the intended number of query timeout in Salesforce.com. |
|
Use Proxy |
Select this check box to use a proxy server, and in the Host, Port, User Id, and Password fields displayed, specify |
|
tStatCatcher Statistics |
Select this check box to gather the Job processing metadata at the Job level |
Global Variables
| ERROR_MESSAGE |
The error message generated by the component when an error occurs. This |
Usage
|
Usage rule |
This component is more commonly used with other Salesforce |
|
Limitation |
Due to license incompatibility, one or more JARs required to use this component are not |
Scenario: Using OAuth2 to log in to Salesforce.com
In this scenario, the OAuth2 (Open Authorization 2.0)
method is adopted to authorize tSalesforceConnection to
access the Salesforce.com resources. This way, better security is achieved as users do not
need entering their Salesforce username/password directly on tSalesforceConnection, which is required by the Basic login type instead.

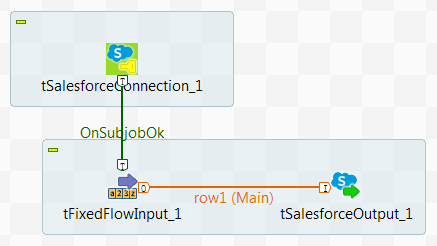
Setting up the Job
-
Drop a tSalesforceConnection component, a
tFixedFlowInput component and a tSalesforceOutput component onto the
workspace. -
Link the tFixedFlowInput component to the
tSalesforceOutput component using a
Row > Main
connection. -
Link the tSalesforceConnection component to
the tFixedFlowInput component using a Trigger > OnSubjobOk
connection.
Configuring the components
-
Double-click the tSalesforceConnection
component to open its Basic settings
view.
-
In the Connection type list, select OAuth.
In the Client Id and Client Secret fields, enter the key and secret used by the
consumer to access Salesforce respectively.In the Callback Host and Callback Port fields, enter the callback host and
port information respectively.In the Token File field, browse to or enter
the path to the token file that stores the refresh token used by the
OAuth-enabled connected app to obtain new sessions without requiring the user to
provide their credentials. -
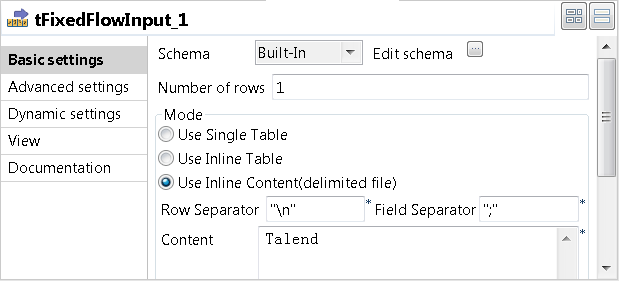
Double-click the tFixedFlowInput component to
open its Basic settings view.
-
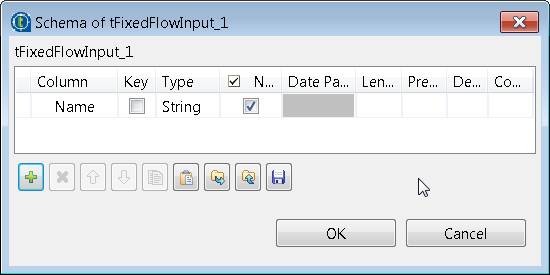
Click the […] button next to Edit schema and in the pop-up schema dialog box,
define the schema by adding one column Name
of String type. Click OK to save the changes and close the
dialog box. -
In the Mode area, select Use Inline Content (delimited file). Then in the
Content field displayed, enter the data to
be written into Salesforce. For example,1Talend -
Double-click the tSalesforceOutput component
to open its Basic settings view.
-
In the drop-down list next to the Property
Type drop-down list, select the tSalesforceConnection component to reuse the connection created
by it. -
Click the […] button next to the Module Name field and in the pop-up dialog box,
select the object you want to access. In this example, it is Account.
-
Click the […] button next to Edit schema to open the schema dialog box.
 On the right side of the panel, remove all the columns except the Name column.Click OK to save the changes and close the
dialog box.
Executing the Job
- Press Ctrl + S to save the Job.
-
Press F6 to run the Job. The Studio console
gives the URL (in yellow) for OAuth authorization.
-
Copy the URL to the browser’s address bar. The Salesforce.com login page
appears.
-
Fill up the username and password and click Log in to
Salesforce.The authorization response is then shown on the browser at the callback
host.
-
Now is the time for the Job to continue running.
 As shown above, the Job is successfully executed.
 -
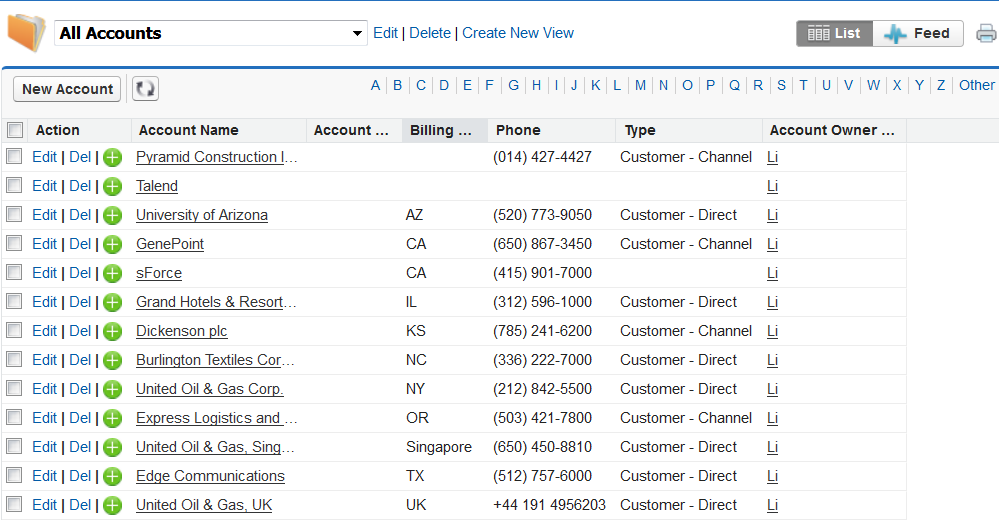
Go to the Salesforce.com and check the Account object. You can find that the
account whose name is Talend is
inserted.