tSQSOutput
queue.
tSQSOutput Standard properties
These properties are used to configure tSQSOutput running in the Standard Job
framework.
The Standard tSQSOutput component belongs to the Cloud family.
The component in this framework is generally available.
Basic settings
|
Use an existing connection |
Select this check box and in the Component |
|
Access Key and Secret Key |
Specify the access keys (the access key ID in the Access To enter the secret key, click the […] button next to |
|
Inherit credentials from AWS |
Select this check box to leverage the instance profile credentials. These |
|
Assume role |
Select this check box and specify the values for the following parameters used to
create a new assumed role session.
For more information about assuming roles, see AssumeRole. |
|
Region |
Specify the AWS region by selecting a region name from the list or entering a |
|
Queue (Name or URL) |
Specify the name or URL of the queue to which the message(s) will |
|
Schema and Edit schema |
A schema is a row description. It defines the number of fields (columns) to Note that the schema of this component is predefined with a single button next to Edit |
|
Use batch mode |
Select this check box to deliver messages to the queue using batch |
|
Die on error |
Select the check box to stop the execution of the Job when an error |
Advanced settings
|
Config client |
Select this check box and in the table displayed specify the client configuration
parameters. Click the [+] button below the table to add as many rows as needed, each row for a client configuration parameter, and set the value of the following attributes for each parameter:
|
|
STS Endpoint |
Select this check box and in the field displayed, specify the AWS Security Token This check box is available only when the Assume |
|
tStatCatcher Statistics |
Select this check box to gather the Job processing metadata at the Job level |
Global variables
|
NB_LINE |
The number of messages processed. This is an After variable and it returns an |
|
NB_LINE_SUCCESS |
The number of messages successfully enqueued. This is an After variable and it |
|
NB_LINE_REJECTED |
The number of messages rejected. This is an After variable and it returns an |
|
ERROR_MESSAGE |
The error message generated by the component when an error occurs. This is an After |
Usage
|
Usage Rule |
This component is usually used as an end component of a Job or Subjob and it |
Delivering messages to an Amazon SQS queue
(Simple Queue Service) queue and then deliver a couple of messages to the queue.
The input messages in this example are as follows, and each message
contains the message creator attribute and the message body information.
|
1 2 3 4 |
#Creator;Body Talend DOC Team;the 1st message from Talend DOC team Talend DEV Team;the 2nd message from Talend DEV team Talend QA Team;the 3rd message from Talend QA team |
Creating a Job for delivering Amazon SQS messages
Create a Job to open a connection to access Amazon SQS, then create
an Amazon SQS queue, finally deliver a couple of messages to the queue.

-
Create a new Job and add a tSQSConnection component, a tSQSQueueCreate component, a tFixedFlowInput component, and a tSQSOutput component by typing their names in the design workspace
or dropping them from the Palette. -
Link the tFixedFlowInput component to
the tSQSOutput component using a Row > Main
connection. -
Link the tSQSConnection component to
the tSQSQueueCreate component using a Trigger > OnSubjobOk
connection. -
Link the tSQSQueueCreate component to
the tFixedFlowInput component using a Trigger > OnSubjobOk
connection.
Opening a connection to access Amazon SQS
component to open a connection to access Amazon SQS.
-
Double-click the tSQSConnection
component to open its Basic settings view.
-
In the Access Key and Secret Key fields, specify the authentication information
required to access Amazon SQS. -
Select an AWS region available for Amazon SQS from the Region drop-down list. In this example, it is
Asia Pacific (Tokyo).
Creating an Amazon SQS queue
component to create an Amazon SQS queue.
-
Double-click the tSQSQueueCreate
component to open its Basic settings view.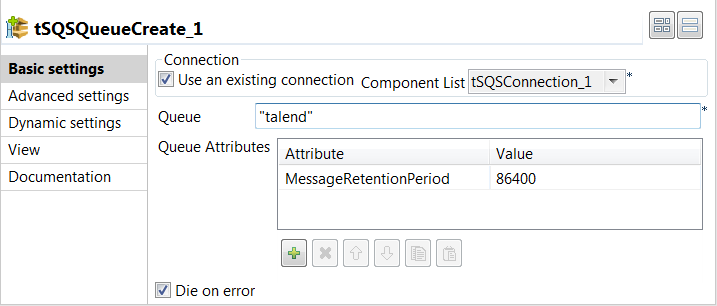
-
Specify the connection details required to access Amazon SQS. In this
example, select the Use an existing connection
check box and from the Component List drop-down
list displayed, select the connection component to reuse its connection details you
have already defined. -
In the Queue field, specify the name
for the queue to be created. In this example, it is
talend. -
If needed, specify the attributes for the queue to be created in the
Queue Attributes table. In this example, the
MessageRetentionPeriod attribute is added and
its value is set to 86400, which means Amazon SQS will retain
the messages delivered to the queue for 86400 seconds (1 day) instead of the default
345600 seconds (4 day).
Delivering messages to the Amazon SQS queue
component and the tSQSOutput component to deliver
messages to the new empty Amazon SQS queue.
-
Double-click the tSQSOutput component
to open its Basic settings view.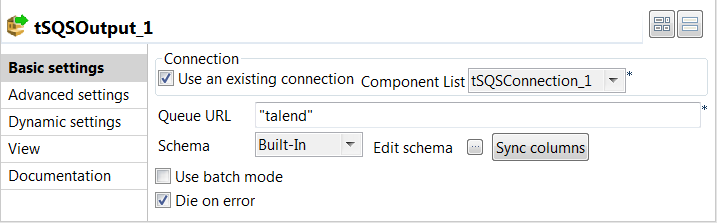
-
Specify the connection details required to access Amazon SQS. In this
example, select the Use an existing connection
check box and from the Component List drop-down
list displayed, select the connection component to reuse its connection details you
have already defined. -
In the Queue URL field, enter the name
for the queue to which the messages will be delivered. In this example, it is
talend. -
Click the

button next to Edit schema to
open the schema dialog box.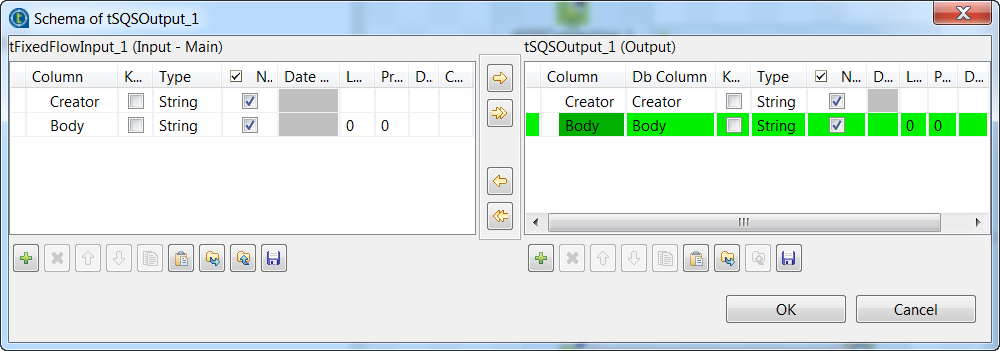 You can see the schema of the tSQSOutput
component is predefined with a single String column Body that stores the body of each message to be delivered. -
Click the

button in the right panel to add one column
Creator of String type, which will hold the customized
creator attribute value of each message. -
Click the

button to copy all columns from the output schema to the input
schema. In the pop-up dialog box, click OK to
accept the changes. -
Click OK to close the schema dialog
box. -
Double-click the tFixedFlowInput
component to open its Basic settings view.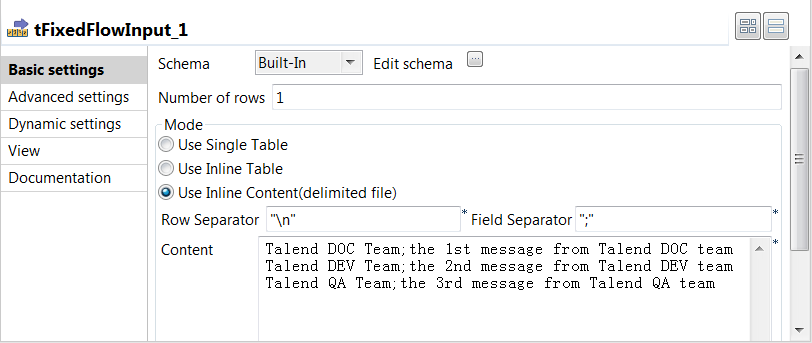
-
In the Mode area, select Use Inline Content(delimited file). Then in the Content field displayed, enter the creator attribute and
body data of the messages to be delivered to Amazon SQS. In this example, it
is:123Talend DOC Team;the 1st message from Talend DOC teamTalend DEV Team;the 2nd message from Talend DEV teamTalend QA Team;the 3rd message from Talend QA team
Executing the Job to deliver Amazon SQS messages
Job for delivering Amazon SQS messages, you can then execute the Job and verify the Job
execution result.
-
Press Ctrl + S to save the Job and
then F6 to execute the Job.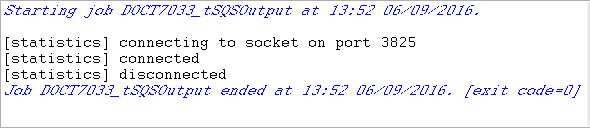 As shown above, the Job is executed successfully.
 -
View the queue details on the AWS console to validate the Job execution
result.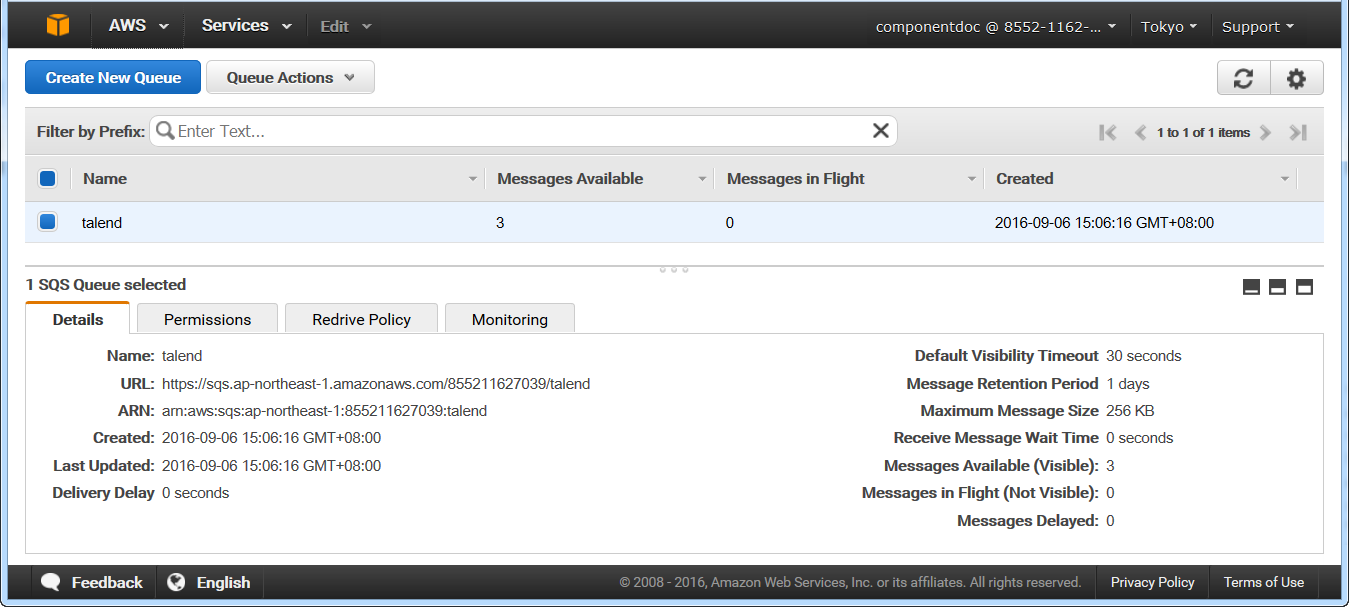 You can see the talend queue is created successfully with the
retention period for one day, and three messages are now available in the
queue. -
Select the talend queue on the AWS console and
then click Queue Actions > View/Delete Messages to view messages in the
talend queue.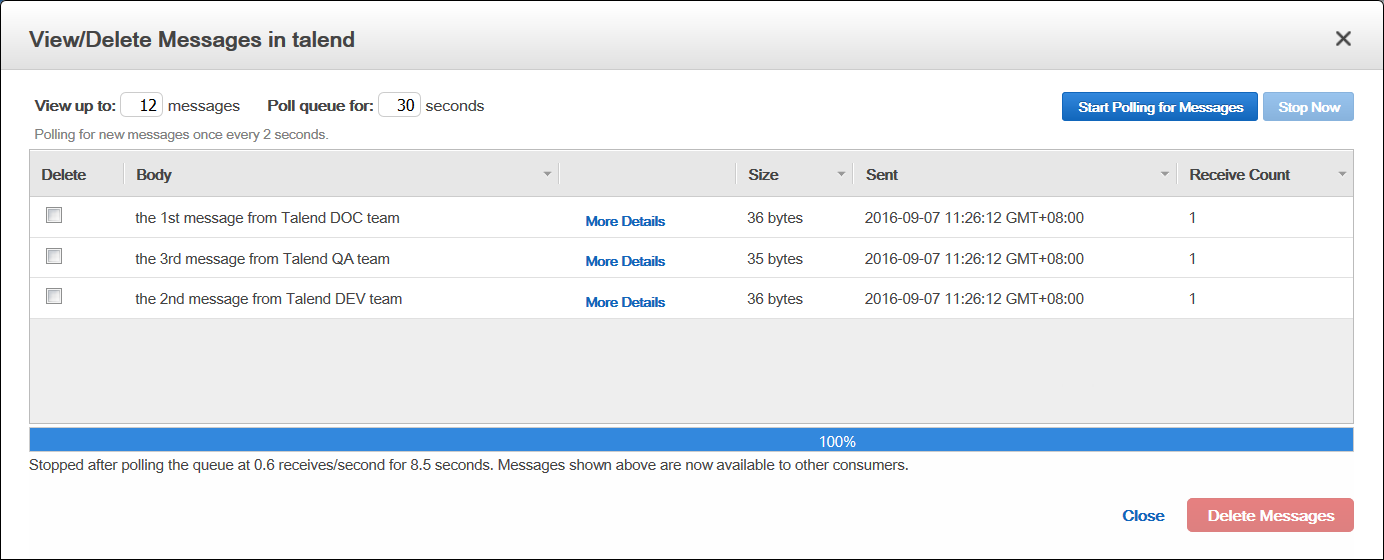 You can see the three messages are now available in the queue.
 -
Click More Details for one of the
messages to view the detailed information of the message.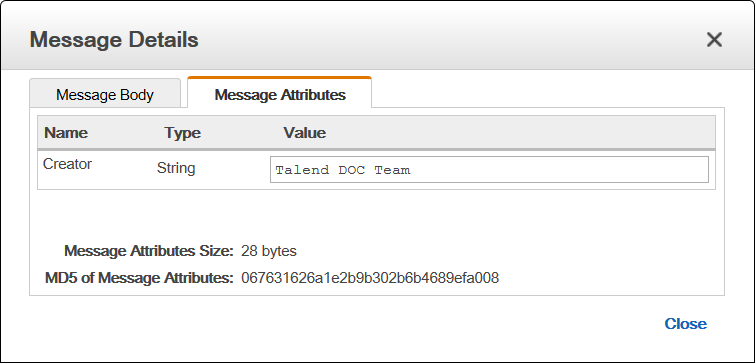 You can see the customized Creator attribute value for the
message is listed on the Message Attributes
tab.