August 16, 2023

tSybaseIQOutputBulkExec – Docs for ESB 6.x

tSybaseIQOutputBulkExec

Gains in performance during Insert operations to a Sybase IQ database.

tSybaseIQOutputBulkExec executes the
Insert action on the data provided.

tSybaseIQOutputBulkExec Standard properties

These properties are used to configure tSybaseIQOutputBulkExec
running in the Standard Job framework.

The Standard
tSybaseIQOutputBulkExec component belongs to the
Databases family.

The component in this framework is generally available.

Basic settings

Property Type

Either Built-In or
Repository.

  • Built-In: No property data
    stored centrally.

  • Repository: Select the
    repository file in which the properties are stored. The fields
    that follow are completed automatically using the data
    retrieved.

Use an existing connection

Select this check box and in the Component
List
click the relevant connection component to reuse the connection
details you already defined.

Note:

When a Job contains the parent Job and the child Job, if you need to share an
existing connection between the two levels, for example, to share the connection created by
the parent Job with the child Job, you have to:

  1. In the parent level, register the database connection to be shared
    in the Basic settings view of the
    connection component which creates that very database connection.

  2. In the child level, use a dedicated connection component to read
    that registered database connection.

For an example about how to share a database connection across Job levels, see


Talend Studio
User Guide
.

This property is available only when
Sybase IQ 12/15 by JDBC or Sybase IQ 16 by
JDBC
is selected from the DB Version and API type
drop-down list.

DB Version and API type

Select the version of the Sybase IQ database to be used and the API used for setting
up the database connection. The valid values are Sybase IQ 12/15 by
JDBC
, Sybase IQ 15 by ODBC, and Sybase
IQ 16 by JDBC
.

Note that for Sybase IQ 12 and Sybase IQ 16, the file to be bulk-loaded must be
located on the same machine as the Sybase IQ server. And for Sybase IQ 15, the file to
be bulk-loaded can be located on a remote machine, however, this means certain setup
on the Sybase IQ server. For more information, see Sybase IQ client-side load support
enhancements
.

Host

Enter the IP address of the Sybase IQ server.

This property is available only when
Sybase IQ 12/15 by JDBC or Sybase IQ 16 by
JDBC
is selected from the DB Version and API type
drop-down list.

Port

Enter the listening port number of the Sybase IQ server.

This property is available only when
Sybase IQ 12/15 by JDBC or Sybase IQ 16 by
JDBC
is selected from the DB Version and API type
drop-down list.

Data Source

Select the type of the data source to be used and complete the corresponding DSN
information in the field alongside. The available types are DSN
and FILEDSN.

When FILEDSN is selected, a […]
button is available next to the Data Source field to allow you
to browse to the data source file of interest.

This property is available only when Sybase IQ 15 by ODBC is
selected from the DB Version and API type drop-down list.

Database

Enter the name of the database.

Username and Password

Enter the DB user authentication data.

To enter the password, click the […] button next to the
password field, and then in the pop-up dialog box enter the password between double quotes
and click OK to save the settings.

Table

Enter the name of the table to be written. Note that only
one table can be written at a time and that the table must exist for the
insert operation to succeed.

Action on table

On the table defined, you can perform one of the
following operations:

  • Default: No operation is
    carried out.

  • Drop and create table:
    The table is removed and created again.

  • Create table: The table
    does not exist and gets created.

  • Create table if does not
    exist
    : The table is created if it does not
    exist.

  • Drop table if exists and
    create
    : The table is removed if it already
    exists and created again.

  • Clear table: The table
    content is deleted.

Filename

Enter the name of the file to be generated and loaded.

Append the file

Select this check box to add the new rows at the end of
the records.

Schema and Edit schema

A schema is a row description. It defines the number of fields (columns) to
be processed and passed on to the next component. The schema is either Built-In or stored remotely in the Repository.


Built-In: You create and store the
schema locally for this component only. Related topic: see
Talend Studio

User Guide.


Repository: You have already created
the schema and stored it in the Repository. You can reuse it in various projects and
Job designs. Related topic: see
Talend Studio

User Guide.

When the schema to be reused has default values that are integers or
functions, ensure that these default values are not enclosed within quotation marks. If
they are, you must remove the quotation marks manually.

You can find more details about how to verify default
values in retrieved schema in Talend Help Center (https://help.talend.com).


Click Edit schema to make changes to the schema.
If the current schema is of the Repository type, three
options are available:

  • View schema: choose this option to view the
    schema only.

  • Change to built-in property: choose this
    option to change the schema to Built-in for
    local changes.

  • Update repository connection: choose this
    option to change the schema stored in the repository and decide whether to propagate
    the changes to all the Jobs upon completion. If you just want to propagate the
    changes to the current Job, you can select No
    upon completion and choose this schema metadata again in the [Repository Content] window.

Advanced settings

Additional JDBC Parameters

Specify additional connection properties in the existing
DB connection, to allow specific character set support.

Fields terminated by

Enter the character, string or regular expression used to
separate fields.

Warning:

As a combination of tSybaseOutputBulk and tSybaseIQBulkExec, this
component does not allow the use of Sybase-oriented row/field
separators, such as x09. To achieve the desired effect (for
example, displaying fields in the tabular form), you need to use
tSybaseOutputBulk and
tSybaseIQBulkExec
together to replace tSybaseIQOutputBulkExec, with used in the
former component and x09 used in the latter.

Lines terminated by

Enter the character or sequence of characters used to
separate lines.

Use enclosed quotes

Select this check box to use data enclosure
characters.

Include Head

Select this heck box to include the column header.

Blank as null

Select this check box to store the input zero-length
varchars as NULLs instead of blanks in the database during the load
operation.

Encoding

Select the encoding type from the list or select
Custom and define it
manually. This field is compulsory for DB data handling.

tStatCatcher Statistics

Select this check box to collect log data at the
component level.

Usage

Usage rule

This component is mainly used when no particular
transformation is required on the data to be loaded onto the database.

Dynamic settings

Click the [+] button to add a
row in the table and fill the Code field
with a context variable to choose your database connection dynamically from
multiple connections planned in your Job. This feature is useful when you
need to access database tables having the same data structure but in
different databases, especially when you are working in an environment where
you cannot change your Job settings, for example, when your Job has to be
deployed and executed independent of
Talend Studio
.

The Dynamic settings table is
available only when the Use an existing
connection
check box is selected in the Basic settings view. Once a dynamic parameter is
defined, the Component List box in the
Basic settings view becomes unusable.

For examples on using dynamic parameters, see Scenario: Reading data from databases through context-based dynamic connections and Scenario: Reading data from different MySQL databases using dynamically loaded connection parameters. For more information on Dynamic
settings
and context variables, see
Talend Studio User Guide
.

Limitation

This component requires installation of its related jar files.

The jodbc.jar also needs to be installed separately in
the Modules view of the

Integration
perspective in your studio.
You can find more details about how to install external modules in Talend Help Center (https://help.talend.com).

For Sybase IQ
12
, the database client/server should be installed
on the same machine where the Studio is installed or where the Job
using tSybaseIQOutputBulkExec
is deployed, so that the component functions properly.

For Sybase IQ
15
, it is allowed that only the database client is
installed on the same machine where the Studio is installed or where
the Job using tSybaseIQOutputBulkExec is deployed, so that the
component functions properly. However, this means certain setup on
the Sybase IQ 15 server. For
details, see Sybase IQ
client-side load support enhancements
.

Scenario: Bulk-loading data to a Sybase IQ 12 database

This scenario describes a Job that writes data generated by a tRowGenerator component into a file and then bulk-loads the data from the
file to a Sybase IQ 12 database.

use_case_tsybaseiqoutputbulkexec_1.png

Adding and linking the components

  1. Create a new Job and add a tRowGenerator
    component and a tSybaseIQOutputBulkExec
    component by typing their names in the design workspace or dropping them from
    the Palette.
  2. Link the tRowGenerator component to the
    tSybaseIQOutputBulkExec component using a
    Row > Main connection.

Configuring the components

  1. Double-click the tRowGenerator component to
    open its RowGenerator Editor.

    use_case_tsybaseiqoutputbulkexec_2.png

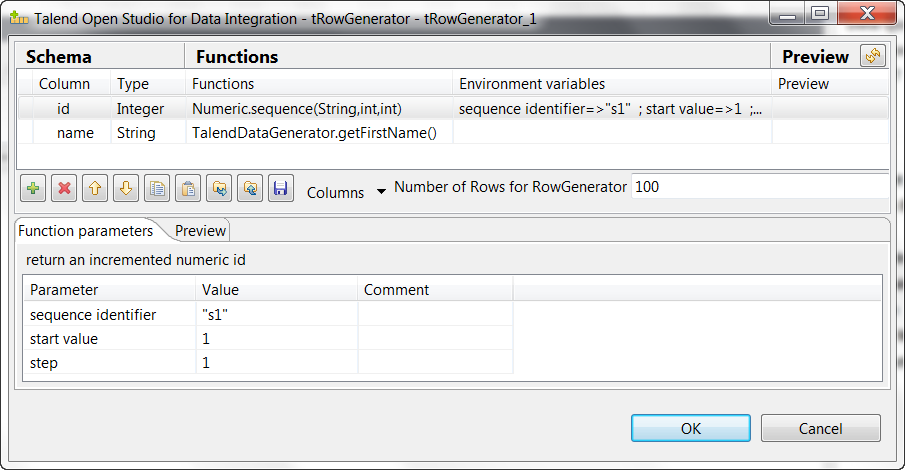
  2. Click the [+] button to add two columns and
    set their properties:

    • id, Integer type, using Numeric.sequence(String,int,int) from the
      Functions list to generate sequence
      numbers.

    • name, String type, using TalendDataGenerator.getFirstName() from the
      Functions list to generate random
      first names.

  3. In the Number of Rows for RowGenerator field,
    enter the number of rows to be generated. In this example, keep the default
    value 100.
  4. Click OK to close the editor and in the
    pop-up dialog box click Yes to propagate the
    schema to the next component.

    use_case_tsybaseiqoutputbulkexec_4.png

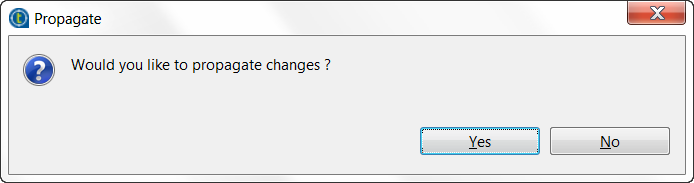
  5. Double-click the tSybaseIQOutputBulkExec
    component to open its Basic settings
    view.

    use_case_tsybaseiqoutputbulkexec_3.png

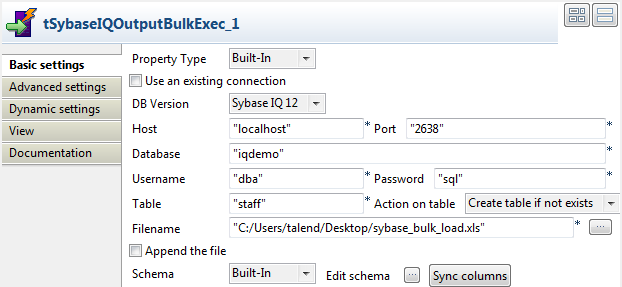
  6. In the Host, Port, Database, Username and Password fields, enter the information required to access the
    Sybase IQ 12 database.
  7. In the Table field, enter the name of the
    table into which the data will be writen. In this example, it is staff.
  8. In the Action on table list, select Create table if not exists.
  9. In the Filename field, enter the full path of
    the file to hold the data.

Saving and executing the Job

  1. Press Ctrl+S to save the Job.
  2. Press F6 to run the Job.

    use_case_tsybaseiqoutputbulkexec_5.png

  3. In the Sybase Central console, open the table staff to check the data:

    use_case_tsybaseiqoutputbulkexec_6.png

    As shown above, the table is created with data inserted.

Document get from Talend https://help.talend.com
Thank you for watching.
Subscribe
Notify of
guest
0 Comments
Inline Feedbacks
View all comments
0
Would love your thoughts, please comment.x
()
x